
Go-to-Market Stage
Go-to-Market Stage

The Go-to-Market Stage is a strategic marketing and execution phase of the roadmap, broken down into eight distinct sequential sub-stages accessed via the left-hand sidebar dropdown:
-
Sub-Stage 1: Welcome to the Go-to-Market Stage
-
The initial landing view providing the phase overview and introduction to launch marketing strategies.
-
-
Sub-Stage 2: Product Positioning & Messaging
-
The second item listed within the sequence, defining how your product is communicated to the market.
-
-
Sub-Stage 3: Ideal Customer Profiles (ICP) & Personas
-
The third item listed within the sequence, outlining target buyer data and segment mapping.
-
-
Sub-Stage 4: Pre-Launch Plan
-
The fourth item listed within the sequence, covering audience building and waitlist acquisition tactics.
-
-
Sub-Stage 5: Launch Plan
-
The fifth item listed within the sequence, managing the specific execution steps for public release day.
-
-
Sub-Stage 6: Post-Launch Growth Plan
-
The sixth item listed within the sequence, outlining organic traffic, backlink building, and scaling frameworks.
-
-
Sub-Stage 7: Measurement & Optimization
-
The seventh item listed within the sequence, tracking core metrics and performance data.
-
-
Sub-Stage 8: Export Go-to-Market Results
-
The final technical milestone within this phase, concluding the marketing sequence to download your complete record before transition parameters unlock.
-
Stage Controls
Sub-Stage 1: Welcome to the Go-to-Market Stage
This introductory screen serves as the gateway to your launch strategy, aligning your business goals with your customer acquisition roadmaps before you dive into heavy tactical execution.
Canvas Layout & Workspace Components
-
Main Workspace Title: Displays "Welcome to the Go-to-Market Stage".
-
Instructional Subtitle: “A quick intro to the GTM stage with a video overview of what you’ll plan and prepare.”
Media & Briefing Section
-
Video Player Card: A large, centered interactive media module features an overview briefing with the phase label "Go To Market" clearly displayed on the left and the official BuildRunKit logo branded in the top-right corner. This presentation introduces you to the core concepts of positioning, pre-launch preparation, and post-launch optimization.
Navigation Controls
Sub-Stage 2: Product Positioning & Messaging
This sub-stage workspace allows you to map out exactly what you offer, who your core audience is, and why your solution is better than the alternatives. It establishes your strategic core values across five structured exercises.
Canvas Layout & Workspace Components
-
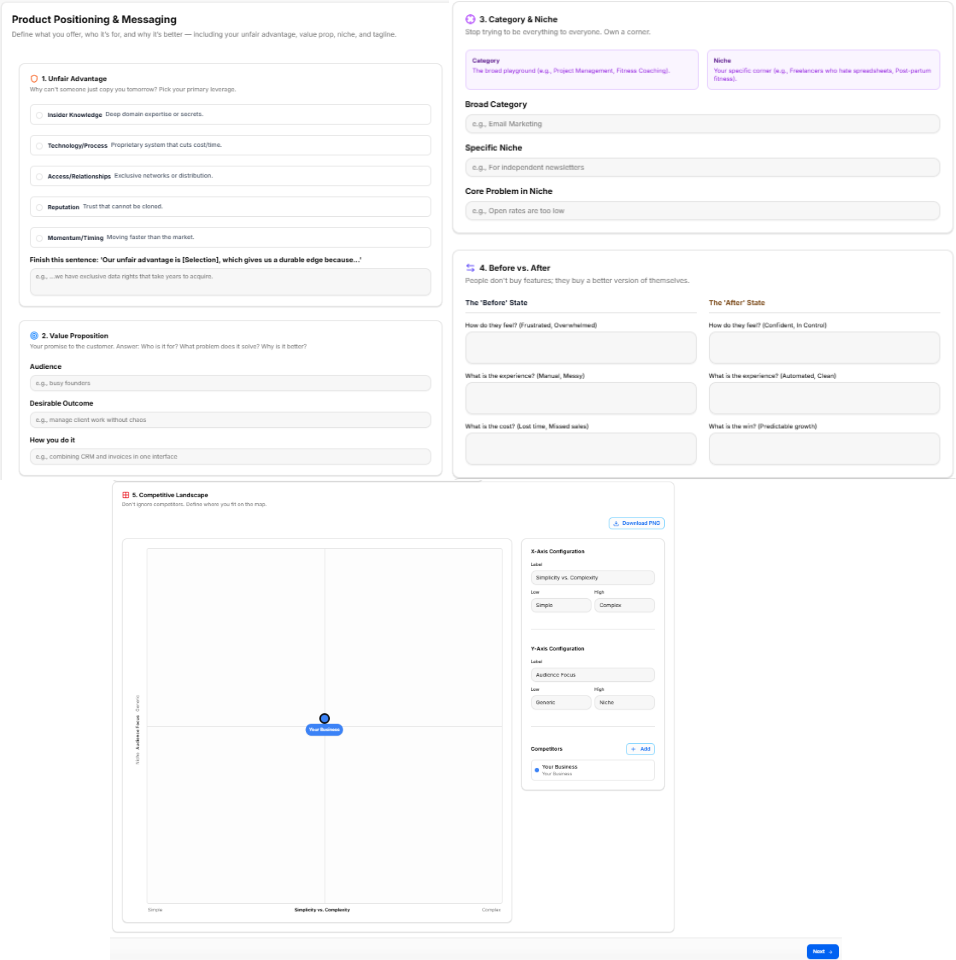
Main Workspace Title: Displays "Product Positioning & Messaging".
-
Instructional Subtitle: “Define what you offer, who it's for, and why it's better - including your unfair advantage, value prop, niche, and tagline.”
1. Unfair Advantage Panel
-
Section Objective: Answer the core question: Why can’t someone just copy you tomorrow? Pick your primary leverage.
-
Primary Leverage Options (Selectable Radio Items):
-
Insider Knowledge: Deep domain expertise or secrets.
-
Technology/Process: Proprietary system that cuts cost/time.
-
Access/Relationships: Exclusive networks or distribution.
-
Reputation: Trust that cannot be cloned.
-
Momentum/Timing: Moving faster than the market.
-
-
Context Statement Field: A text area prompting you to finish the sentence: "Our unfair advantage is [Selection], which gives us a durable edge because..." (e.g., "...we have exclusive data rights that take years to acquire.")
2. Value Proposition Panel
-
Section Objective: Define your core promise to the customer by answering who it is for, what problem it solves, and why it is better.
-
Input Fields:
-
Audience: (e.g., busy founders)
-
Desirable Outcome: (e.g., manage client work without chaos)
-
How you do it: (e.g., combining CRM and invoices in one interface)
-
3. Category & Niche Panel
-
Section Objective: Stop trying to be everything to everyone. Own a corner.
-
Reference Guide Blocks:
-
Category Block: The broad playground (e.g., Project Management, Fitness Coaching).
-
Niche Block: Your specific corner (e.g., Freelancers who hate spreadsheets, Post-partum fitness).
-
-
Input Fields:
-
Broad Category: (e.g., Email Marketing)
-
Specific Niche: (e.g., For independent newsletters)
-
Core Problem in Niche: (e.g., Open rates are too low)
-
4. Before vs. After Panel
-
Section Objective: Contrast customer experiences under the philosophy: People don’t buy features; they buy a better version of themselves.
-
The 'Before' State Columns:
-
How do they feel? (Frustrated, Overwhelmed)
-
What is the experience? (Manual, Messy)
-
What is the cost? (Lost time, Missed sales)
-
-
The 'After' State Columns:
-
How do they feel? (Confident, In Control)
-
What is the experience? (Automated, Clean)
-
What is the win? (Predictable growth)
-
5. Competitive Landscape Matrix Panel
-
Section Objective: Don't ignore competitors. Define where you fit on the map.
-
Interactive 2D Matrix Chart: A quadrant plot featuring adjustable axes to visually pin your market positioning relative to others.
-
X-Axis Configuration:
-
Label Input: Sets the horizontal axis criteria (Default: Simplicity vs. Complexity).
-
Low Bounds / High Bounds Fields: Custom text fields to specify axis extremes (Defaults: Simple / Complex).
-
-
Y-Axis Configuration:
-
Label Input: Sets the vertical axis criteria (Default: Audience Focus).
-
Low Bounds / High Bounds Fields: Custom text fields to specify axis extremes (Defaults: Generic / Niche).
-
-
Competitors Directory:
-
Displays your current tracked brands list (e.g., tracking a baseline plot for Your Business).
-
Click the blue + Add button to create and overlay a new competitor marker onto the grid workspace.
-
-
Action Utilities:
-
Download PNG: Click the button at the top-right of the canvas block to save a local visual capture of your filled matrix chart.
-
Navigation Controls
-
Next Button: A blue Next → navigation utility button is located at the bottom-right margin of the footer row. Clicking this control saves all text elements and axis configurations, progressing the interface view directly to Sub-Stage 3: Ideal Customer Profiles (ICP) & Personas.
Sub-Stage 3: Ideal Customer Profiles (ICP) & Personas
This sub-stage workspace visualizes your target buyer segments to refine broad market data into specific strategic priorities for your immediate launch.
The system bridges your historical research by automatically carrying over and displaying the primary target profiles you chose back in the Market Research Stage.
Canvas Layout & Workspace Components
-
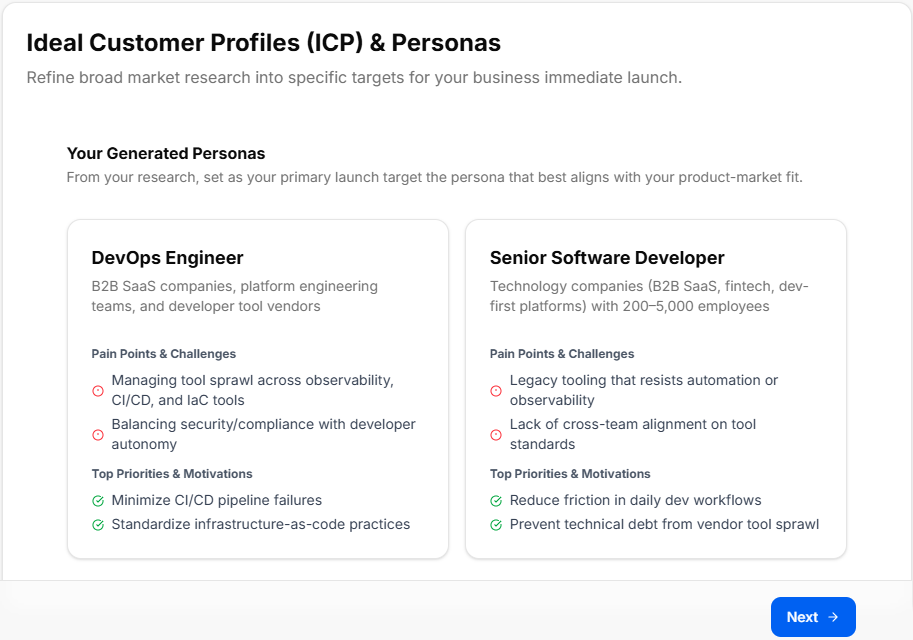
Main Workspace Title: Displays "Ideal Customer Profiles (ICP) & Personas".
-
Instructional Subtitle: “Refine broad market research into specific targets for your business immediate launch.”
Your Generated Personas Section
This area populates dynamically based on the choices selected during your earlier market research sub-stages, prompting you to keep your core product-market fit in mind.
-
Section Subtitle: “From your research, set as your primary launch target the persona that best aligns with your product-market fit.”
-
Dynamic Persona Display Cards: The canvas layouts render comprehensive breakdown metrics for your selected target categories (such as the DevOps Engineer or Senior Software Developer layout components shown in). Each profile block reviews:
-
Target Segment Description: Summarizes industry focus, team environments, and organizational scale parameters.
-
Pain Points & Challenges: A red-alert indicator list highlighting critical target frictions to address in marketing messaging.
-
Top Priorities & Motivations: A green checkmark list detailing the specific positive outcomes and metrics the target profiles care about most.
-
Navigation Controls
-
Next Button: A blue Next → navigation utility button is located at the bottom-right margin of the footer line. Clicking this control confirms your launch targets and moves the platform view sequentially into Sub-Stage 4: Pre-Launch Plan.
Sub-Stage 4: Pre-Launch Plan
This sub-stage workspace focuses on building anticipation, generating early audience lists, and organizing promotional assets before your official public release. It establishes an active pre-launch roadmap across five operational strategy sections and a contextual briefing area.
Canvas Layout & Workspace Components
-
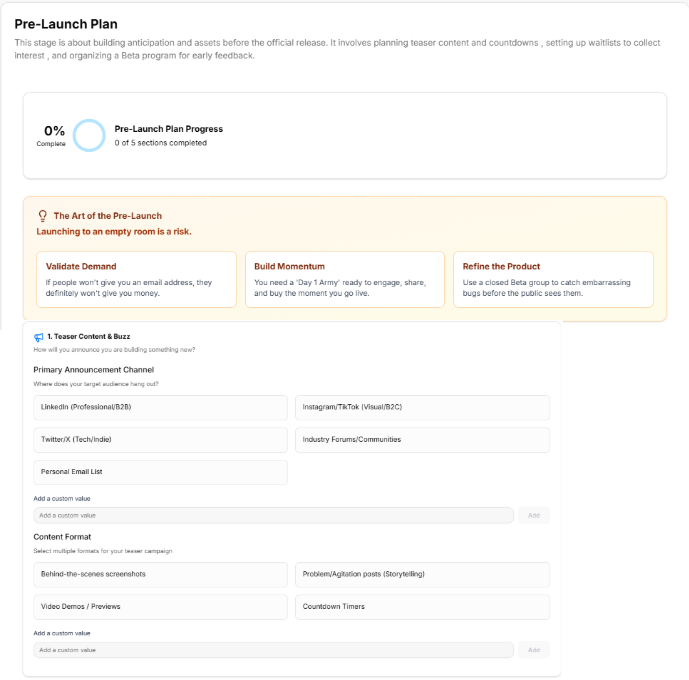
Main Workspace Title: Displays "Pre-Launch Plan".
-
Instructional Subtitle: “This stage is about building anticipation and assets before the official release. It involves planning teaser content and touchdowns , setting up waitlists to collect interest , and organizing a Beta program for early feedback.”
Progress Tracker & Contextual Briefing
-
Pre-Launch Plan Progress Tracker: A visual metrics card displaying an interactive circular progress gauge tracking your setup status across the "0% Complete / 0 of 5 sections completed" benchmark milestones.
-
The Art of the Pre-Launch Box: An orange-accented briefing panel reminding founders: "Launching to an empty room is a risk." It lists three core strategic values:
-
Validate Demand: If people won't give you an email address, they definitely won't give you money.
-
Build Momentum: You need a 'Day 1 Army' ready to engage, share, and buy the moment you go live.
-
Refine the Product: Use a closed Beta group to catch embarrassing bugs before the public sees them.
-
1. Teaser Content & Buzz Panel
-
Section Objective: How will you announce you are building something new?
-
Primary Announcement Channel Options (Selectable Chips):
-
LinkedIn (Professional/B2B)
-
Twitter/X (Tech/Indie)
-
Personal Email List
-
Instagram/TikTok (Visual/B2C)
-
Industry Forums/Communities
-
-
Content Format Options (Selectable Chips):
-
Behind-the-scenes screenshots
-
Video Demos / Previews
-
Problem/Agitation posts (Storytelling)
-
Countdown Timers
-
-
Custom Inputs: Both modules contain an "Add a custom value" field line with a right-aligned Add button to inject customized channels or unique media types into your plan.
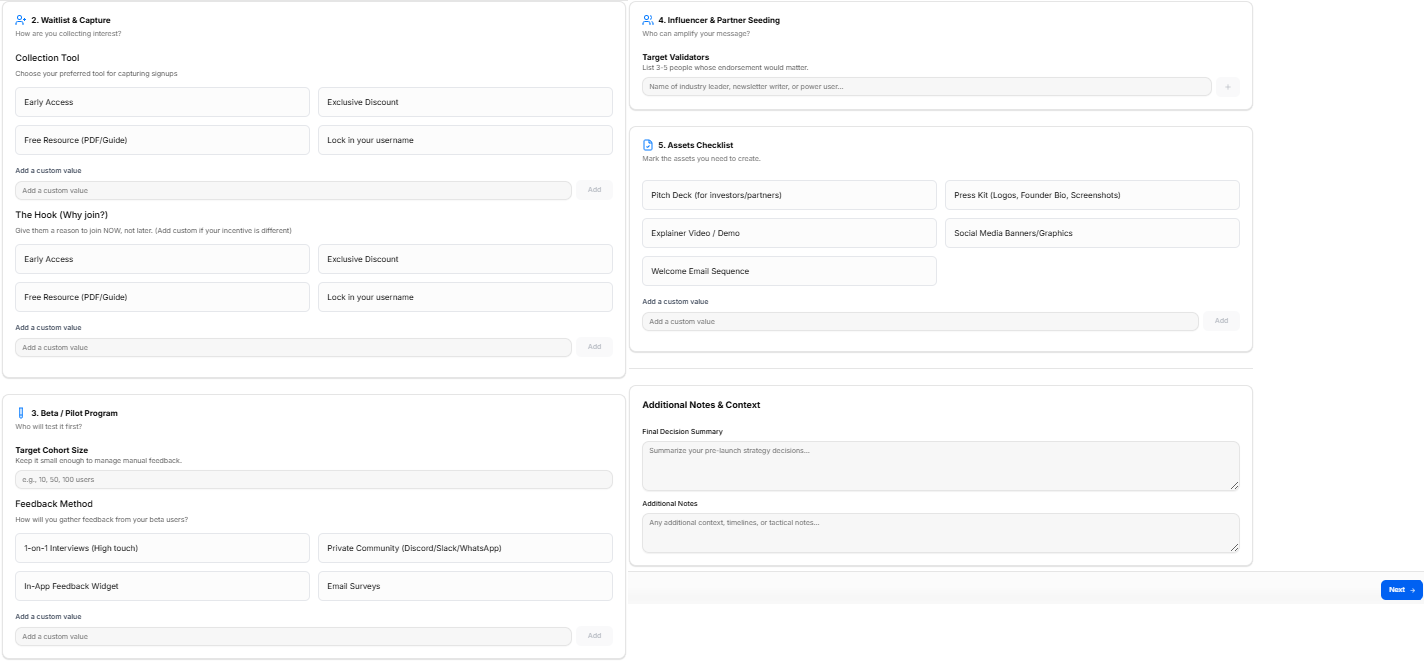
2. Waitlist & Capture Panel
-
Section Objective: How are you collecting interest?
-
Collection Tool Strategy (Selectable Chips):
-
Early Access
-
Free Resource (PDF/Guide)
-
Exclusive Discount
-
Lock in your username
-
-
The Hook (Why join?) Strategy (Selectable Chips):
-
Early Access
-
Free Resource (PDF/Guide)
-
Exclusive Discount
-
Lock in your username
-
-
Custom Inputs: Includes explicit "Add a custom value" open text fields to append personalized signup incentives or lead magnets.
3. Beta / Pilot Program Panel
-
Section Objective: Who will test it first?
-
Target Cohort Size Field: A text entry field to lock in clear testing caps (e.g., 10, 50, 100 users).
-
Feedback Method Options (Selectable Chips):
-
1-on-1 Interviews (High touch)
-
In-App Feedback Widget
-
Private Community (Discord/Slack/WhatsApp)
-
Email Surveys
-
-
Custom Inputs: An "Add a custom value" option lines the footer of this card for logging unique testing communication paths.
4. Influencer & Partner Seeding Panel
-
Section Objective: Who can amplify your message?
-
Target Validators Registry: An open form field line prompting you to “List 3-5 people whose endorsement would matter” (e.g., Name of industry leader, newsletter writer, or power user...). Clicking the right-aligned plus (+) button registers the validator target to your layout matrix.
5. Assets Checklist Panel
-
Section Objective: Mark the assets you need to create.
-
Asset Tracking Selection Matrix (Selectable Chips):
-
Pitch Deck (for investors/partners)
-
Explainer Video / Demo
-
Welcome Email Sequence
-
Press Kit (Logos, Founder Bio, Screenshots)
-
Social Media Banners/Graphics
-
-
Custom Inputs: Features an "Add a custom value" box to track specific content or multimedia collateral requirements unique to your pipeline.
Additional Notes & Context Panel
Located at the base of your planning canvas, this space acts as your strategic summary log:
-
Final Decision Summary Block: A text area to write down your macro strategy conclusions.
-
Additional Notes Block: A text space to freely register timelines, operational variables, launch days, or specific tactical tasks.
Navigation Controls
-
Next Button: A blue Next → navigation utility button is located at the absolute bottom-right margin of the footer block. Clicking this control saves your pre-launch variables and steps your view sequentially forward into Sub-Stage 5: Launch Plan.
Sub-Stage 5: Launch Plan
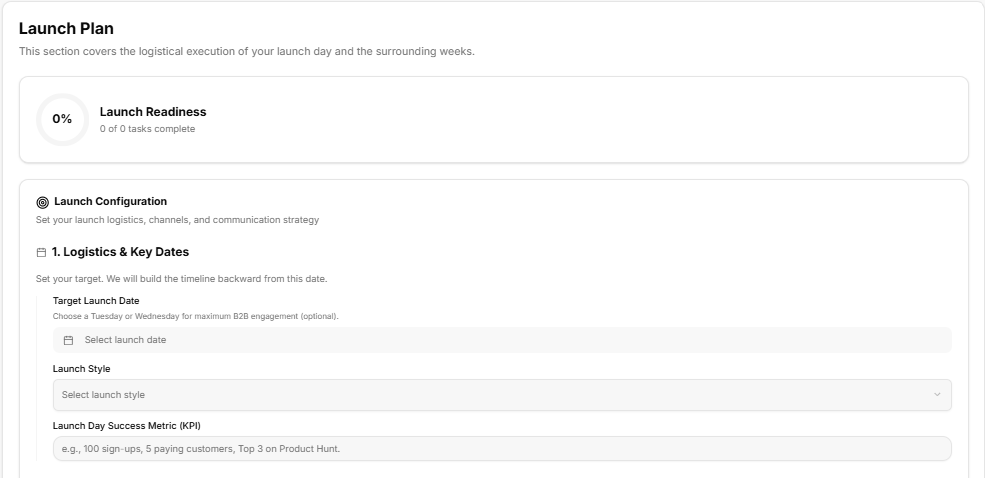
This sub-stage covers the logistical execution of your launch day and the surrounding weeks. It consolidates target milestones, primary distribution platforms, and audience outreach timelines into three operational modules.
Canvas Layout & Workspace Components
-
Main Workspace Title: Displays "Launch Plan".
-
Instructional Subtitle: “This section covers the logistical execution of your launch day and the surrounding weeks.”
Launch Readiness Tracker
-
Launch Readiness Gauge: A dedicated metrics tracking card positioned at the top of the canvas, displaying a circular status gauge calibrated at "0% Launch Readiness / 0 of 0 tasks complete" to track prerequisite setup completion.
Launch Configuration Settings
The lower canvas layout groups your logistics entries under a master configuration block reading “Set your launch logistics, channels, and communication strategy.”
1. Logistics & Key Dates Panel
-
Section Objective: “Set your target. We will build the timeline backward from this date.”
-
Target Launch Date Selection: An interactive date picker field accompanied by an operational tip: “Choose a Tuesday or Wednesday for maximum B2B engagement (optional).”
-
Launch Style Menu: A dropdown menu selection tool to finalize your execution approach (e.g., Select launch style).
-
Launch Day Success Metric (KPI) Input: An open input field to define concrete target milestones (e.g., 100 sign-ups, 5 paying customers, Top 3 on Product Hunt).
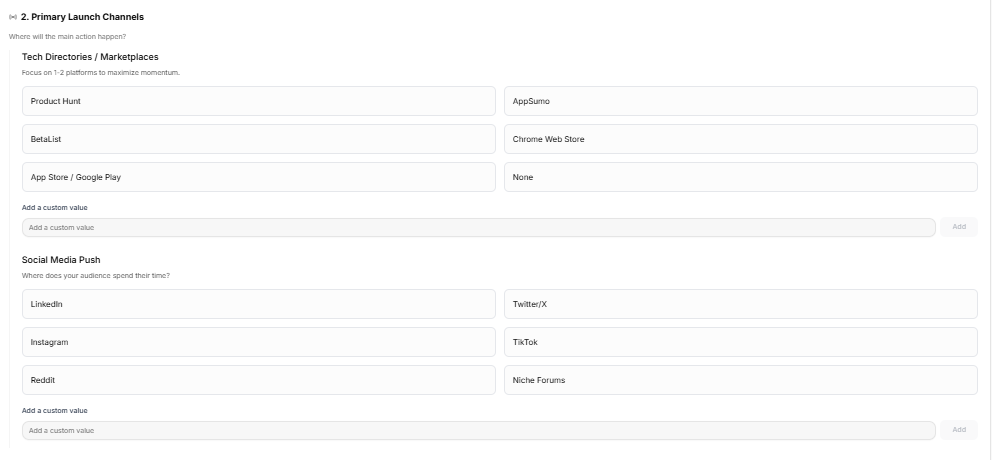
2. Primary Launch Channels Panel
-
Section Objective: Manage distribution paths under the guiding header: “Where will the main action happen?”
-
Tech Directories / Marketplaces: A list of selection chips instructed to “Focus on 1-2 platforms to maximize momentum”:
-
Product Hunt
-
BetaList
-
App Store / Google Play
-
AppSumo
-
Chrome Web Store
-
None
-
-
Social Media Push: Selection chips mapping audience presence by asking: “Where does your audience spend their time?”
-
LinkedIn
-
Instagram
-
Reddit
-
Twitter/X
-
TikTok
-
Niche Forums
-
-
Custom Inputs: Both categories provide an open text bar labeled "Add a custom value" with an Add button to introduce specific target directories or unique community channels.
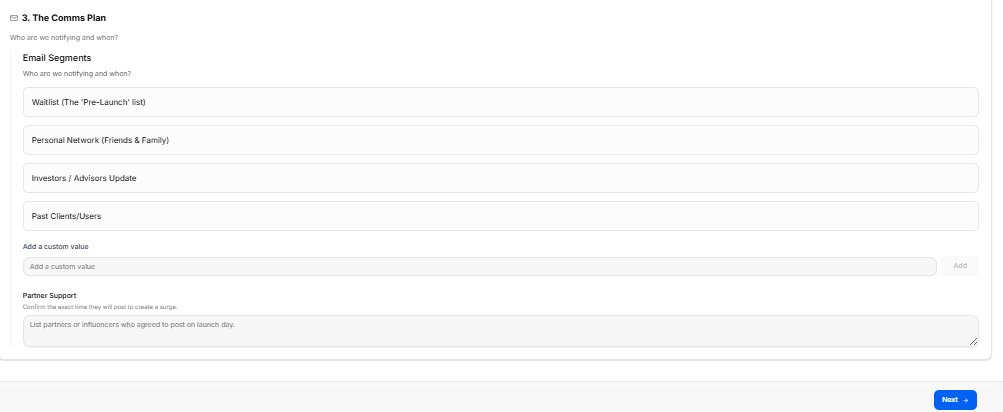
3. The Comms Plan Panel
-
Section Objective: Organizes contact lists under the operational brief: “Who are we notifying and when?”
-
Email Segments: Selection chips identifying core communication cohorts:
-
Waitlist (The 'Pre-Launch' list)
-
Personal Network (Friends & Family)
-
Investors / Advisors Update
-
Past Clients/Users
-
-
Custom Inputs: Includes an "Add a custom value" row to add specialized mailing tags or segmented customer cohorts.
-
Partner Support Logging: A wide-form text block noted with “Confirm the exact time they will post to create a surge,” prompting you to “List partners or influencers who agreed to post on launch day.”
Navigation Controls
Sub-Stage 6: Post-Launch Growth Plan
This sub-stage workspace shifts the focus from launch-day excitement to long-term sustainability. It helps founders map out customer acquisition systems across four core operational pipelines to turn initial momentum into repeatable growth.
Canvas Layout & Workspace Components
-
Main Workspace Title: Displays "Post-Launch Growth Plan".
-
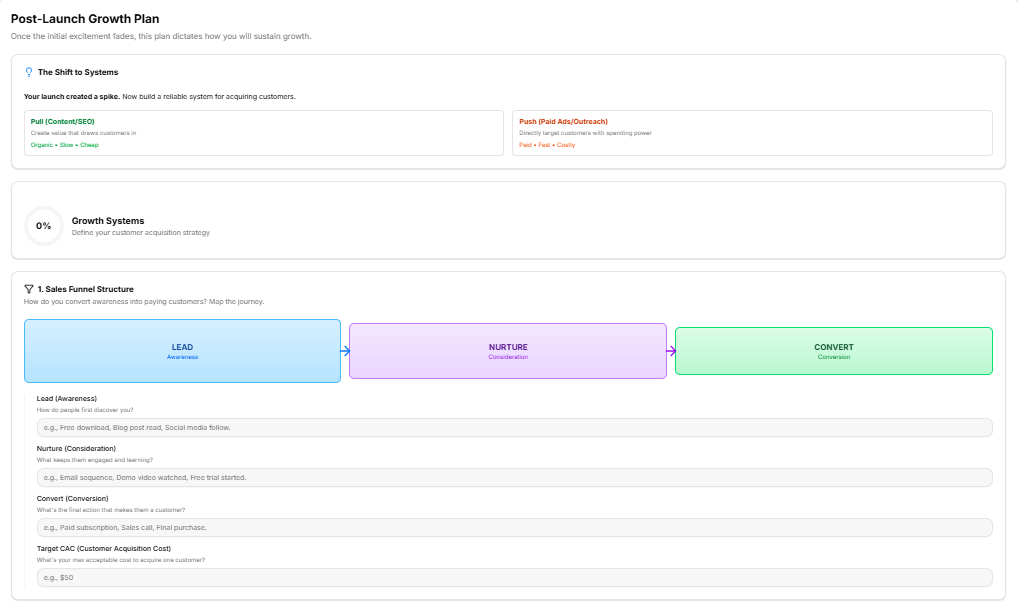
Instructional Subtitle: “Once the initial excitement fades, this plan dictates how you will sustain growth.”
Strategic Framework Briefing & Progress
-
The Shift to Systems Box: A top-tier strategic panel highlighting: "Your launch created a spike. Now build a reliable system for acquiring customers." It contrasts the two primary acquisition mechanisms:
-
Pull (Content/SEO): Create value that draws customers in (Organic • Slow • Cheap).
-
Push (Paid Ads/Outreach): Directly target customers with spending power (Paid • Fast • Costly).
-
-
Growth Systems Tracker: A tracking card displaying a circular performance gauge calibrated at "0% Growth Systems / Define your customer acquisition strategy" to monitor strategic form completion.
1. Sales Funnel Structure Panel
-
Section Objective: Answer the core question: How do you convert awareness into paying customers? Map the journey.
-
Visual Journey Flow Matrix: Displays a sequential pipeline mapping the transition from LEAD (Awareness) $\rightarrow$ NURTURE (Consideration) $\rightarrow$ CONVERT (Conversion).
-
Input Fields:
-
Lead (Awareness): How do people first discover you? (e.g., Free download, Blog post read, Social media follow.)
-
Nurture (Consideration): What keeps them engaged and learning? (e.g., Email sequence, Demo video watched, Free trial started.)
-
Convert (Conversion): What's the final action that makes them a customer? (e.g., Paid subscription, Sales call, Final purchase.)
-
Target CAC (Customer Acquisition Cost): What's your max acceptable cost to acquire one customer? (e.g., $50)
-
2. Paid Acquisition Plan Panel
-
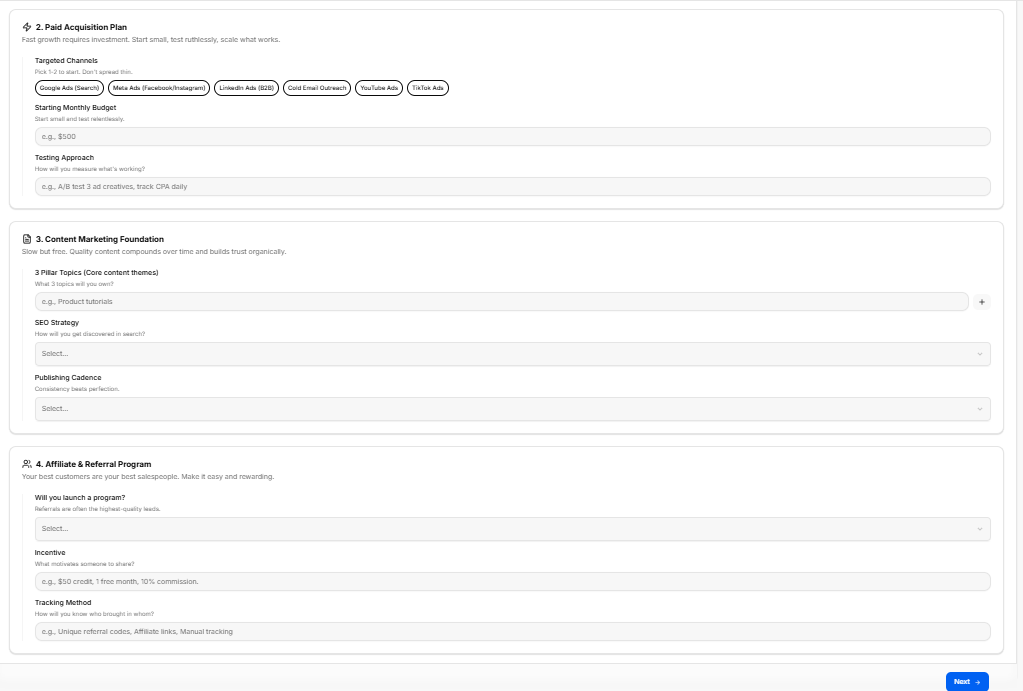
Section Objective: Fast growth requires investment. Start small, test ruthlessly, scale what works.
-
Targeted Channels: Multi-select chips stating: Pick 1-2 to start. Don't spread thin. Options include:
-
Google Ads (Search)
-
Meta Ads (Facebook/Instagram)
-
LinkedIn Ads (B2B)
-
Cold Email Outreach
-
YouTube Ads
-
TikTok Ads
-
-
Starting Monthly Budget Field: Start small and test relentlessly. (e.g., $500)
-
Testing Approach Field: How will you measure what's working? (e.g., A/B test 3 ad creatives, track CPA daily)
3. Content Marketing Foundation Panel
-
Section Objective: Slow but free. Quality content compounds over time and builds trust organically.
-
3 Pillar Topics (Core content themes): An open field to determine your authority areas: What 3 topics will you own? (e.g., Product tutorials). Click the right-aligned plus (+) icon to add themes to your tracking grid.
-
SEO Strategy Dropdown: Selectable menu to define your discovery model: How will you get discovered in search?
-
Publishing Cadence Dropdown: Selectable schedule matrix emphasizing: Consistency beats perfection.
4. Affiliate & Referral Program Panel
-
Section Objective: Your best customers are your best salespeople. Make it easy and rewarding.
-
Will you launch a program? Dropdown: A menu item to confirm referral integrations: Referrals are often the highest-quality leads.
-
Incentive Field: What motivates someone to share? (e.g., $50 credit, 1 free month, 10% commission.)
-
Tracking Method Field: How will you know who brought in whom? (e.g., Unique referral codes, Affiliate links, Manual tracking)
Navigation Controls
Sub-Stage 7: Measurement & Optimization

This final sub-stage workspace provides a structured framework for defining key metrics, user feedback channels, and systematic product iteration loops to ensure long-term, sustainable growth.
Canvas Layout & Workspace Components
-
Main Workspace Title: Displays "Measurement & Optimization".
-
Instructional Subtitle: “This final stage ensures you are tracking the right metrics to improve over time. It involves defining Key Performance Indicators (KPIs) and benchmarks.”
Strategic Mindset & Progress Tracking
As documented in "image_33e7d7.png", the top section provides a master context block for metric definitions:
-
The Iteration Mindset Panel: A light blue-accented briefing card summarizing The Growth Loop: Test $\rightarrow$ Learn $\rightarrow$ Improve $\rightarrow$ Test. It advises founders: “Successful products are never "done." They evolve through continuous measurement, user feedback, and deliberate iteration. The companies that win don't guess—they test, measure, and adapt.”
-
Measurement & Optimization Progress Tracker: A visual performance card containing a status wheel calibrated at "0% Complete / Define your measurement and iteration strategy".
1. KPI Definitions Panel
Visible at the base of "image_33e7d7.png", this module focuses on data-driven business benchmarks:
-
Section Objective: “What numbers matter most? Track the metrics that actually drive your business forward.”
-
Conversion Rate Field: A text entry field to specify target conversions: What percentage of visitors become paying customers? (e.g., 2%)
-
Customer Acquisition Cost (CAC) Field: An input block to outline acquisition targets: How much does it cost to acquire one customer? (e.g., $15.00)
-
Lifetime Value (LTV) Field: A text entry row to project long-term user revenue: How much revenue does one customer generate over their lifetime? (e.g., $100.00)
-
Data Source Dropdown: A selectable drop-menu asking founders: Where are you tracking these metrics? (Select...)
2. Feedback Mechanisms Panel
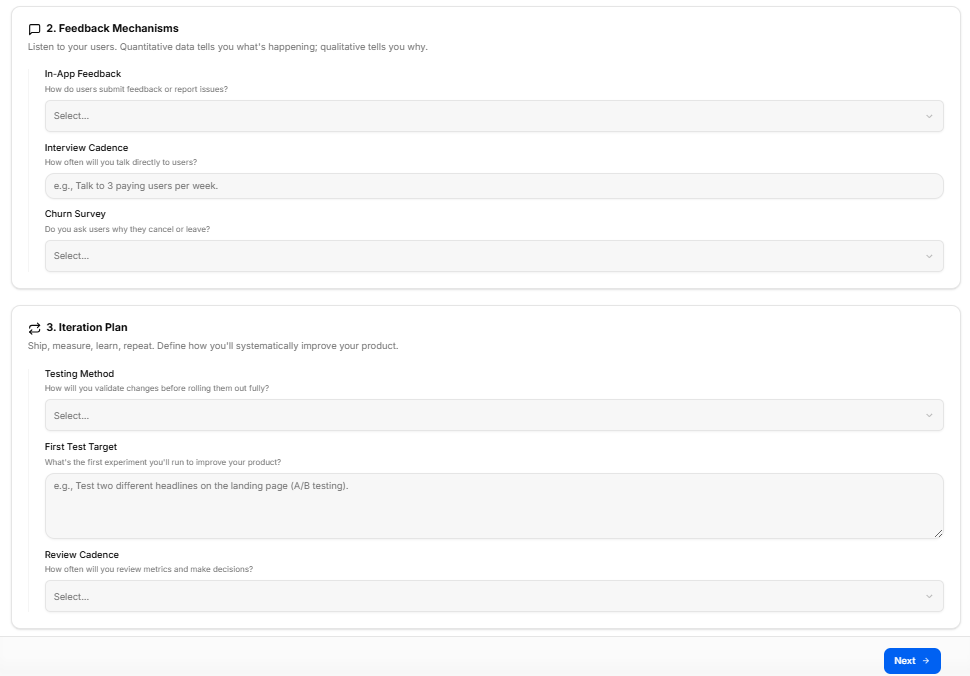
Located at the top of "image_33e716.png", this card helps capture qualitative user insight:
-
Section Objective: “Listen to your users. Quantitative data tells you what's happening; qualitative tells you why.”
-
In-App Feedback Dropdown: A drop-menu mapping issue submission channels: How do users submit feedback or report issues? (Select...)
-
Interview Cadence Field: An open text block establishing a conversational timeline: How often will you talk directly to users? (e.g., Talk to 3 paying users per week.)
-
Churn Survey Dropdown: A dropdown tool to evaluate user departures: Do you ask users why they cancel or leave? (Select...)
3. Iteration Plan Panel
Positioned at the lower half of "image_33e716.png", this final strategic box establishes product improvement cycles:
-
Section Objective: “Ship, measure, learn, repeat. Define how you'll systematically improve your product.”
-
Testing Method Dropdown: A structured drop-menu to manage feature testing: How will you validate changes before rolling them out fully? (Select...)
-
First Test Target Input Block: A multi-line text area to document immediate validation milestones: What's the first experiment you'll run to improve your product? (e.g., Test two different headlines on the landing page (A/B testing).)
-
Review Cadence Dropdown: A selectable schedule menu determining data analysis cycles: How often will you review metrics and make decisions? (Select...)
Navigation Controls
Sub-Stage 8: Export Go-to-Market Results
This final substage workspace compiles all the data, strategy cards, and parameters configured across your previous steps into a central export portal, allowing founders to generate a master strategy document.
Canvas Layout & Workspace Components
-
Main Workspace Title: Displays "Export Go-to-Market Results".
-
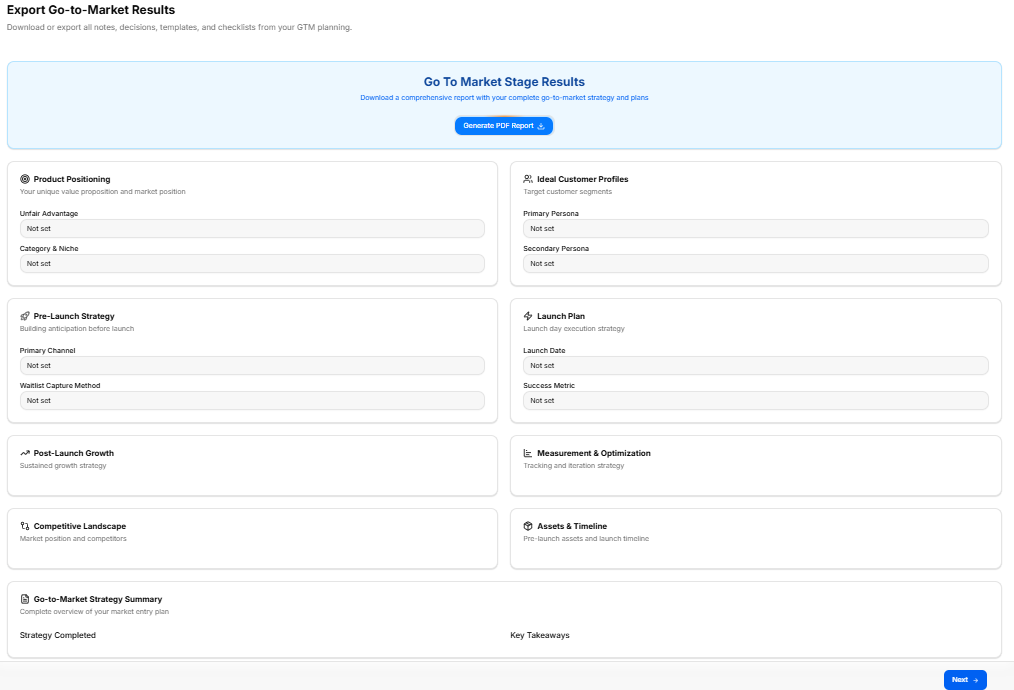
Instructional Subtitle: “Download or export all notes, decisions, templates, and checklists from your GTM planning.”
Master Export Utility
As shown in "image_338254.png", a prominent, blue-bordered action box is centered at the top of the workspace:
-
Go To Market Stage Results Header: “Download a comprehensive report with your complete go-to-market strategy and plans”.
-
Export Action Button: A solid blue button labeled Generate PDF Report 📥 triggers the document compilation pipeline.
GTM Data Field Overview Matrix
The remainder of the canvas in "image_338254.png" acts as a multi-grid review matrix, displaying summary fields currently reading "Not set" across several foundational components:
-
Product Positioning Panel:
-
Objective: Your unique value proposition and market position.
-
Fields: Unfair Advantage, Category & Niche.
-
-
Ideal Customer Profiles Panel:
-
Objective: Target customer segments.
-
Fields: Primary Persona, Secondary Persona.
-
-
Pre-Launch Strategy Panel:
-
Objective: Building anticipation before launch.
-
Fields: Primary Channel, Waitlist Capture Method.
-
-
Launch Plan Panel:
-
Objective: Launch day execution strategy.
-
Fields: Launch Date, Success Metric.
-
-
Post-Launch Growth Panel:
-
Objective: Sustained growth strategy.
-
-
Measurement & Optimization Panel:
-
Objective: Tracking and iteration strategy.
-
-
Competitive Landscape Panel:
-
Objective: Market position and competitors.
-
-
Assets & Timeline Panel:
-
Objective: Pre-launch assets and launch timeline.
-
Summary & Action Footer
-
Go-to-Market Strategy Summary Panel: Spans the lower width of the layout to present a “Complete overview of your market entry plan”, tracking Strategy Completed logs alongside macro Key Takeaways.
-
Navigation Controls: A blue Next → navigation utility button anchors the absolute bottom-right corner of the footer page to conclude the framework pipeline.
No comments to display
No comments to display