
BuildRunKit Projects: Projects Settings
UserBuildRunKit ProfileProjects: Projects Settings - Import / Export Tab
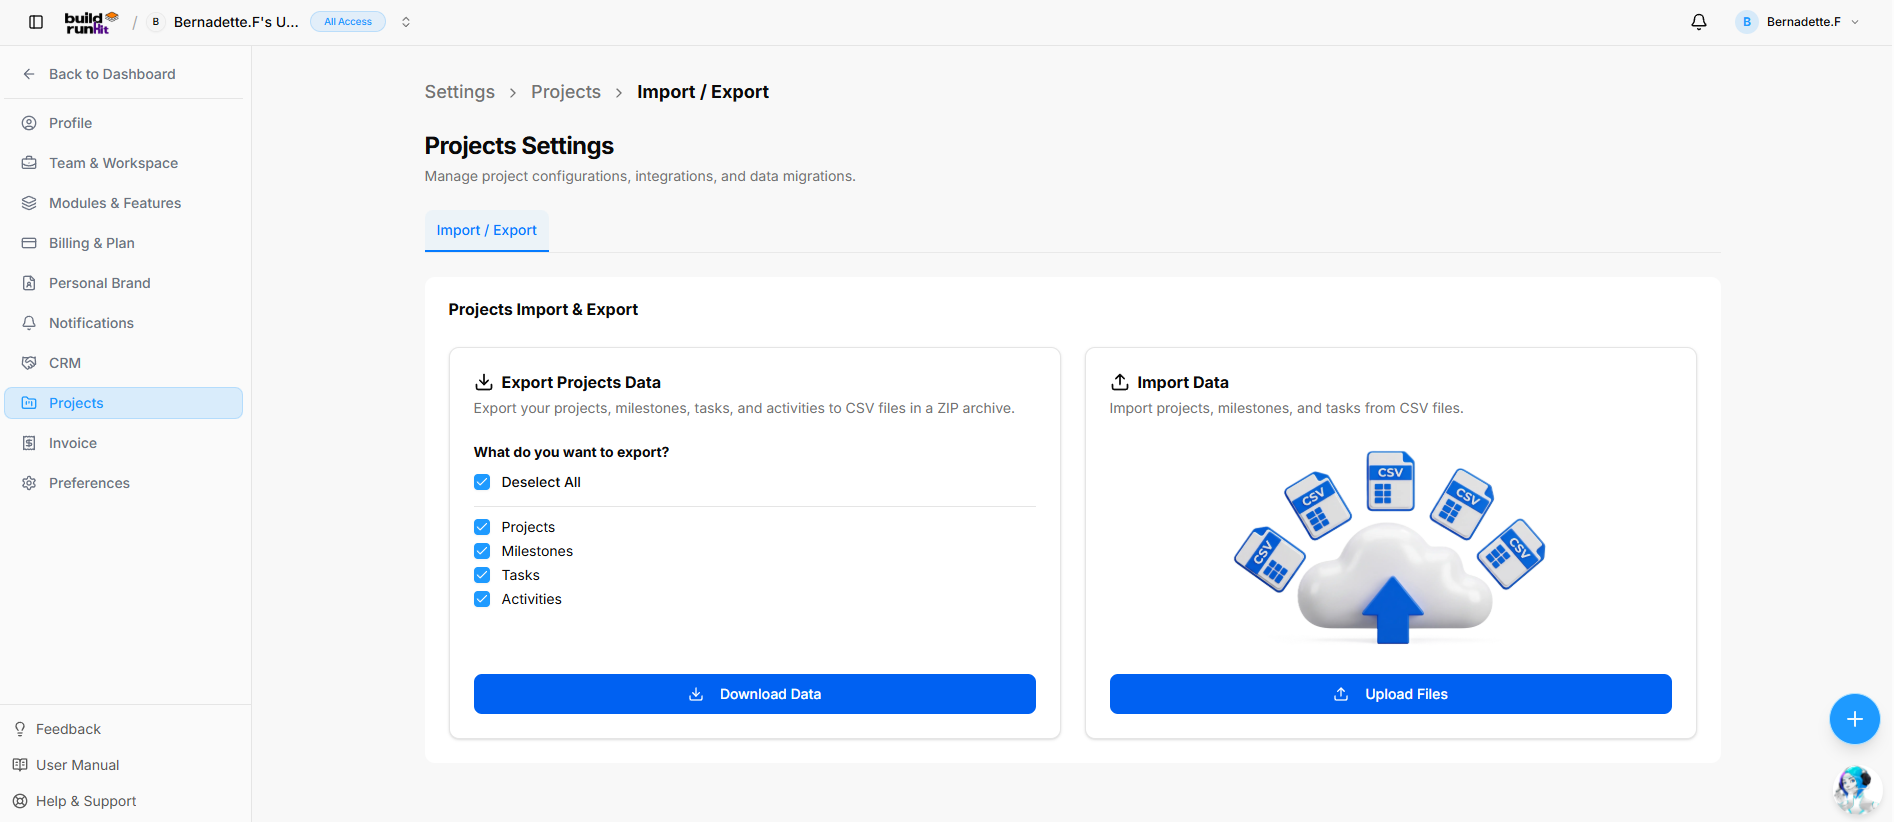
Location & Header
Breadcrumb Trail (Traction Navigation Path): Settings > Projects > Import / Export
Page Heading: Projects Settings
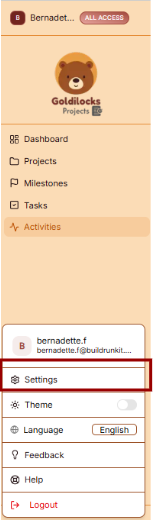
Sub-description: "Manage project configurations, integrations, and data migrations."
Active Tab: Import / Export
Projects Import & Export Dashboard
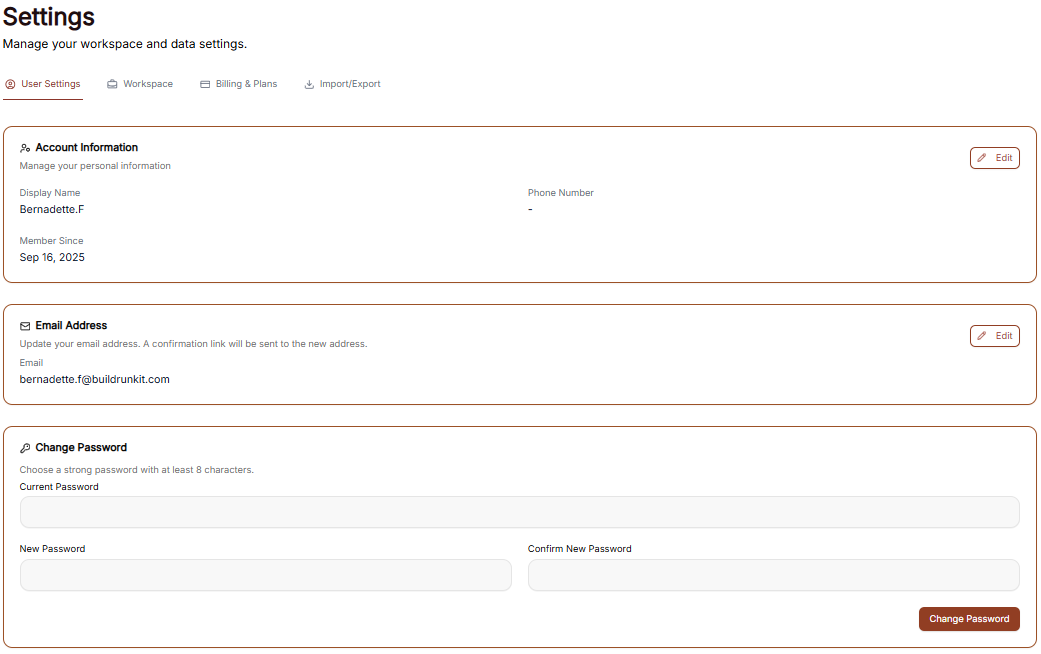
The Settingsdashboard areaprovides allowsside-by-side youmodules tofor manageexporting yoursystem personal information, account security,backups and howimporting thebulk interface appears to you.data:
Managing
UnderExport theProjects UserData Profile tab, you can view and update your primary account details:Panel:
-
UserDescription:Profile: This section displays"Export yourFirstprojects,Name,milestones,Last Name,tasks, andEmail Address. Enter your details into the text fieldsactivities tokeepCSVyourfilesaccountininformationacurrent.ZIP archive." -
UpdateSelectProfile:AllAfter/makingDeselectchangesAll Toggle: Master checkbox toyour nameselect oremail,deselectclickalltherecordbrown Update Profile button at the bottom of the form to save your details.
Account Security
You can update your login credentials at any time in the Security section:
Current Password: Enter your existing password for verification.categories.
NewExport Password:Categories CreateCheckboxes: aSelectable newdata password in the provided field.
Confirm New Password: Re-enter the new password to ensure it matches.
Update Password: Click the brown Update Password button to finalize your new credentials.
Interface Preferences
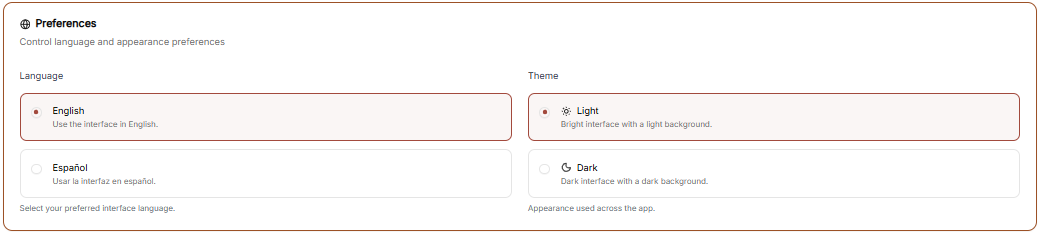
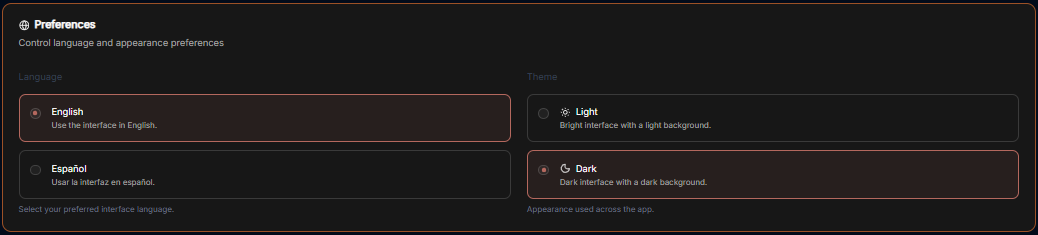
You can customize the look of your workspace through the General Settings menu.
Theme Selection Adjust the visual appearance of the application to match your working environment:
Dark Mode: Use the toggle switch to enable or disable the high-contrast dark theme.
Light Theme: When toggled off, the interface uses a bright background.
Dark Theme: When toggled on, the interface uses a dark background, ideal for low-light environments.
Workspace Management
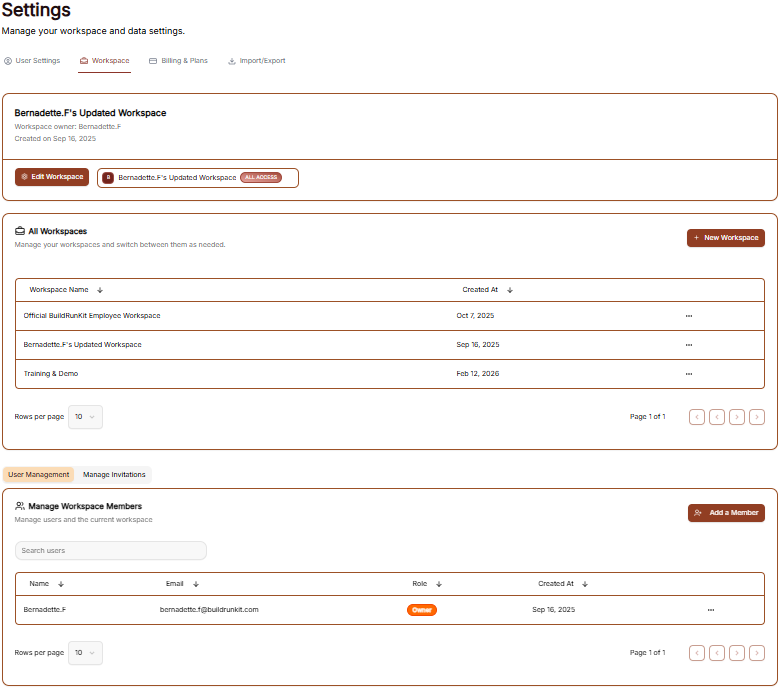
The Workspaces settings allow you to manage the different environments you belong to and see your current access levels.
All Workspaces
This tab provides an overview of the workspace your account is currently associated with.
Workspace Details: You can see the name of the workspacesets (e.g.Projects, "Goldilocks Projects") and its current subscription plan (e.g.Milestones, "Free"Tasks, Activities).
Actions:Download ByData clickingButton: Primary action button to generate and export the threecompressed dotsZIP (actions menu) next to the workspace, you can manage your involvement in that environment:
Exit: Select this to remove yourself from the workspace.
Manage Workspace Members
Control who has access to your workspace in this section.
Member List: View all users, their email addresses, and their assigned roles.
User: Displays the name of the member (e.g., "Bernadette F").
Email: Displays the email address associated with the member.
Role: Shows the permissions level of the user (e.g., "Owner").archive.
InviteImport Members:Data ClickPanel:
Description: "+Import Inviteprojects, member"milestones, buttonand attasks thefrom topCSV right to add a new person to the team via email.files."
RemovingUpload Users:Files ToButton: revokePrimary access, click the three dots (actions menu) next to a member's name and select Remove user.
Billing & Plans
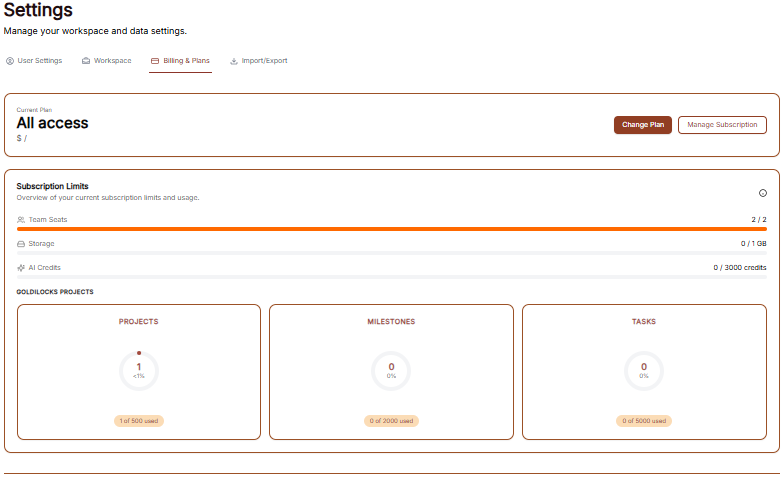
The Billing & Plans section provides a complete overview of your current subscription, usage limits, and available upgrades to ensure your workspace has the resources it needs.
Current Plan Overview
At the top of the page, you can see the status of your primary subscription:
Plan Type: Displays your current level of access (e.g., "All access").
Change Plan: Click this brownaction button to browse different subscription tiers.
Manage Subscription: Click this white button to update payment methods or view billing history.
Subscription Limits
Track your real-time resource consumption throughopen the Subscriptionimport Limitswizard dashboard:
Resource Progress Bars: Visual indicators show your usage for:
Team Seats: Displays the number of active members out of your total limit (e.g., 2 / 2).
Storage: Shows how much data you have used (e.g., 0 / 1 GB).
AI Credits: Tracks your monthly or evergreen AI usage (e.g., 0 / 3000 credits).
Module Statistics: Detailed cards provide a breakdown of specific workspace items:
Projects: Tracks active initiatives (e.g., 1 of 500 used).
Milestones: Tracks project phases (e.g., 0 of 2000 used).
Tasks: Tracks individual work items (e.g., 0 of 5000 used).modal.
AvailableBuildRunKit Add-onsProjects: &Import ExpansionsAssistant Wizard Modal
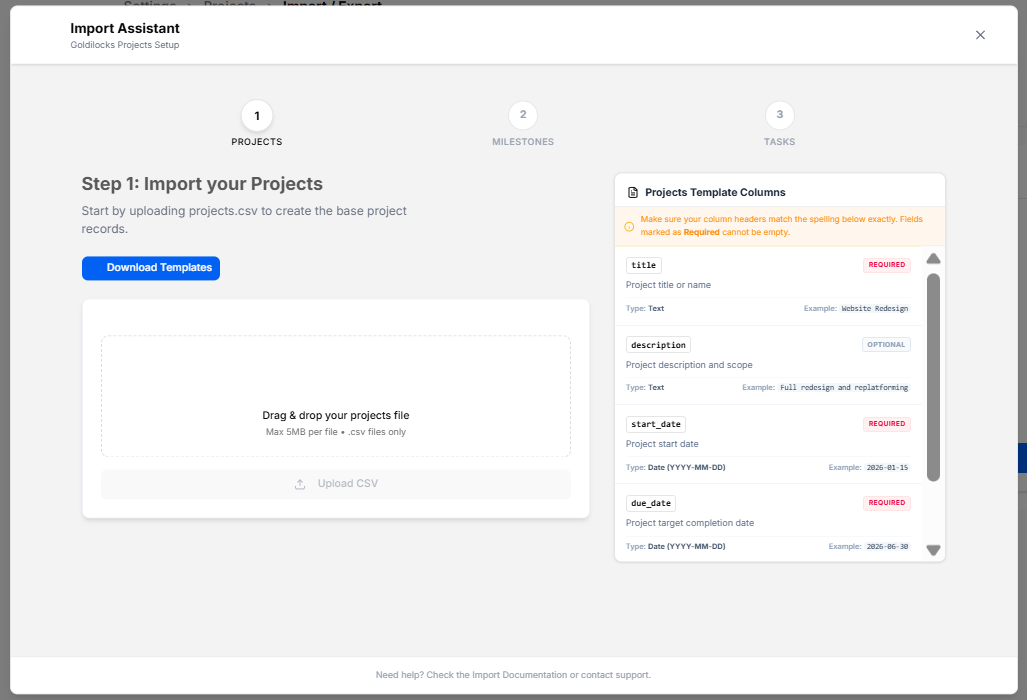
Customize
Modal your workspace by adding specific resources without changing your entire plan:Setup
-
SearchTrigger&Action:Filter: UseClicking thesearchbluebarUploadorFilescategorybuttontagson(AIthe&ImportCredits,/CRM,ExportTeam,settingsInvoicing,tabetc.)openstothefindmulti-stepspecificImportupgrades.Assistant overlay. -
Header:Add-onModalOptions: - Assistant
Additionalwith Usagesub-heading Credits:(Goldilocks AProjects one-timeSetup) and an x close icon in the top-upright of 3,000 evergreen AI credits ($3 one-off).corner.
CRMProgress Expansion:Tracker: IncreaseDisplays capacitynumbered for3-step contacts,navigation deals,sequence:
PROJECTS ($5/mo).Active)
Extra Seat: Add a new team member to your workspace ($3/mo).MILESTONES
InvoicesTASKS
Step 25,0001: additionalImport monthlyyour invoicesProjects
Section Heading: Step 1: Import your Projects
Projects Expansion: Manage 2,000 active projects and 25,000 tasks ($5/mo).
Storage Pack: Add 5GB of shared storage for documents and assets ($3/mo).
Strategy Hub Expansion: Unlock 20,000 tasks and extended mind mapping limits ($5/mo).
Purchasing: Click theSub-description: "Get" button on any card to add the expansion to your account.
Checkout Process
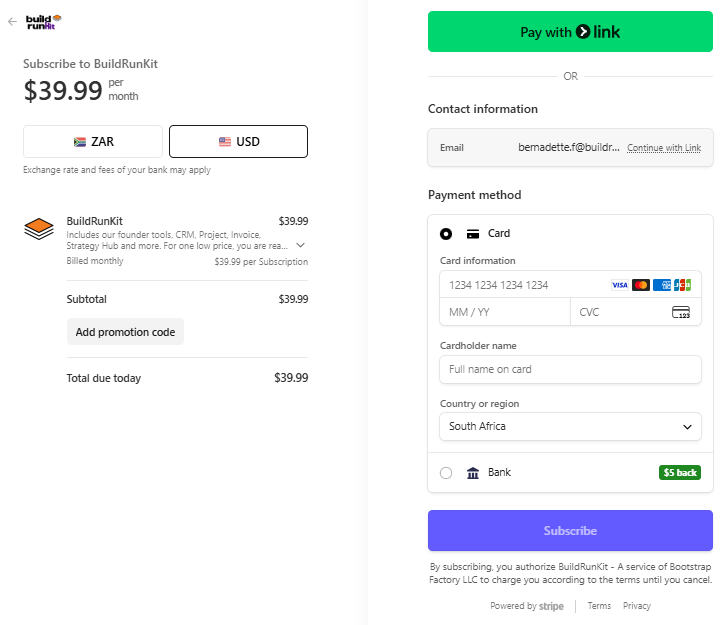
The Checkout page is the final step for any plan change or add-on purchase:
Back to subscription: A link at the top left to return without purchasing.
Payment Method: Confirms the card on file that will be charged for the transaction.
Order Summary: Displays the Subtotal, Tax, and the final Total Amount Due.
Action: Click the brown Pay & Subscribe button to finalize the order and update your workspace limits.
Import & Export
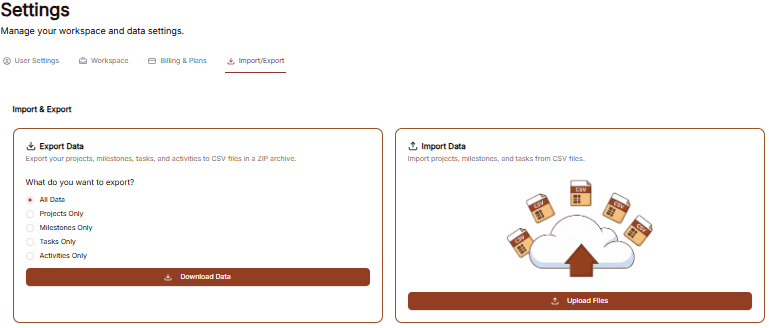
The Import/Export section allows you to manage your data by downloading it for external use or uploading existing records into the Goldilocks Projects ecosystem.
Exporting Your Data
You can export your workspace records into CSV files, which are compiled into a single ZIP archive for easy download.
Selection Options: Choose what data you wish to download by selecting All Data, or specific categories including Projects Only, Milestones Only, Tasks Only, or Activities Only.
Download: Click the brown Download Data button to generate and save your ZIP file.
Activities Reports: For specialized reporting, you can choose to generate an Activities Report in PDF (best for printing and sharing) or Excel (best for analysis and editing) formats.
Importing Your Data
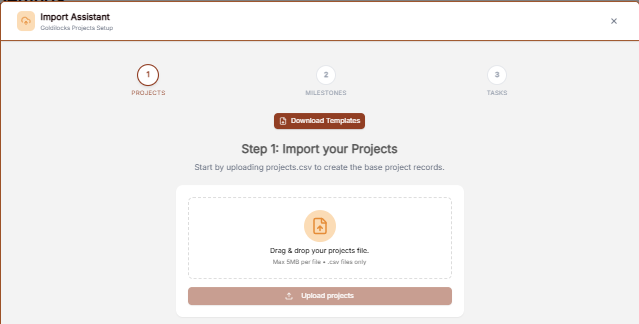
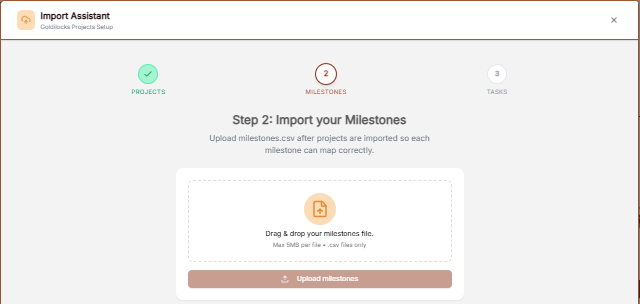
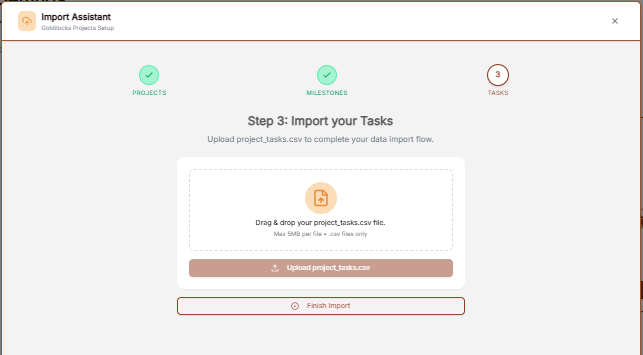
The Import Assistant guides you through a multi-step process to ensure all data is mapped correctly between projects, milestones, and tasks.
Step 1: Import Projects: Start by dragginguploading and dropping your projects.csv file to create the base project records. Projects are a required component of the import process."
StepDownload 2:Templates ImportButton: Milestones:Action Oncebutton projectsto aredownload imported,standardized upload yoursample milestones..csvsostructures eachfor milestone can map correctly to its parent project. Milestones are also a required component of the import.mapping.
StepFile 3:Drag Import& TasksDrop (Optional)Upload Zone:
Interactive upload abox (project_tasks.csvto& completedrop your dataprojects flow.file, Max 5MB per file • .csv files only).
Finalizing:Upload YouCSV: can chooseButton to clicktrigger Finishlocal Importfile immediatelydirectory after successfully importing your milestones, or you can continue to the task import step if you have task data to include.selection.
Projects Template Columns Reference Panel
TechnicalPanelNoteWarning Header:All"Makeimportsurefilesyourmustcolumn headers match the spelling below exactly. Fields marked as Required cannot bein.csvformat with a maximum size of5MBper file.empty."
Column Mapping Specifications:
title (REQUIRED): Project title or name (Type: Text, Example: Website Redesign).
description (OPTIONAL): Project description and scope (Type: Text, Example: Full redesign and replatforming).
start_date (REQUIRED): Project start date (Type: Date (YYYY-MM-DD), Example: 2026-01-15).
due_date (REQUIRED): Project target completion date (Type: Date (YYYY-MM-DD), Example: 2026-06-30).
Footer Support Text
"Need help? Check the Import Documentation or contact support."