
BuildRunKit Tools Directory Section
Tools Directory Section
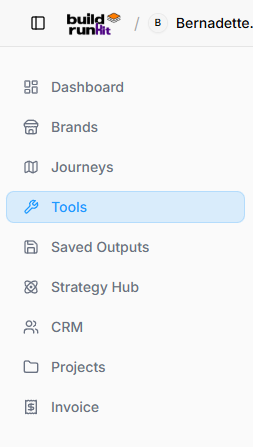
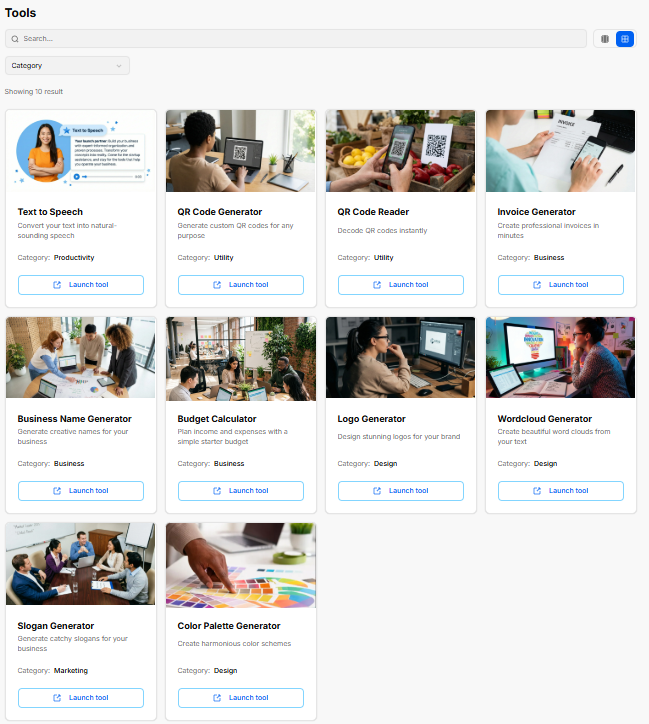
The Tools section acts as a central library for built-in utilities designed to streamline content generation, branding, productivity, and financial calculations.
Navigation & Filtering Controls
-
Search Bar: Quick filter field to search for specific tools by name.
-
Category Dropdown: Allows filtering tools by functional area (e.g., Productivity, Utility, Business, Design, Marketing).
-
View Switcher: Toggles display between card grid view and list view.
Available Built-In Tools Overview
-
Text to Speech (Productivity): Converts written text into natural-sounding speech audio files.
-
QR Code Generator (Utility): Generates custom QR codes for web links, contact details, or media.
-
QR Code Reader (Utility): Scans and decodes existing QR codes directly within the workspace.
-
Invoice Generator (Business): Quick utility to draft and export professional invoices on the fly.
-
Business Name Generator (Business): Generates creative business name suggestions based on brand prompts.
-
Budget Calculator (Business): Helps map income, operational costs, and initial starter budgets.
-
Logo Generator (Design): Creates initial logo design concepts for brand setup.
-
Wordcloud Generator (Design): Builds visual word clouds from input text or dataset keywords.
-
Slogan Generator (Marketing): Creates marketing taglines and catchy slogans for products or services.
-
Color Palette Generator (Design): Generates complementary color schemes for brand aesthetics.
-
Launch Tool Button: Opens the selected tool interface in full view.
Text to Speech Generator Tool Sub-Section
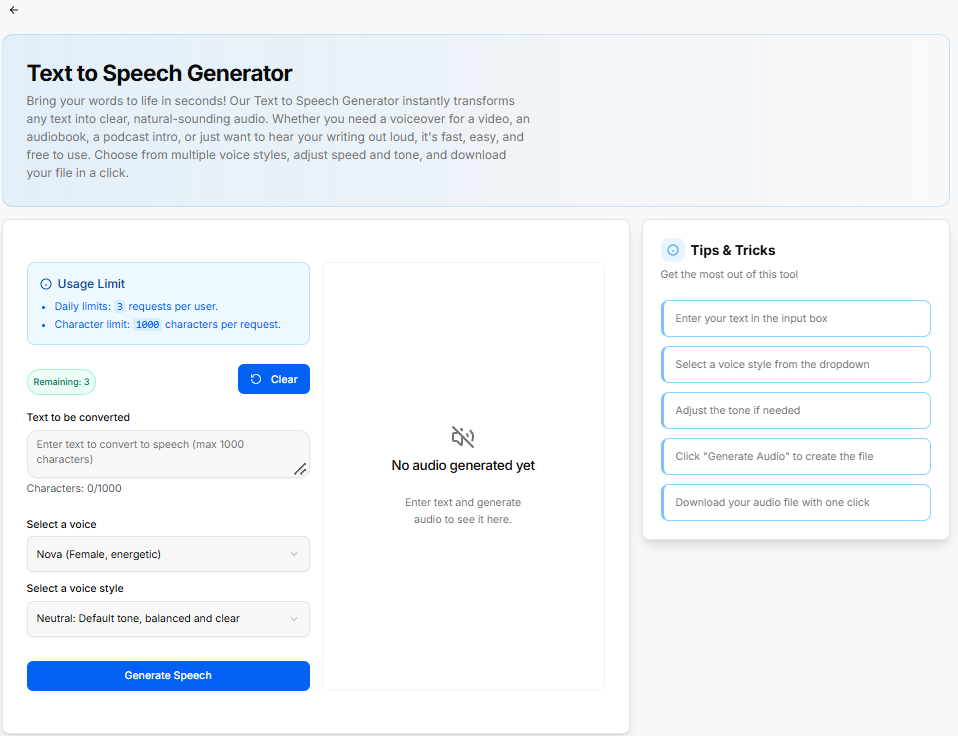
The Text to Speech Generator transforms typed content into natural-sounding speech audio files for voiceovers, podcasts, or audiobooks.
Usage Limits & Parameters
-
Usage Limit Notice: Displays active daily restrictions (3 requests per user) and character limits (1000 characters per request).
-
Remaining Indicator: Shows remaining available requests for the session (e.g., Remaining: 3).
Configuration Controls
-
Text to be converted: Input text area accepting up to 1000 characters with an active character counter (e.g., Characters: 0/1000).
-
Clear Button: Resets the text input box.
-
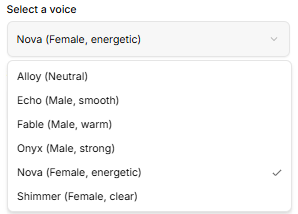
Select a voice: Dropdown menu to select preferred speaker profiles:
-
-
Alloy: Neutral tone.
-
Echo: Male, smooth tone.
-
Fable: Male, warm tone.
-
Onyx: Male, strong tone.
-
Nova: Female, energetic tone.
-
Shimmer: Female, clear tone.
-
-
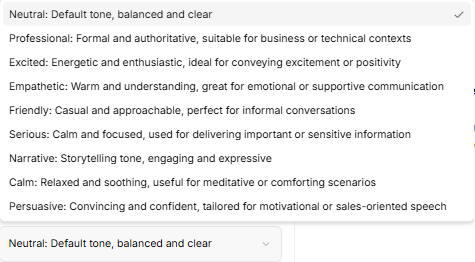
Select a voice style: Dropdown menu to adjust delivery tone:
-
-
Neutral: Default tone, balanced and clear.
-
Professional: Formal and authoritative, suitable for business or technical contexts.
-
Excited: Energetic and enthusiastic, ideal for conveying excitement or positivity.
-
Empathetic: Warm and understanding, great for emotional or supportive communication.
-
Friendly: Casual and approachable, perfect for informal conversations.
-
Serious: Calm and focused, used for delivering important or sensitive information.
-
Narrative: Storytelling tone, engaging and expressive.
-
Calm: Relaxed and soothing, useful for meditative or comforting scenarios.
-
Persuasive: Convincing and confident, tailored for motivational or sales-oriented speech.
-
-
Generate Speech Button: Processes the input text and generates the audio file.
Audio Preview & Output
-
Audio Player Display: Center panel showing generated audio playback controls (displays "No audio generated yet" before processing).
Tips & Tricks Sidebar
-
Step 1: Enter your text in the input box.
-
Step 2: Select a voice and voice style from the dropdowns.
-
Step 3: Adjust the tone if needed.
-
Step 4: Click "Generate Audio" to create the file.
-
Step 5: Download your audio file with one click.
QR Code Generator Tool Sub-Section
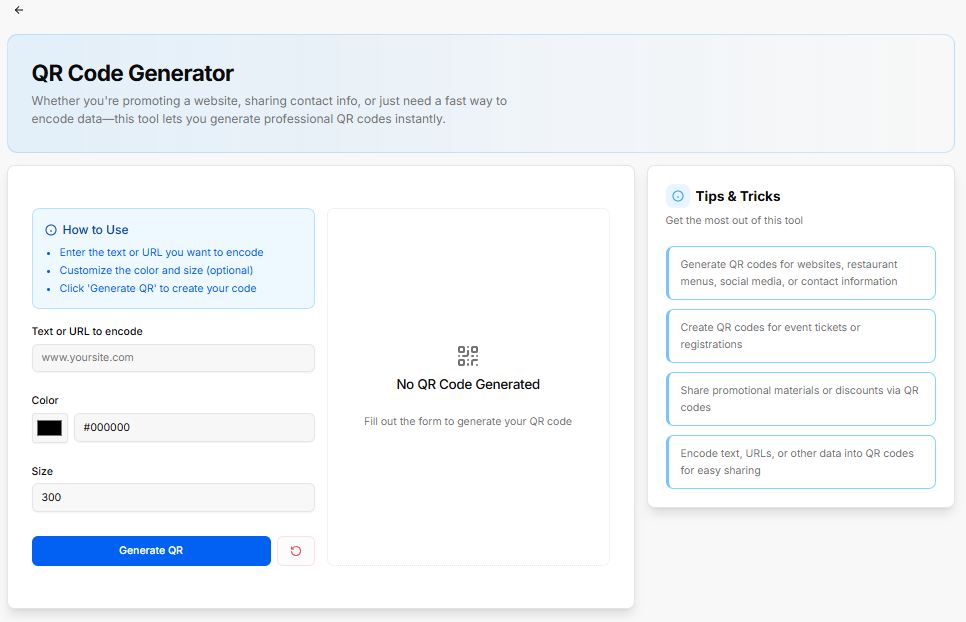
The QR Code Generator allows users to instantly encode text, web links, contact details, or promotional data into custom downloadable QR codes.
How to Use Panel
-
Step 1: Enter the text or URL you want to encode.
-
Step 2: Customize the color and size (optional).
-
Step 3: Click 'Generate QR' to create your code.
Configuration Controls
-
Text or URL to encode: Input field to specify destination web address or raw text (e.g., www.yoursite.com).
-
Color: Color selector and hex code input field to set custom QR code accent colors (defaults to #000000).
-
Size: Numeric input field specifying image dimension in pixels (defaults to 300).
-
Generate QR Button: Processes inputs and creates the rendered code image.
-
Reset Button: Red icon button to clear form settings.
Preview Panel
-
QR Output Display: Center panel showing generated code preview (displays "No QR Code Generated" before processing).
Tips & Tricks Sidebar
-
Tip 1: Generate QR codes for websites, restaurant menus, social media, or contact information.
-
Tip 2: Create QR codes for event tickets or registrations.
-
Tip 3: Share promotional materials or discounts via QR codes.
-
Tip 4: Encode text, URLs, or other data into QR codes for easy sharing.
QR Reader Tool Sub-Section
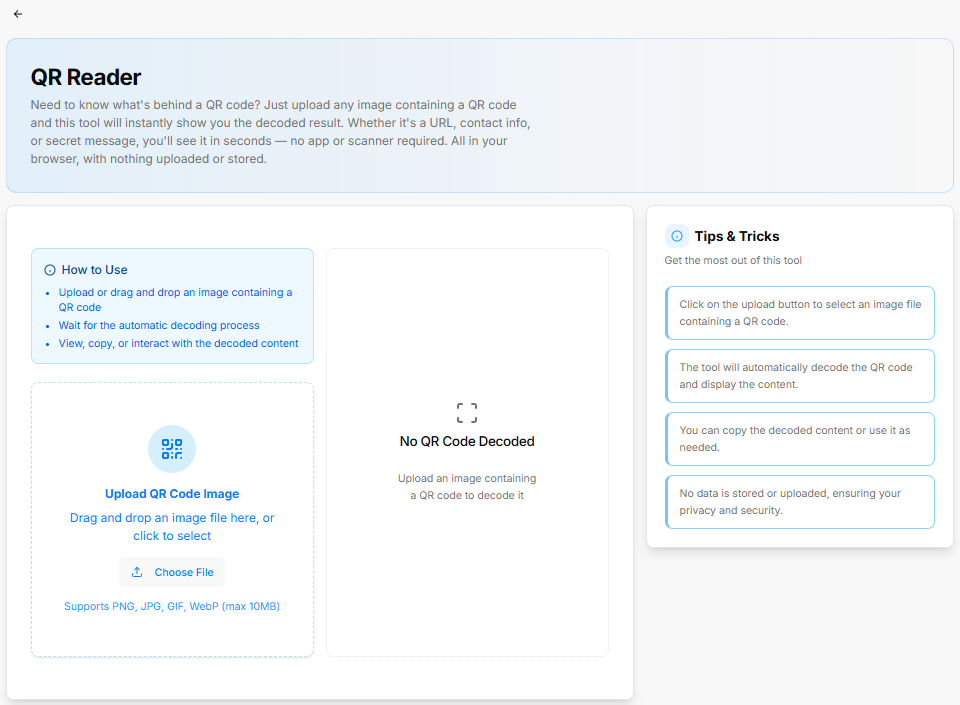
The QR Reader utility decodes uploaded QR code images directly within the browser without storing or transmitting personal data.
How to Use Panel
-
Step 1: Upload or drag and drop an image containing a QR code.
-
Step 2: Wait for the automatic decoding process.
-
Step 3: View, copy, or interact with the decoded content.
Upload & File Controls
-
Upload Area: Drag and drop region with file browser trigger ("Drag and drop an image file here, or click to select").
-
Choose File Button: Opens the local file selector window.
-
Supported Formats Notice: Highlights accepted file types (Supports PNG, JPG, GIF, WebP - max 10MB).
Decoded Output Panel
-
Result Display: Center area showing the decoded text or link output (displays "No QR Code Decoded" before an image is selected).
Tips & Tricks Sidebar
-
Tip 1: Click on the upload button to select an image file containing a QR code.
-
Tip 2: The tool will automatically decode the QR code and display the content.
-
Tip 3: You can copy the decoded content or use it as needed.
-
Tip 4: No data is stored or uploaded, ensuring your privacy and security.
Invoice Generator Tool Sub-Section
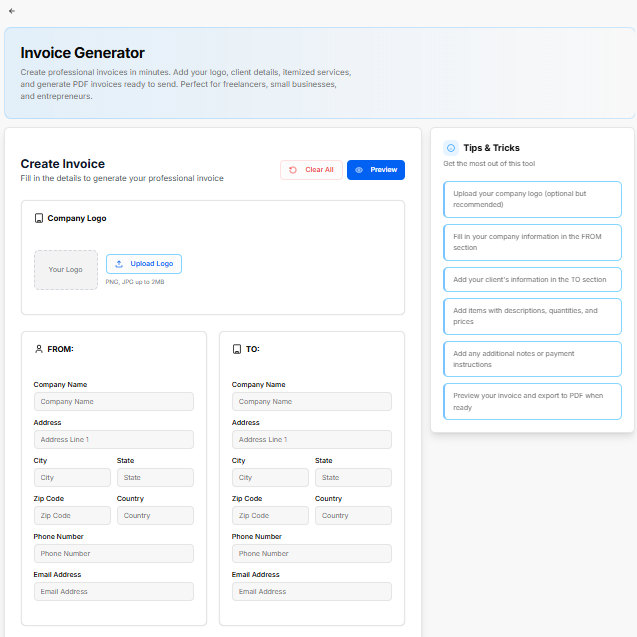
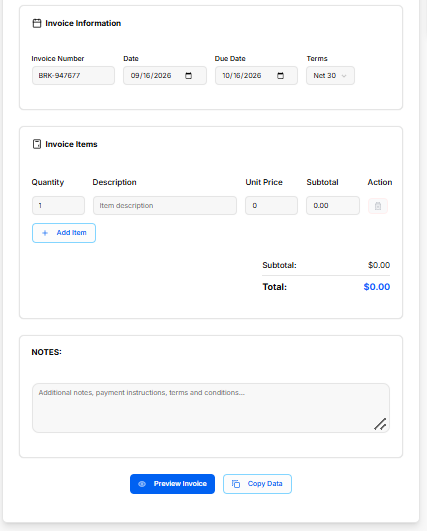
The Invoice Generator tool allows users to quickly draft, preview, and generate PDF invoices with custom branding, sender/client contact details, line items, and payment notes.
Header Actions
-
Clear All Button: Resets all form fields and line items across the entire tool.
-
Preview Button: Opens the formatted PDF preview window.
Company Logo Panel
-
Upload Logo Button: Opens local file selector to attach company branding (Supports PNG, JPG up to 2MB).
Sender & Recipient Details
-
FROM Panel: Form fields to specify sender contact details including Company Name, Address, City, State, Zip Code, Country, Phone Number, and Email Address.
-
TO Panel: Form fields to specify client billing details including Company Name, Address, City, State, Zip Code, Country, Phone Number, and Email Address.
Invoice Information Panel
-
Invoice Number: Auto-generated identifier string (e.g., BRK-947677).
-
Date: Calendar selector to set the issuance date.
-
Due Date: Calendar selector to set the payment deadline date.
-
Terms: Dropdown menu to select payment terms (e.g., Net 30).
Invoice Items Panel
-
Itemized Line Form: Table row fields for Quantity, Description, Unit Price, and calculated Subtotal.
-
Action Column: Red trash icon to remove an individual line item.
-
Add Item Button: Appends a new blank row to the invoice table.
-
Calculated Totals: Displays real-time Subtotal and final Total amounts.
Notes & Final Controls
-
NOTES Box: Multiline text area for adding payment instructions, bank details, or terms and conditions.
-
Preview Invoice Button: Generates the final formatted document layout.
-
Copy Data Button: Copies input data to clipboard for quick reuse.
Tips & Tricks Sidebar
-
Step 1: Upload your company logo (optional but recommended).
-
Step 2: Fill in your company information in the FROM section.
-
Step 3: Add your client's information in the TO section.
-
Step 4: Add items with descriptions, quantities, and prices.
-
Step 5: Add any additional notes or payment instructions.
-
Step 6: Preview your invoice and export to PDF when ready.
Business Name Generator Tool Sub-Section
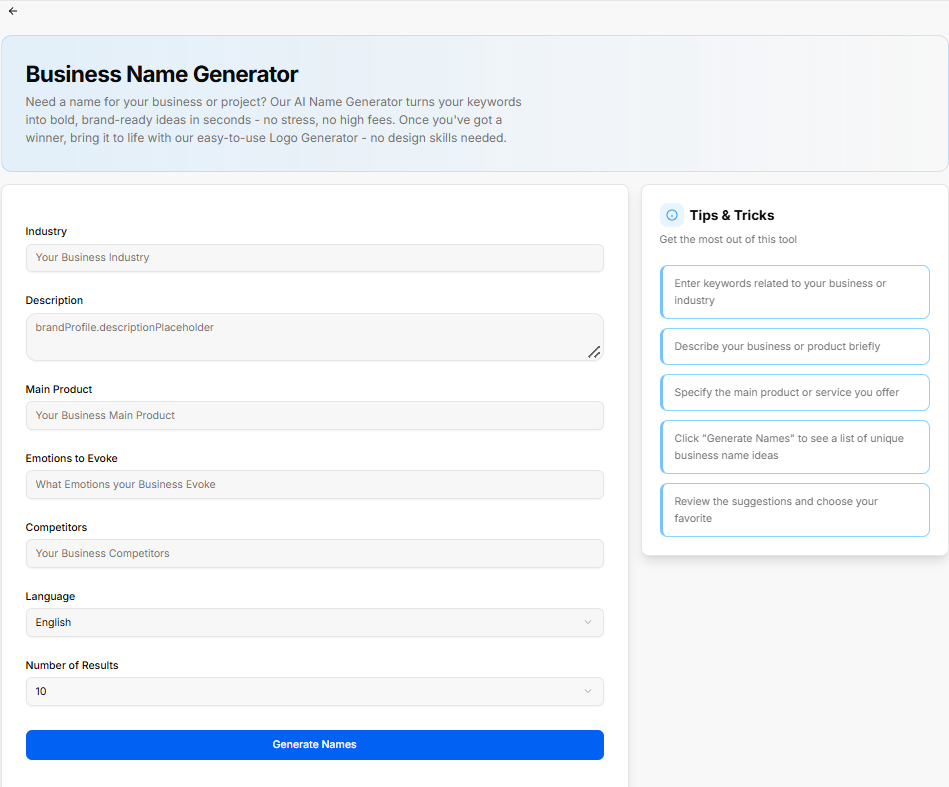
The Business Name Generator tool uses AI to transform keywords, business descriptions, and industry positioning into brand-ready business name ideas.
Configuration Controls
-
Industry: Text input field to enter the target business domain (e.g., Your Business Industry).
-
Description: Multiline text input field to summarize the company overview and offerings (placeholder displays default variable label).
-
Main Product: Input field to specify the primary product or service offered (e.g., Your Business Main Product).
-
Emotions to Evoke: Field to define target feelings or brand impression (e.g., What Emotions your Business Evoke).
-
Competitors: Input field to list key industry competitors for comparative naming context (e.g., Your Business Competitors).
-
Language: Dropdown selector to choose output language (defaults to English).
-
Number of Results: Dropdown menu to set total name suggestions generated (defaults to 10).
-
Generate Names Button: Triggers the AI model to output name suggestions based on specified inputs.
Tips & Tricks Sidebar
-
Step 1: Enter keywords related to your business or industry.
-
Step 2: Describe your business or product briefly.
-
Step 3: Specify the main product or service you offer.
-
Step 4: Click "Generate Names" to see a list of unique business name ideas.
-
Step 5: Review the suggestions and choose your favorite.
Budget Calculator Tool Sub-Section
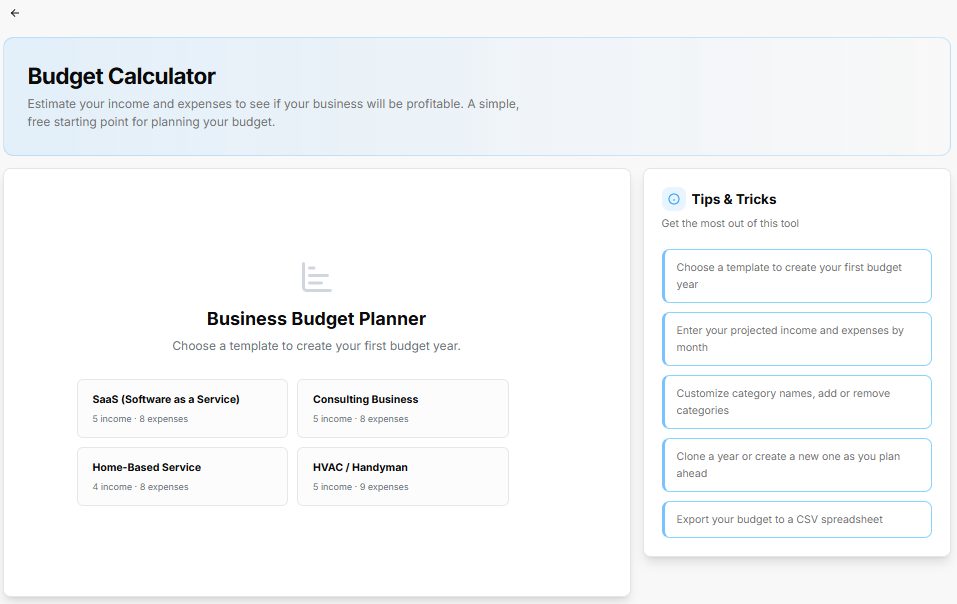
The Budget Calculator helps users estimate revenue, operational expenses, and profitability using pre-configured industry templates or custom financial structures.
Business Budget Planner Templates
-
SaaS (Software as a Service): Includes 5 income streams and 8 default expense categories.
-
Consulting Business: Includes 5 income streams and 8 default expense categories.
-
Home-Based Service: Includes 4 income streams and 8 default expense categories.
-
HVAC / Handyman: Includes 5 income streams and 9 default expense categories.
Tips & Tricks Sidebar
-
Step 1: Choose a template to create your first budget year.
-
Step 2: Enter your projected income and expenses by month.
-
Step 3: Customize category names, add or remove categories.
-
Step 4: Clone a year or create a new one as you plan ahead.
-
Step 5: Export your budget to a CSV spreadsheet.
Logo Generator Tool Sub-Section
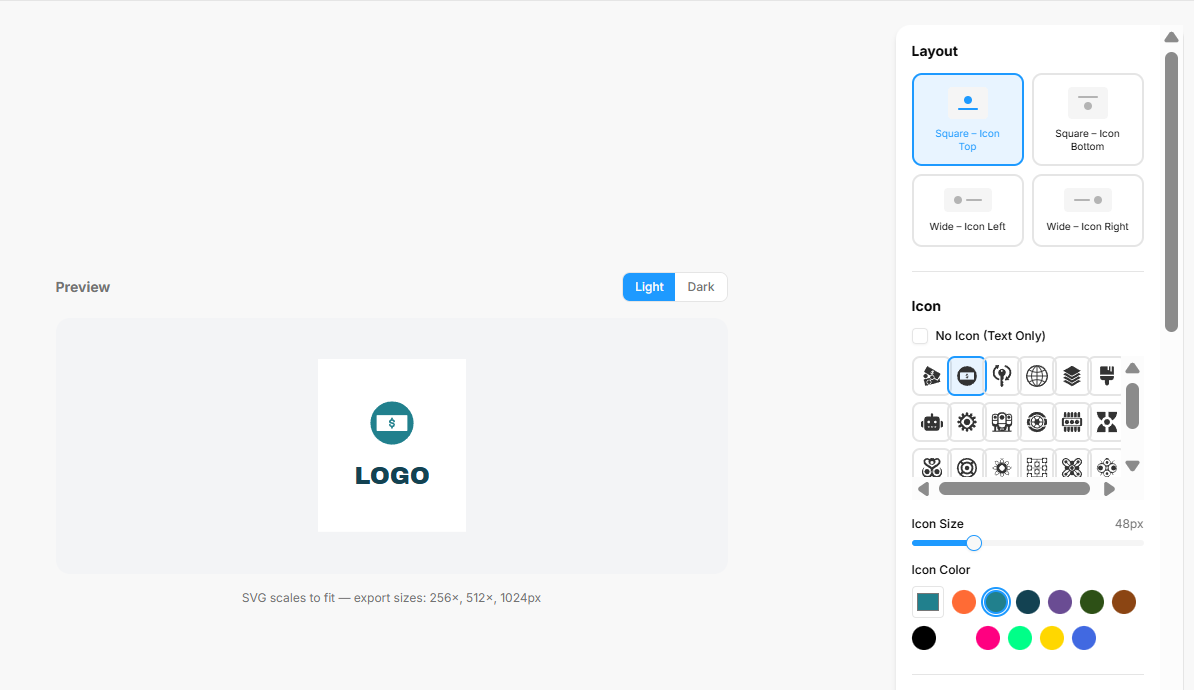
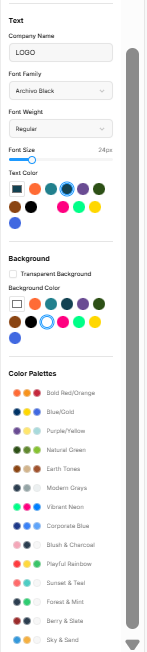
The Logo Generator allows users to create, customize, and export vector logos with adjustable icon arrangements, typography, color palettes, and canvas backgrounds.
Preview Canvas Controls
-
Preview Theme Toggle: Switches canvas display between Light and Dark background modes.
-
SVG Export Sizes: Renders resizable SVG graphics supporting export dimensions at 256×, 512×, and 1024px.
Layout Options
-
Square – Icon Top: Arranges icon centered directly above company text.
-
Square – Icon Bottom: Arranges icon centered directly below company text.
-
Wide – Icon Left: Positions icon to the left of company text.
-
Wide – Icon Right: Positions icon to the right of company text.
Icon Settings
-
No Icon (Text Only): Checkbox to remove symbol graphics for wordmark designs.
-
Icon Selection Matrix: Grid picker with scrollable categories of vector icons.
-
Icon Size Slider: Adjustable range slider setting pixel dimension (e.g., 48px).
-
Icon Color Swatches: Palette buttons to apply primary colors to the selected icon.
Text Settings
-
Company Name: Input text field to set displayed brand name (e.g., LOGO).
-
Font Family: Dropdown menu to select typography (e.g., Archivo Black).
-
Font Weight: Dropdown menu to adjust font weight (e.g., Regular).
-
Font Size Slider: Range slider setting font dimensions in pixels (e.g., 24px).
-
Text Color Swatches: Palette choices for company name lettering.
Background Settings
-
Transparent Background: Checkbox to remove canvas fill for transparent PNG/SVG exports.
-
Background Color Swatches: Palette choices for solid canvas background colors.
Color Palettes
-
Preset Themes: Pre-configured palette combinations including Bold Red/Orange, Blue/Gold, Purple/Yellow, Natural Green, Earth Tones, Modern Grays, Vibrant Neon, Corporate Blue, Blush & Charcoal, Playful Rainbow, Sunset & Teal, Forest & Mint, Berry & Slate, and Sky & Sand.
Word Cloud Generator Tool Sub-Section
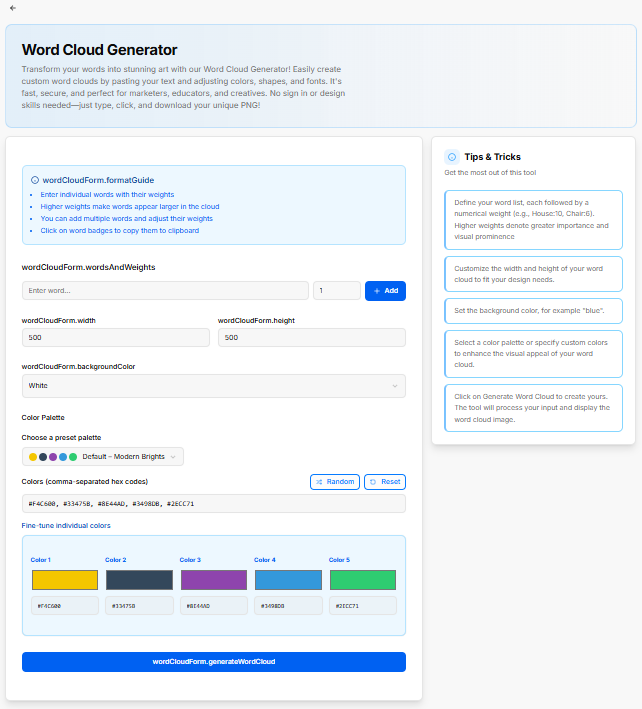
The Word Cloud Generator allows users to transform word lists and assigned numerical weights into custom downloadable word cloud artwork.
Format Guide Panel
-
Step 1: Enter individual words with their weights.
-
Step 2: Higher weights make words appear larger in the cloud.
-
Step 3: You can add multiple words and adjust their weights.
-
Step 4: Click on word badges to copy them to clipboard.
Configuration Controls
-
Words & Weights Entry: Input fields for word entry ("Enter word...") and numerical weight assignment (defaults to 1), alongside an + Add button to commit terms to the list.
-
Dimensions: Numeric input fields for canvas Width (defaults to 500) and Height (defaults to 500).
-
Background Color: Dropdown menu to select canvas background styling (defaults to White).
Color Customization
-
Choose a preset palette: Dropdown menu offering pre-configured color schemes (e.g., Default – Modern Brights).
-
Colors (comma-separated hex codes): Text field accepting direct hex color codes (e.g., #F4C600, #33475B, #8E44AD, #3498DB, #2ECC71).
-
Random Button: Shuffles hex values to generate random color combinations.
-
Reset Button: Restores default palette settings.
-
Fine-tune individual colors: Swatch controls to manually adjust individual color slots (Color 1 through Color 5) using color pickers or hex inputs.
-
Generate Word Cloud Button: Triggers canvas rendering based on active terms, weights, and color settings.
Tips & Tricks Sidebar
-
Tip 1: Define your word list, each followed by a numerical weight (e.g., House:10, Chair:6). Higher weights denote greater importance and visual prominence.
-
Tip 2: Customize the width and height of your word cloud to fit your design needs.
-
Tip 3: Set the background color, for example "blue".
-
Tip 4: Select a color palette or specify custom colors to enhance the visual appeal of your word cloud.
-
Tip 5: Click on Generate Word Cloud to create yours. The tool will process your input and display the word cloud image.
Slogan Generator Tool Sub-Section
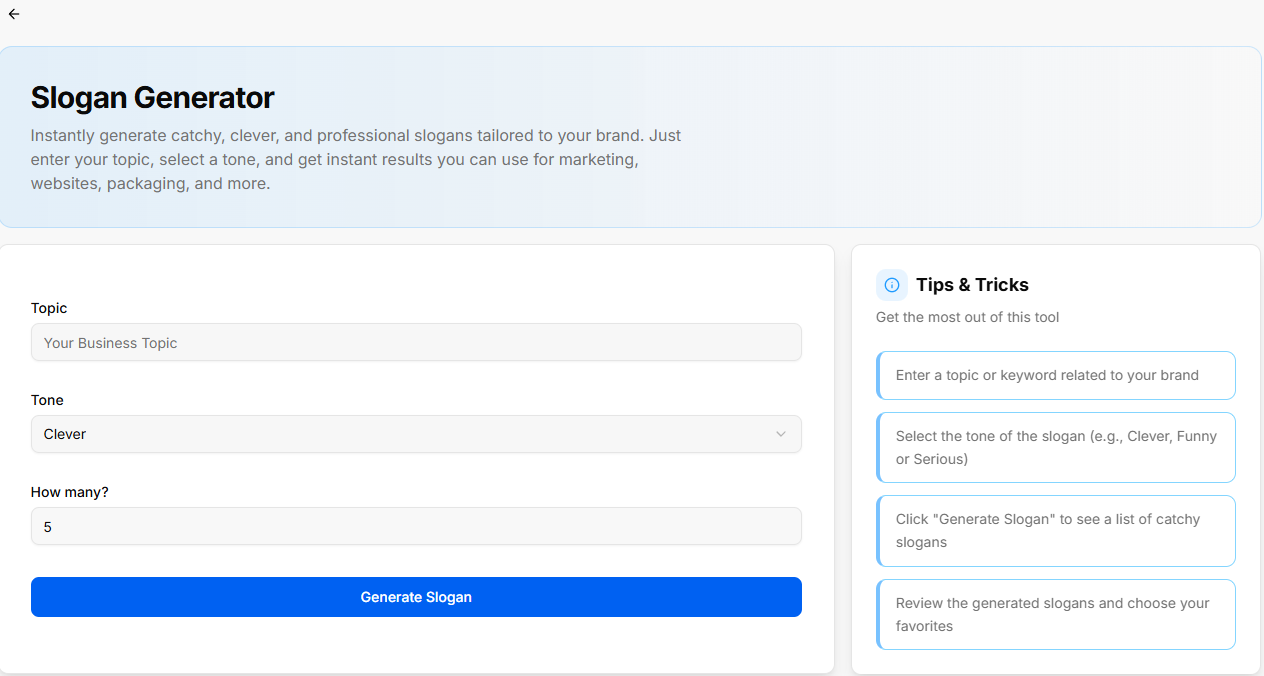
The Slogan Generator tool instantly creates catchy, professional slogans tailored to your brand for marketing, websites, packaging, and more.
Configuration Controls
-
Topic: Text input field to specify the brand topic or keywords (e.g., Your Business Topic).
-
Tone: Dropdown menu to select the delivery style (defaults to Clever).
-
How many?: Numeric input field to specify the total number of slogans generated (defaults to 5).
-
Generate Slogan Button: Triggers the generation process based on specified inputs.
Tips & Tricks Sidebar
-
Step 1: Enter a topic or keyword related to your brand.
-
Step 2: Select the tone of the slogan (e.g., Clever, Funny or Serious).
-
Step 3: Click "Generate Slogan" to see a list of catchy slogans.
-
Step 4: Review the generated slogans and choose your favorites.
Color Palette Generator Tool Sub-Section
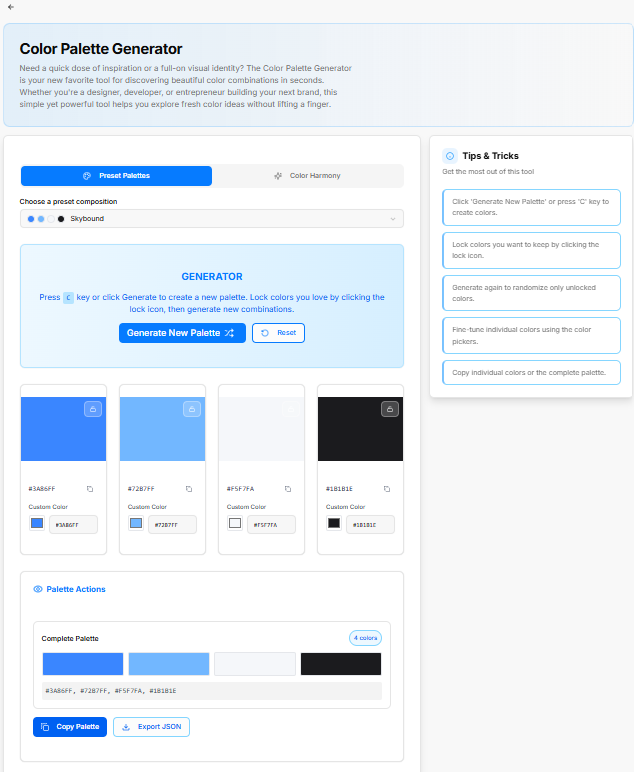
The Color Palette Generator helps designers, developers, and founders discover, fine-tune, and export cohesive color schemes using presets or color harmony rules.
Generator Mode Tabs
-
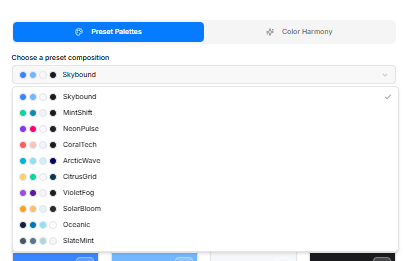
Preset Palettes: Select from curated multi-color brand combinations.
-
Choose a preset composition: Dropdown menu offering pre-built compositions: Skybound, MintShift, NeonPulse, CoralTech, ArcticWave, CitrusGrid, VioletFog, SolarBloom, Oceanic, and SlateMint.
-
-
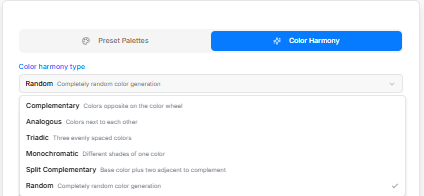
Color Harmony: Generate combinations based on formal color wheel relationships.
-
Color harmony type: Dropdown menu to select harmony rules:
-
Complementary: Colors opposite on the color wheel.
-
Analogous: Colors next to each other on the color wheel.
-
Triadic: Three evenly spaced colors on the color wheel.
-
Monochromatic: Different shades of a single color.
-
Split Complementary: Base color plus two colors adjacent to its complement.
-
Random: Completely random color generation.
-
-
Generator Controls & Cards
-
Generate New Palette Button: Creates a new color combination (or press key C).
-
Reset Button: Restores initial default colors.
-
Color Swatch Cards: Individual cards showing generated hex values (e.g., #3A86FF, #7287FF, #F5F7FA, #18181E):
-
Lock Icon: Locks individual swatches so they remain unchanged during subsequent randomizations.
-
Copy Hex Icon: Copies the specific hex code to clipboard.
-
Custom Color Input: Color picker and hex text input box for direct manual edits.
-
Palette Actions Panel
-
Complete Palette Preview: Summary bar displaying all generated colors together with item count indicator (e.g., 4 colors).
-
Copy Palette Button: Copies all comma-separated hex codes to clipboard (e.g., #3A86FF, #7287FF, #F5F7FA, #18181E).
-
Export JSON Button: Downloads palette configuration as a structured JSON file.
Tips & Tricks Sidebar
-
Tip 1: Click 'Generate New Palette' or press 'C' key to create colors.
-
Tip 2: Lock colors you want to keep by clicking the lock icon.
-
Tip 3: Generate again to randomize only unlocked colors.
-
Tip 4: Fine-tune individual colors using the color pickers.
-
Tip 5: Copy individual colors or the complete palette.