
BuildRunKit Invoices: Settings
UserBuildRunKit Profile &Invoices: Settings (Company Tab)
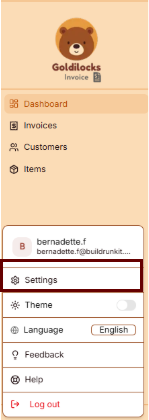
The Invoice Settings areapanel allows youconfiguration toof managecore yourbilling personalparameters, information,business accountidentification security,details, invoice styling templates, currencies, and howdata themanagement interface appears to you.options.
Managing
Navigation Personal Information
Under the User tab, you can view and update your primary account details:
-
UserCompany:Profile:SelectedThisactivesectiontabdisplaysforyourprimaryDisplay Name, your Phone Number, and the date you became a member. Click the Edit button to make changes to your name or phoneorganization details. -
EmailInvoices:Address: View the primary email associated with your account. You can update this by clicking Edit, which will trigger a confirmation link to your new address.
Account Security
You can update your login credentials at any time in the Change Password section:
Current Password: Enter your existing passwordTab for verification.invoice configuration and formatting.
NewFinances: Password:Tab Createfor afinancial newparameters passwordand containingcurrency at least 8 characters.settings.
Confirm:Import Re-enter/ theExport: newTab passwordfor todata ensureimport itand matches,backup then click the brown Change Password button to finalize.utilities.
Company
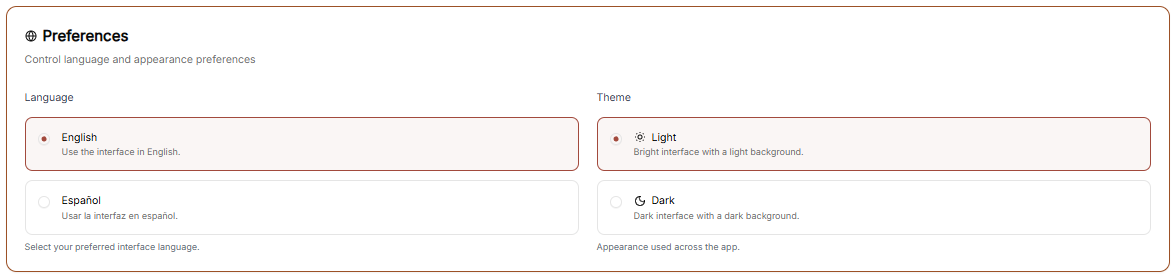
InterfaceCard Preferences
This
You can customizepopulates the look'Bill From' details across generated invoices and languageclient ofbilling your workspace through the Preferences menu.
Language Settingsstatements.
Choose the primary language for your interface:
-
ImageEnglish:Logo:UseImagetheuploadinterfacecontrolin(SelectEnglish.
Español: Usar la interfaz en español.
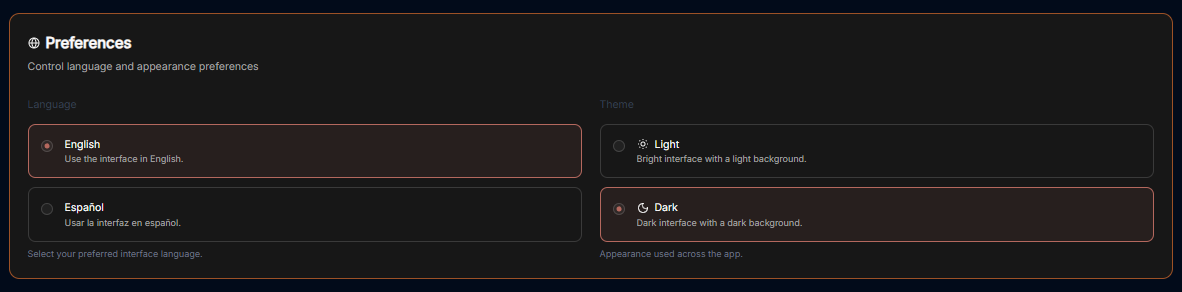
Theme Selection
Adjust the visual appearance of the application to match your working environment:
Light Theme: A bright interface with a light-colored background.
Dark Theme: A high-contrast interface with a dark background, idealbutton) for low-lightbranding environments.
Workspace Management
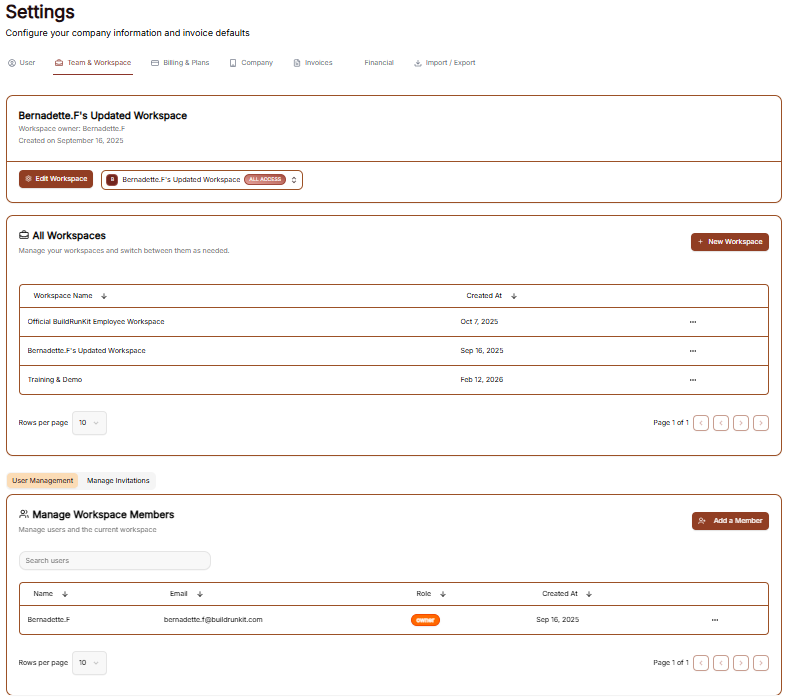
The Workspace settings allow you to control the environments you belong to, manage your team, and update workspace identities.
All Workspaces
This tab provides an overview of every workspace your account is currently associated with.invoices.
-
StatusFile&Limits:Plans: You can see the name of each workspace and its current subscription plan (e.g., "Custom" or "Enterprise").
Leaving a Workspace: By clicking the three dots (actions menu) next to a workspace, you can select Exit to remove yourself from that environment.
Edit Workspace
This is where you manage the primary identity of your current business environment.
Changing the Name: Use the Edit Workspace section to update the display name of the workspace.
Save Changes: Ensure you click the brown Save Changes button after renaming to apply the update across the suite.
Manage Workspace Members
Control who has access to your workspace in this section.
Member List: View all users, their email addresses, and their assigned roles (e.g., Owner).
Invite Members: Click the + Invite member button at the top right to add a new person to the team via email.
Removing Users: To revoke access, click the three dots (actions menu) next to a member's name and select Remove user.
Subscription & Billing
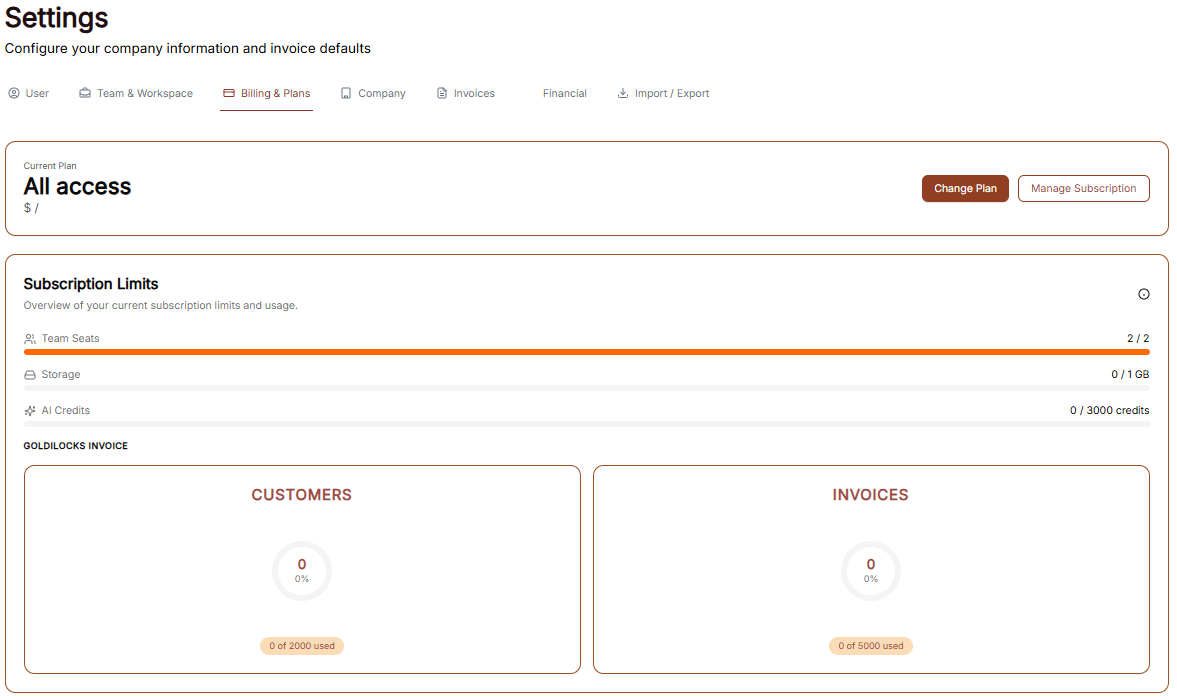
The Subscription area is where you manage your workspace plan, tracking limits, and payment details to ensure uninterrupted access to the Goldilocks Suite.
Plan Overview & Usage
In the Subscription tab, you can monitor your current plan's status and usage limits:
Active Plan: View your current subscription tier (e.g., "Custom").
Billing Cycle: Confirm the cost of your plan and the frequency of payments (e.g., "$0.00 / Monthly").
Usage Trackers: Monitor how much of your plan you have used, including your Invoices, Customers, and Items counts.
Plan Actions: You can click Change Plan to upgrade or downgrade your service level, or Cancel Subscription if you wish to stop your recurring payments.
Payment Methods
The Billing tab allows you to manage the credit cards or accounts associated with your workspace:
Saved Methods: View your currently active payment card, including the brand (e.g., Visa), the last four digits, and the expiration date.
Primary Indicator: Your default payment method will be clearly marked with a "Primary" badge.
Managing Cards: Click the three dots (actions menu) next to a saved card to remove it from your account.
Adding New Payments: Click the brown + Add payment method button to securely link a new card for future billing cycles.
Subscription & Billing
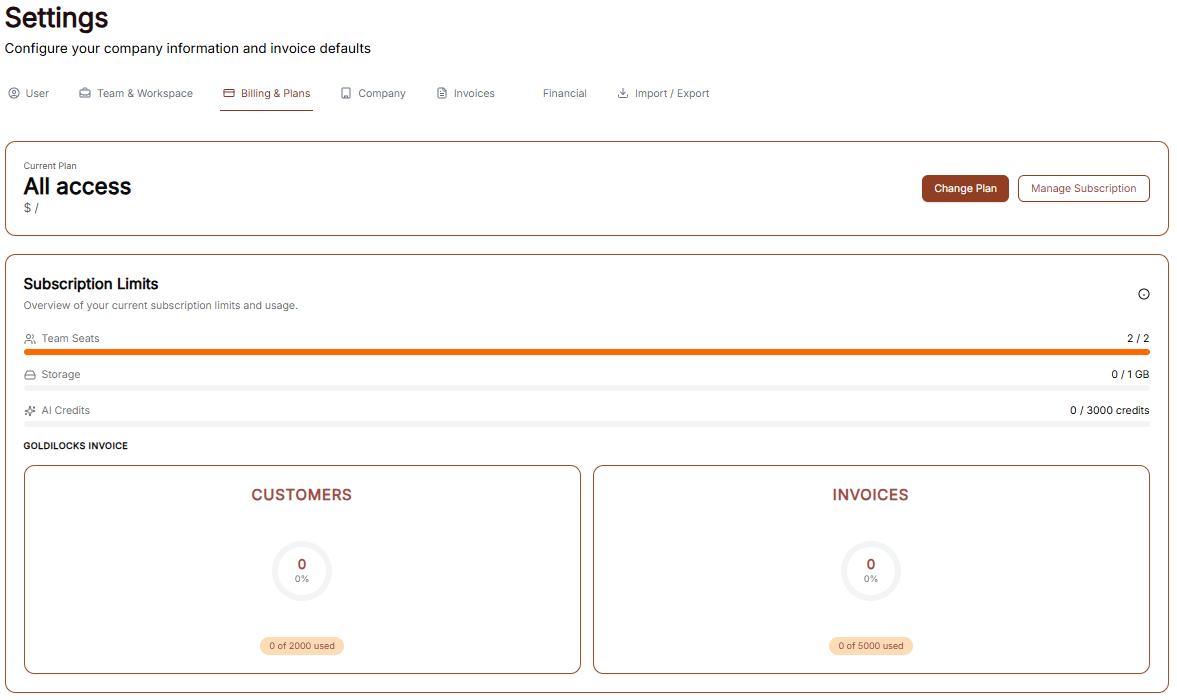
The Subscription area is your hub for managing plan access, tracking workspace limits, and handling payments.
Subscription Overview
This tab provides a high-level view of your current standing:
Active Plan: Displays the name of your current plan (e.g., "Custom").
Cost Details: Shows the recurring price and billing frequency (e.g., "$0.00 / Monthly").
Usage Trackers: Three progress bars track your real-time usage for Invoices, Customers, and Items against your plan’s total capacity.
Management Buttons: * Change Plan: Opens the tier selection menu.
Cancel Subscription: Initiates the process to stop recurring payments.
Changing Your Plan
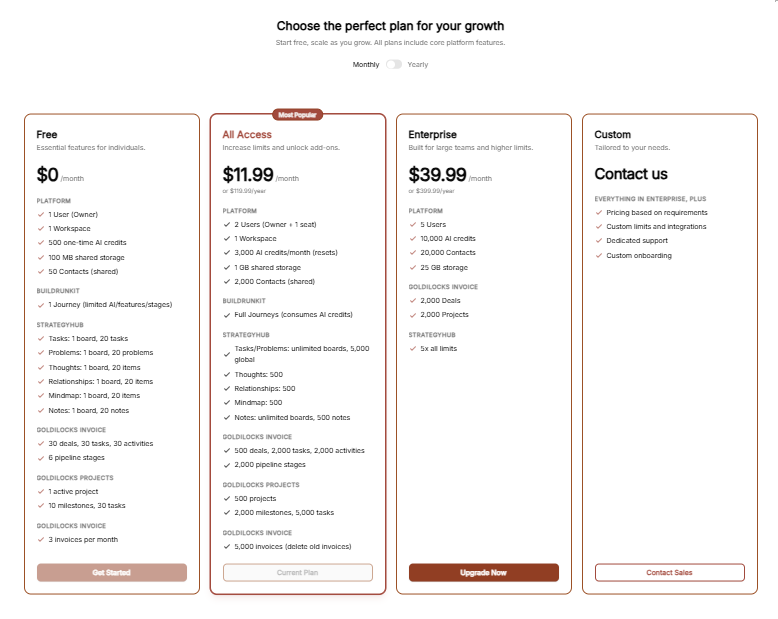
Clicking Change Plan reveals the available subscription tiers:
Billing Toggle: A switch at the top to toggle between Monthly and Yearly pricing.
Plan Tiers: Choose between Free, Plus, and Pro.
Tier Limits: Each column details the specific limits for Invoices, Customers, Items, and Workspace Members.
Action: Click the brown Choose Plan button under your desired tier to proceed.
Add-ons
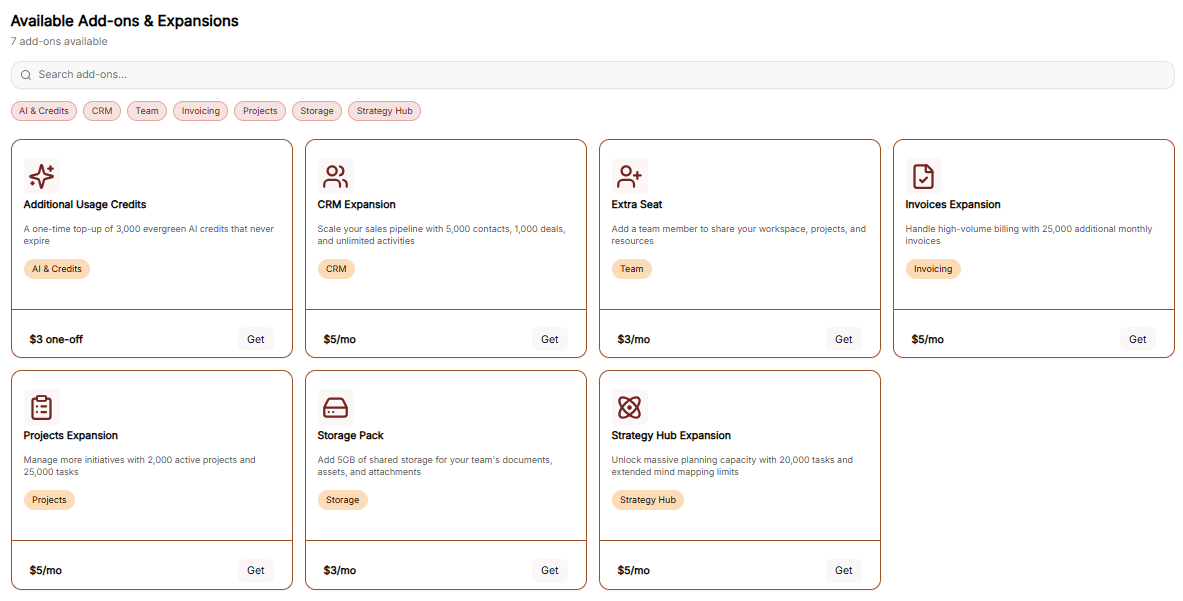
The Add-ons tab allows for modular upgrades without changing your full plan:
Available Features: You can purchase extra Invoices, Customers, Items, or Workspace Members.
Pricing: Each add-on lists its specific monthly cost.
Action: Click the brown Buy button next to the relevant feature to initiate the purchase.
Checkout Process
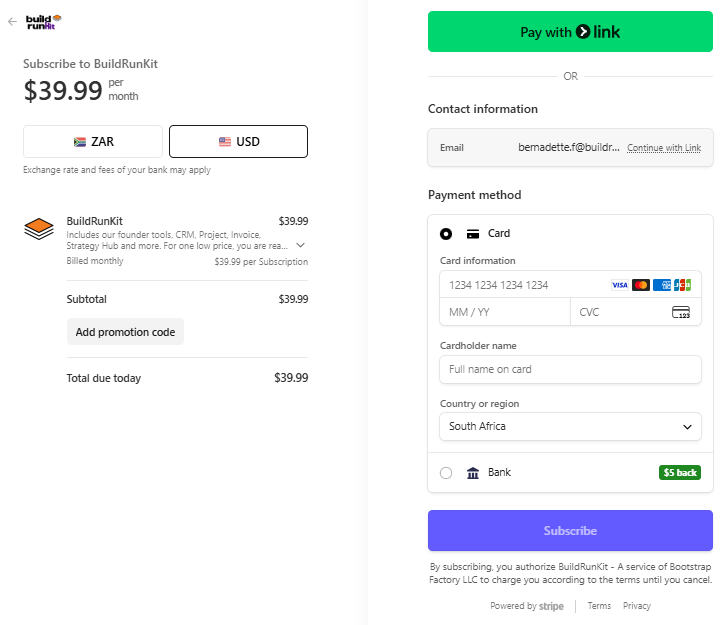
The Checkout page is the final step for any plan change or add-on purchase:
Back to subscription: A link at the top left to return without purchasing.
Payment Method: Confirms the card on file that will be charged for the transaction.
Order Summary: Displays the Subtotal, Tax, and the final Total Amount Due.
Action: Click the brown Pay & Subscribe button to finalize the order and update your workspace limits.
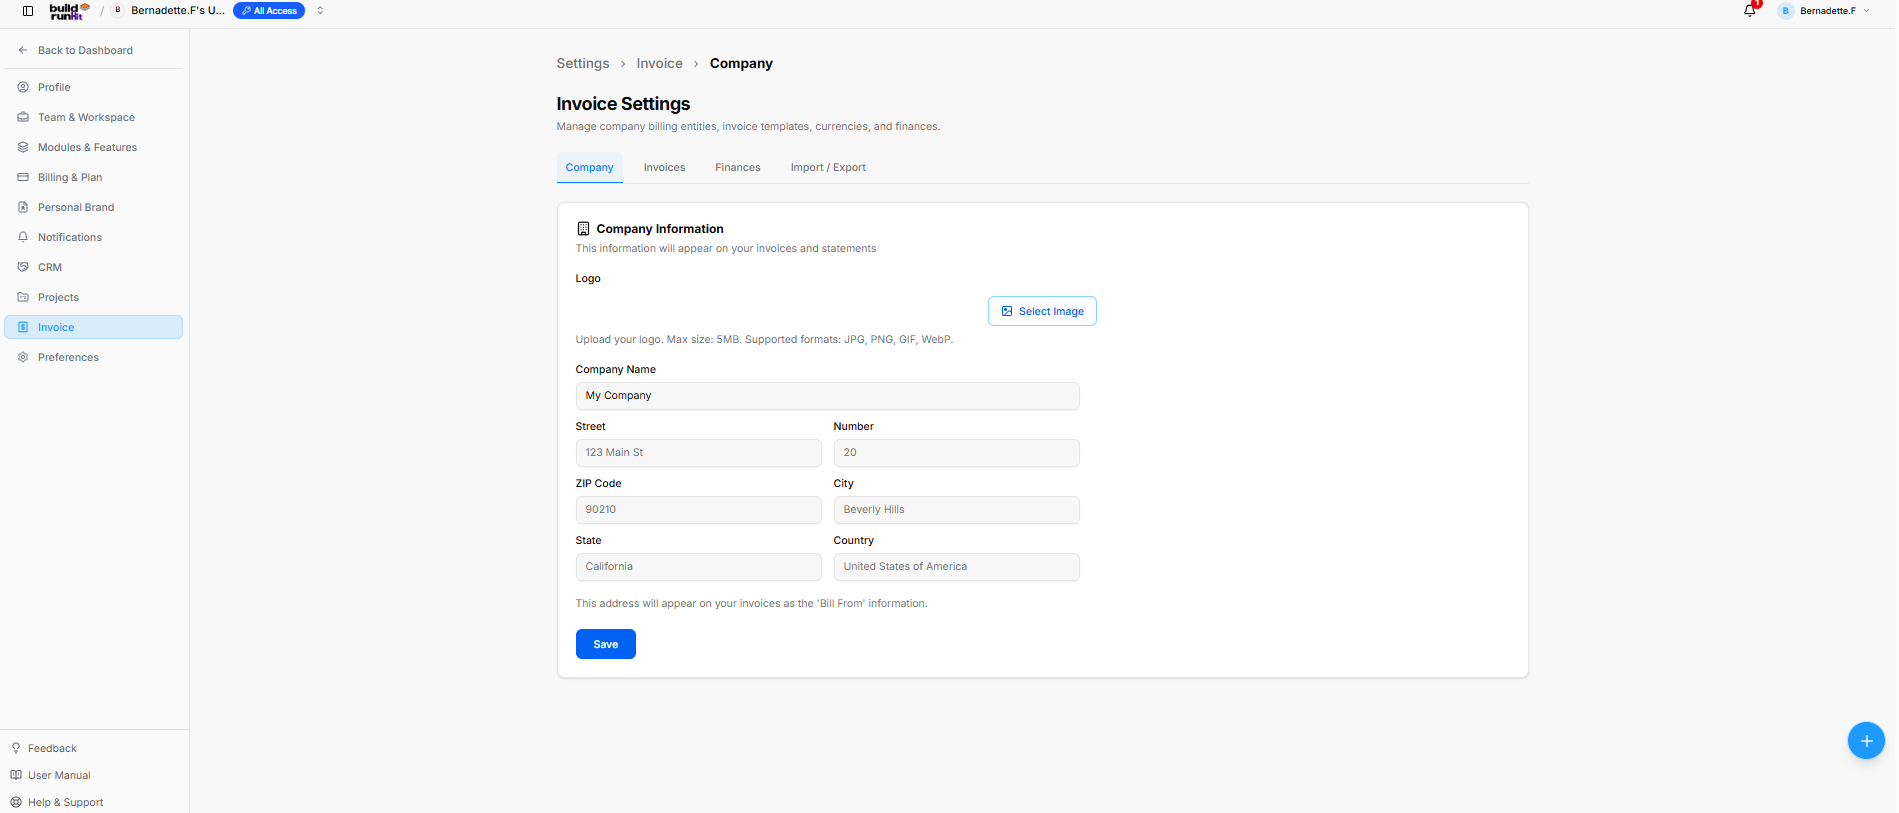
Company Information
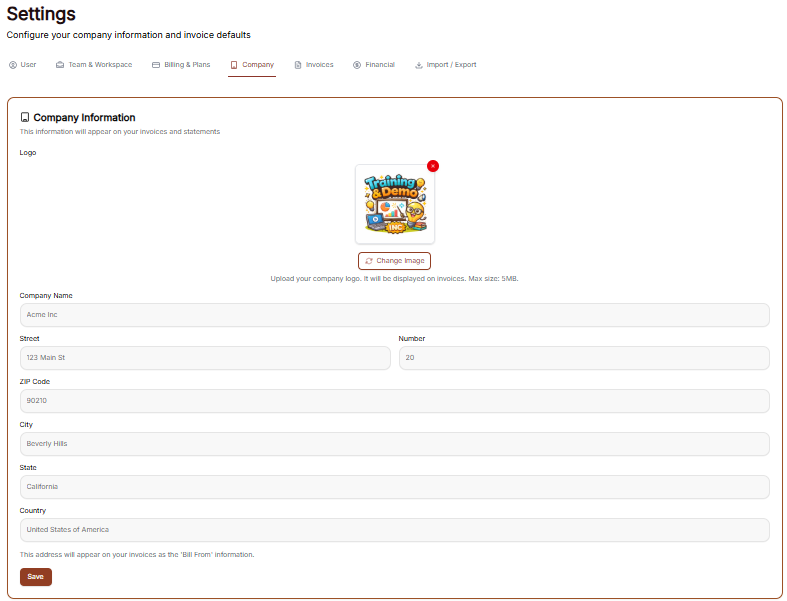
This information will appear on your invoices and statements.
Logo: Displays your current business logo image.
Click the Change Image button to upload a new logo (Max size: 5MB).
ClickJPG, thePNG, redGIF, X icon to remove the current logo.WebP.
Company Name:Name: A textText field to enterdefine yourthe businessbilling name.entity name (e.g., My Company).
Street:Street: AText textinput fieldfor tothe enter yourprimary street address.address (e.g., 123 Main St).
Number:Number: AText textinput field to enter yourfor building or unit number.
ZIP Code: A text field to enter your postal code.
City: A text field to enter your city.
State: A text field to enter your state.
Country: A text field to enter your country.
This address will appear on your invoices as the 'Bill From' information.
Save: Click the brown button at the bottom left to save your updates.
Invoices Settings
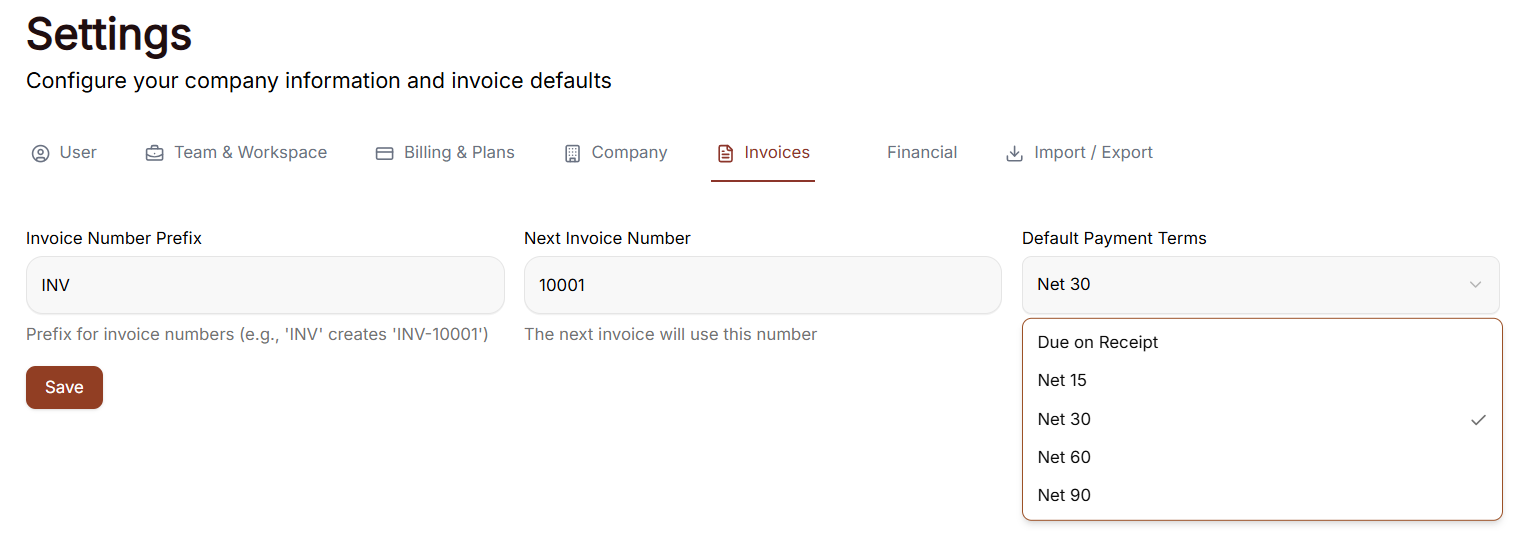
The Invoices tab in your settings allows you to configure the numbering and default terms for your billing documents.
Invoicing Preferences
Invoice Number Prefix: Enter the text that will appear before every invoicesuite number (e.g., "INV"20). The system notes that a prefix like 'INV' will create a number like 'INV-10001'.
NextZIP InvoiceCode: Number:Text Displaysinput thefor numericalpostal valuerouting that(e.g., will be assigned to your very next invoice.90210).
DefaultCity: PaymentText Terms: Select the standard deadlineinput for paymentsmunicipality from(e.g., theBeverly dropdown menu. Options include:
Due on ReceiptHills).
NetState: 15Text input for region/state (e.g., California).
NetCountry: 30Text input for billing country (currentlye.g., selected)United States of America).
Header & Action Buttons
Save: Primary blue button to confirm and save updated company settings.
BuildRunKit Invoices: Settings (Invoices Tab)
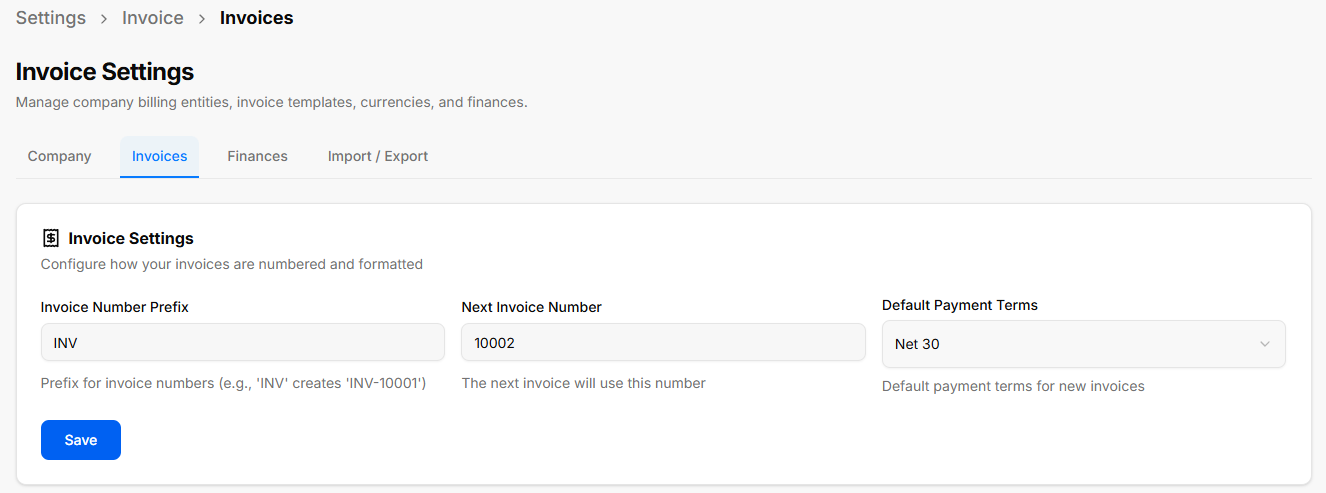
The Invoices tab allows configuration of automatic invoice numbering conventions and default billing terms.
Invoice Settings Card
This section controls how newly generated invoices are numbered and formatted:
Invoice Number Prefix: Text field to set the standard prefix for invoice identifiers (e.g., INV creates INV-10001).
NetNext 60Invoice Number: Text input field setting the starting sequential integer for the upcoming invoice (e.g., 10002).
NetDefault 90
Save: Click the brown Save buttonselector to apply any changes made to these fields.
Financial
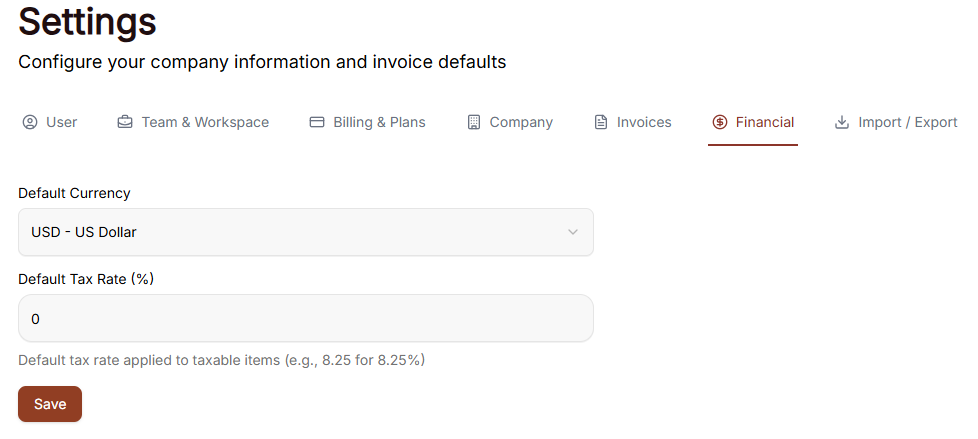
The Financial settings tab allows you to configure yourset baseline currencypayment anddue tax rulesdates for all billing operations.
Default Currency: A dropdown menu to select the primary currency used for generatingnew invoices (e.g., Net 30).
Header & Action Buttons
Save: Primary blue button to confirm and apply updated invoice formatting rules.
BuildRunKit Invoices: Settings (Finances Tab)
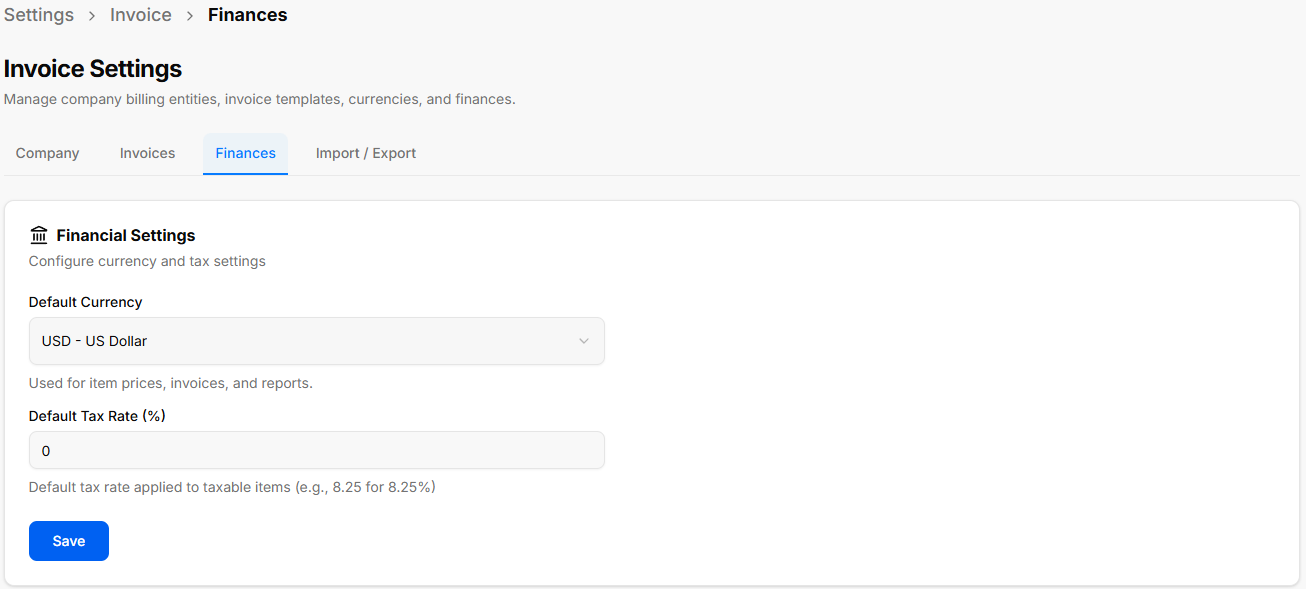
The Finances tab allows configuration of monetary parameters and tax calculations applied across line items and reports.
Financial Settings Card
This section controls default currencies and tax rates:
Default Currency: Dropdown menu used to set the baseline currency for item prices, invoice totals, and financial reporting (currently showing USD - US Dollar)Dollar).
Default Tax Rate (%): ANumeric textinput field to enterspecify the standard taxdefault percentage applied automatically to taxable line items.
Note: Enter the numeric value directly without the percentage signitems (e.g., 0, or 8.25 for 8.25%).
Header
&Action Buttons
-
Save:Save:ClickPrimary blue button to confirm and update financial preferences.
BuildRunKit Invoices: Settings (Import / Export Tab)
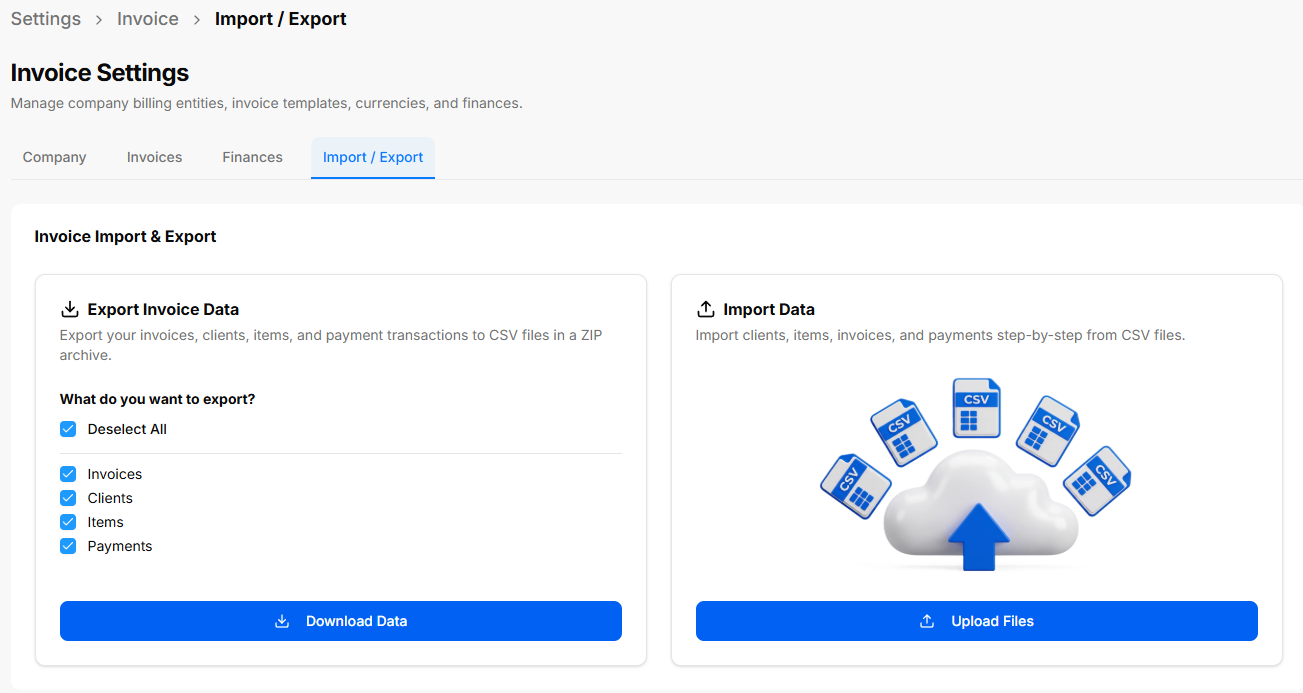
The Import / Export tab provides data portability tools for downloading system backups or bulk-importing entity records using structured CSV files.
Export Invoice Data Card
Allows batch downloading of module records into a single compressed ZIP file containing CSVs:
Selection Checkboxes:
Select All / Deselect All: Global toggle for all dataset selections.
Invoices: Includes invoice records and line items.
Clients: Includes customer directory profiles.
Items: Includes saved line-item catalog products/services.
Payments: Includes logged transaction records.
Download Data: Primary blue button to execute the brownZIP export.
Import Data Card & Import Assistant
Provides guided step-by-step importing of system records via CSV files:
Upload Files Button: Opens the Import Assistant modal overlay.
Import Assistant Modal
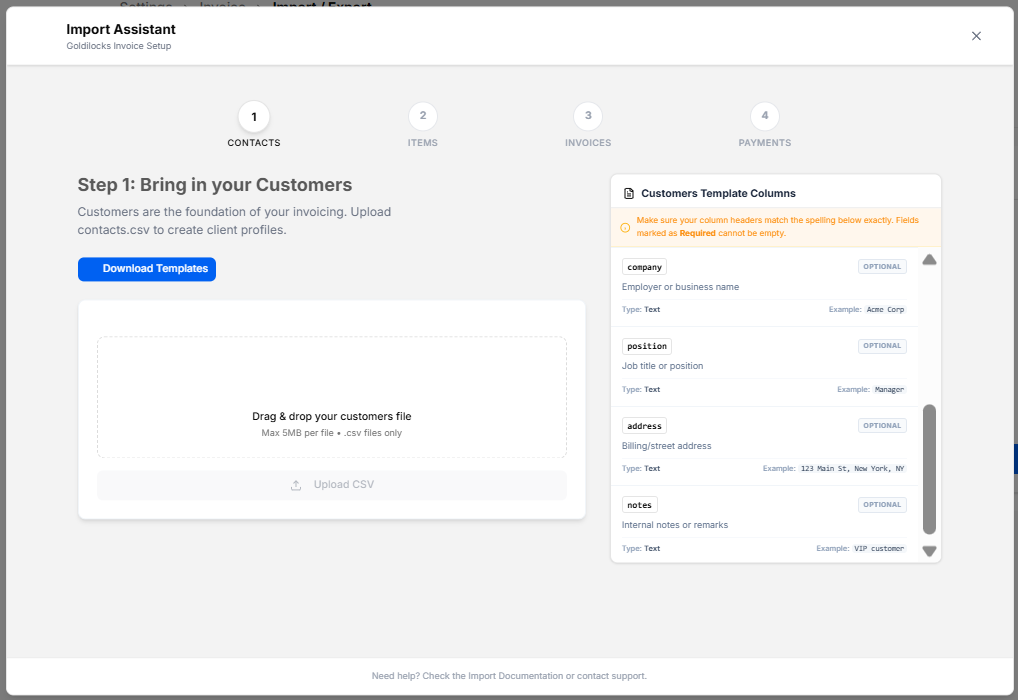
4-Step Wizard Steps:
CONTACTS (Current active step: Step 1: Bring in your Customers).
ITEMS.
INVOICES.
PAYMENTS.
Download Templates: Action button atto download formatted CSV template files.
File Drag & Drop Area: Upload box supporting .csv files up to 5MB (Upload CSV button).
Customers Template Columns Reference Panel: Displays required column header formatting rules and data types:
company: Optional text (Example: Acme Corp).
position: Optional text (Example: Manager).
address: Optional text (Example: 123 Main St, New York, NY).
notes: Optional text (Example: VIP customer).
Close (x): Discards import progress and returns to the bottomSettings left to finalize and apply your default financial configurations.screen.