
BuildRunKit CRM: Settings Dashboard Overview
UserBuildRunKit Profile &CRM: Settings Dashboard Overview
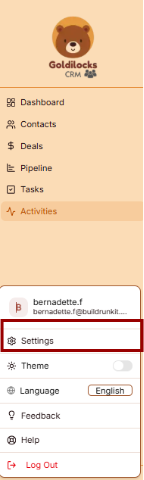
Managing Personal Information
Under the User Settings tab, you can view and update your primary account details:
-
ProfileBrandDetails:Logo:ThisBuildRunKitsection allows you to manage your identity. You can enter and update your First Name, Last Name, Email, and Phone numberlogo inthetop-leftprovided text fields.corner. -
Bio:WorkspaceUseSelector:theDropdownlargershowingtextcurrentareaworkspaceto(Bernadette.F'saddWorkspace)awithbriefaccessprofessionaltiersummarybadgeor(Alldescription to your profile.Access). -
SaveTopChanges:RightClickActions:theNotificationbrownbellSaveiconChangesandbuttonuseratprofilethedropdownbottommenuright to finalize any updates to your personal information.(Bernadette.F).
Account Security
You can manage your account access and protection through the Security menu:Sidebar
-
PasswordBackManagement:Control:Update<-your login credentialsBack tokeepDashboardyour account secure.
Notifications: Configure how and when you receive system alerts and updates.
Interface Preferences
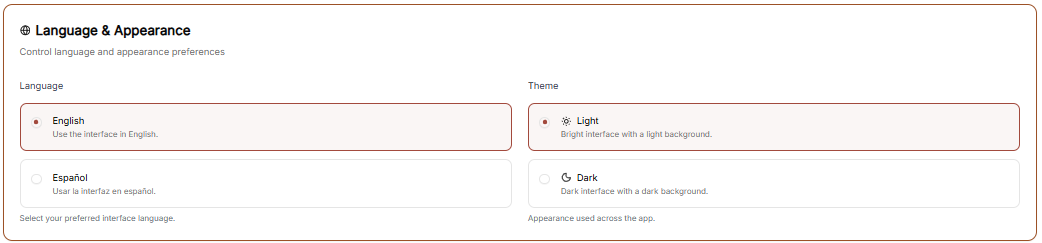
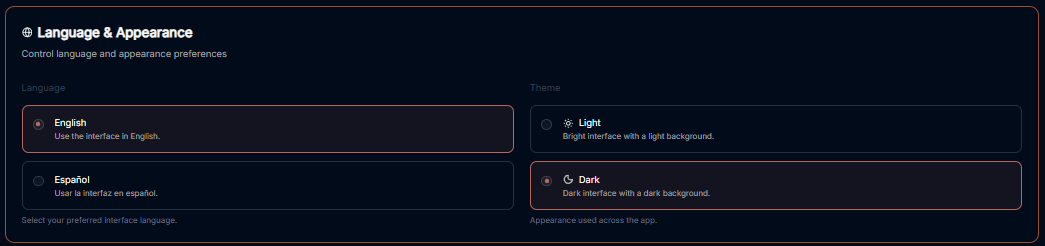
You can customize the look of your workspace through the Appearance menubutton to match your working environment.
Theme Selection Adjust the visual style of the application:
Light: A bright interface with a light-colored background.
Dark: A high-contrast interface with a dark background, ideal for low-light environments.
System: Automatically syncs the interface theme with your device's operating systemexit settings.
UpdateAccount Theme:Settings Click the brown Update Theme button to apply your chosen visual style.
Workspace Management
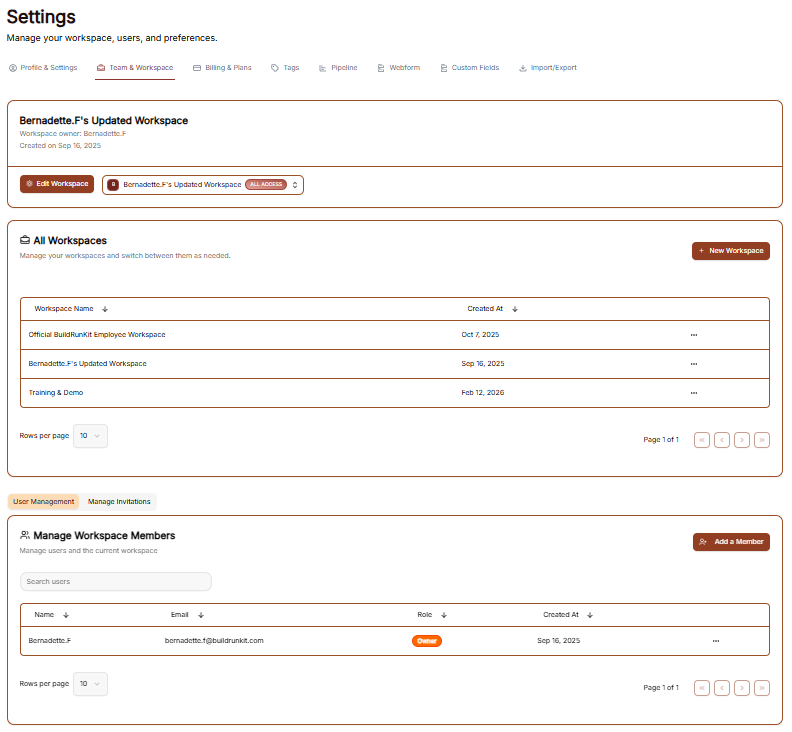
The Workspace settings allow you to control the environments you belong to, manage your team, and update workspace identities.
All Workspaces
This tab provides an overview of every workspace your account is currently associated with.Links:
-
Status & Plans: You can see the name of each workspace and its current subscription plan (e.g., "Custom" or "Enterprise").Profile -
LeavingTeama&Workspace:WorkspaceBy
Modules three& dotsFeatures
Billing to& aPlan
Personal selectBrand
Notifications
Edit
Workspace
ThisModule isSettings where you manage the primary identity of your current business environment.Links:
-
ChangingCRMthe(CurrentlyName: Use the Edit Workspace section to update the display name of the workspace.Active) -
SaveProjectsChanges:
Invoice
Preferences
Manage
ControlBottom whoSidebar has access to your workspace in this section.Links:
-
Member List: View all users, their email addresses, and their assigned roles (e.g., Owner).Feedback -
InviteUserMembers: Click the + Invite member button at the top right to add a new person to the team via email.Manual -
Removing Users: To revoke access, click the three dots (actions menu) next to a member's name and select Remove user.
SubscriptionHelp & Billing
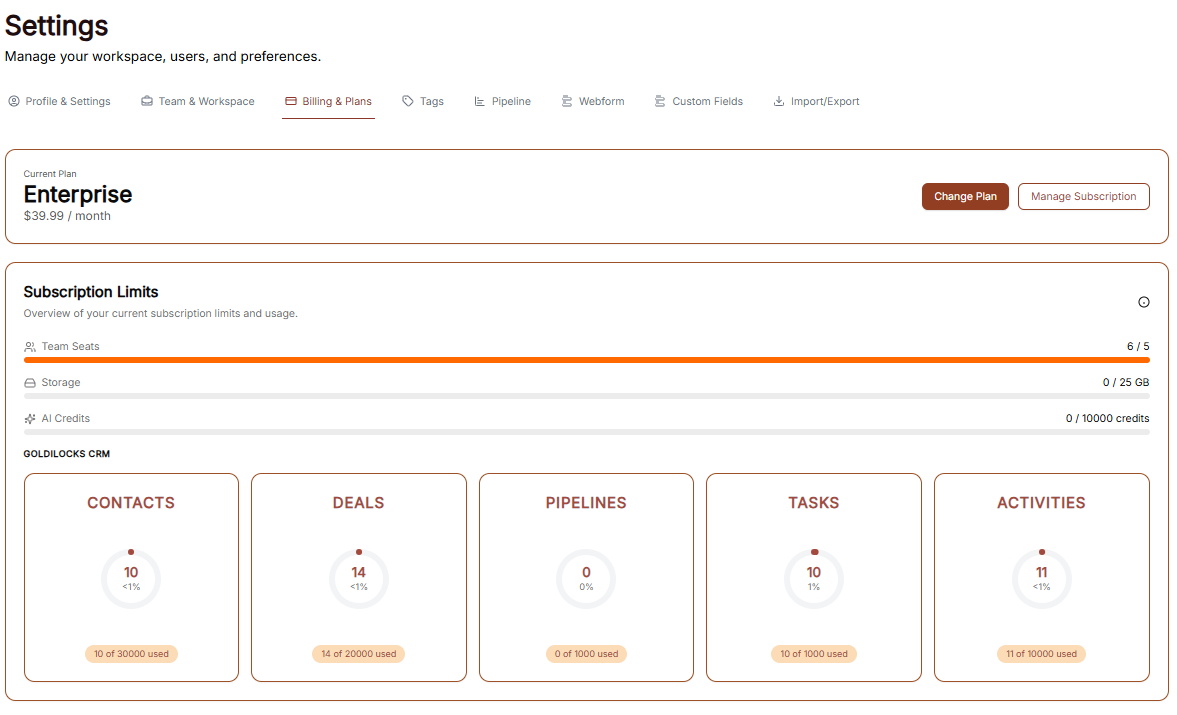
The Subscription area is your hub for managing plan access, tracking workspace limits, and handling payments.
Subscription Overview
This tab provides a high-level view of your current standing:
Active Plan: Displays the name of your current plan (e.g., "Custom").
Cost Details: Shows the recurring price and billing frequency (e.g., "$0.00 / Monthly").
Usage Trackers: Three progress bars track your real-time usage for Invoices, Customers, and Items against your plan’s total capacity.
Management Buttons: * Change Plan: Opens the tier selection menu.
Cancel Subscription: Initiates the process to stop recurring payments.Support
Changing
CRM YourSettings PlanHeader
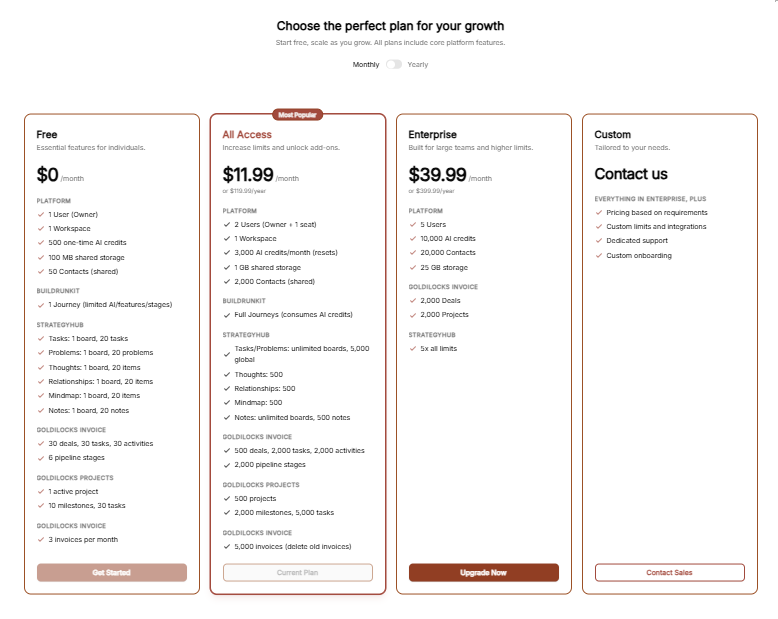
ClickingLocation Change Plan reveals the available subscription tiers:Tracking
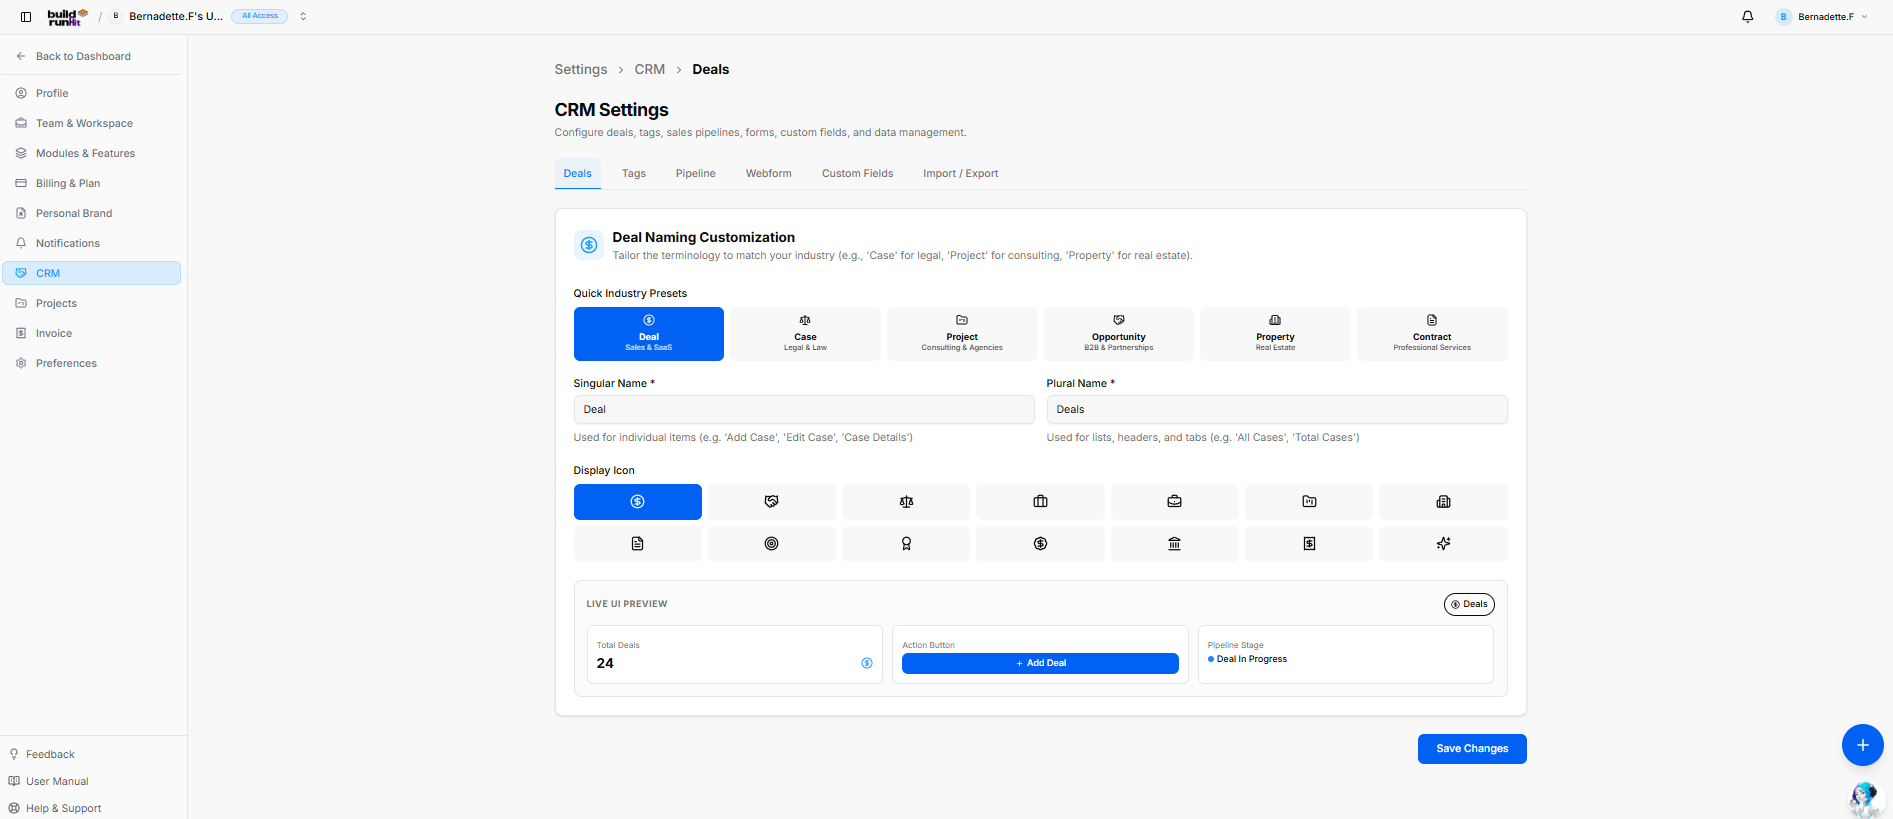
Deals (Active Tab)
Action:Tags
Pipeline
Webform
Custom Fields
Import / Export
Deals Tab Configuration Controls
Section Title: Deal Naming Customization
Section Subtext: "Tailor the brownterminology Chooseto Planmatch your industry (e.g., 'Case' for legal, 'Project' for consulting, 'Property' for real estate)."
Quick Industry Presets:
Deal (Sales & SaaS) — Selected
Case (Legal & Law)
Project (Consulting & Agencies)
Opportunity (B2B & Partnerships)
Property (Real Estate)
Contract (Professional Services)
Singular Name *: Input text field showing Deal (Helper text: Used for individual items (e.g. 'Add Case', 'Edit Case', 'Case Details')).
Plural Name *: Input text field showing Deals (Helper text: Used for lists, headers, and tabs (e.g. 'All Cases', 'Total Cases')).
Display Icon: 14 selectable icon choices to represent deals across the UI (Dollar symbol currently selected).
Live UI Preview Panel
Preview Tab Badge: Shows top right button underpreview your(Deals).
Total Deals Metric Card: Preview showing 24 with dollar icon.
Action Button Preview: Shows blue + Add Deal primary button.
Pipeline Stage Preview: Shows stage badge with status dot (Deal In Progress).
Save Changes: Primary action button in the bottom right of the panel to proceed.apply configuration.
Floating Action Button: Blue + button in bottom-right corner.
Support Widget: AI assistant icon in bottom-right corner.
Add-onsBuildRunKit CRM: CRM Settings - Tags Tab
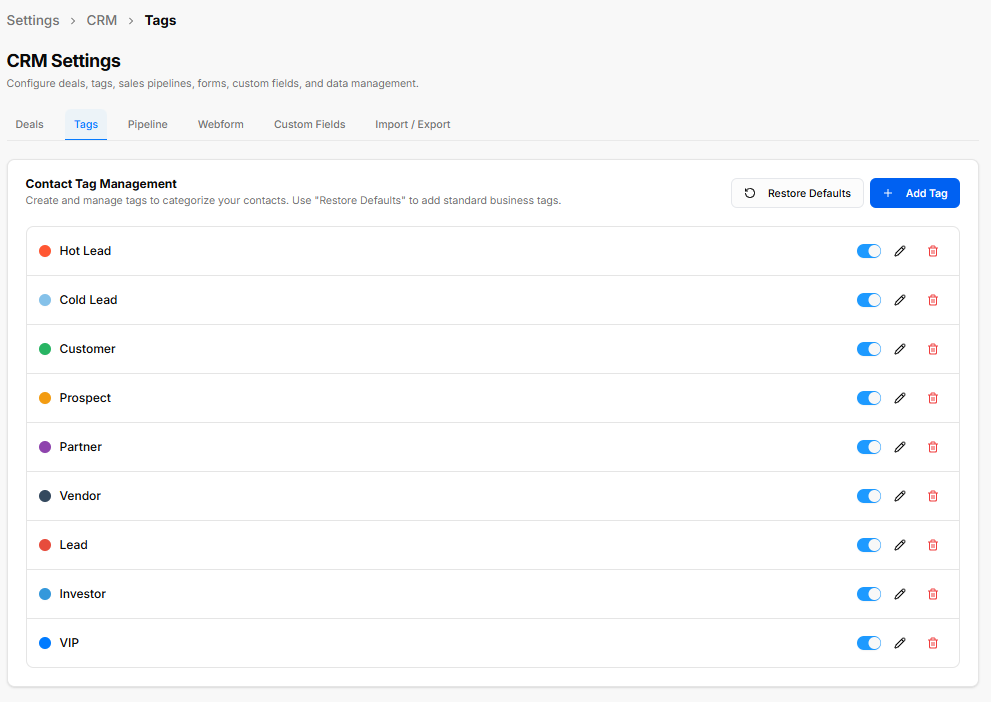
TheLocation Add-ons& tab allows for modular upgrades without changing your full plan:Header
Active Tab: Tags
Checkout
Contact ProcessTag
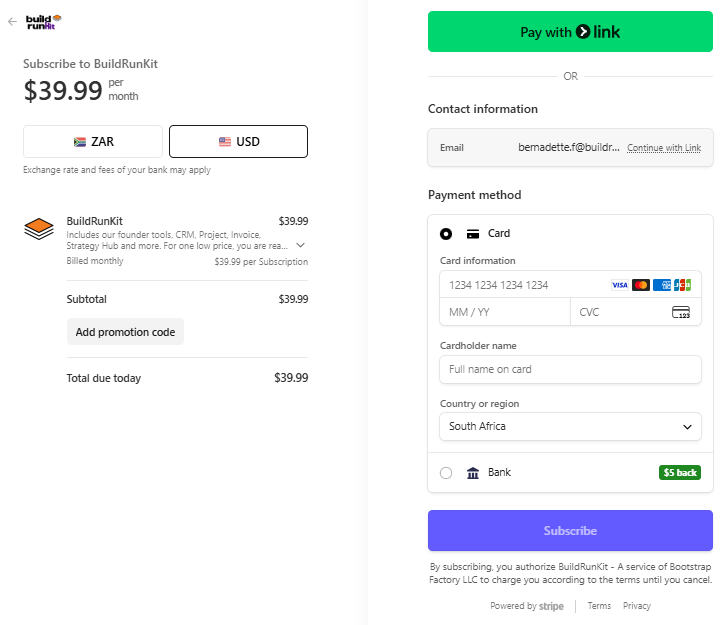
The Checkout page is the final step for any plan change or add-on purchase:Section
-
BackSectiontoHeader:subscription:ContactATaglink at the top left to return without purchasing.Management -
PaymentSectionMethod:Description:Confirms"Createtheandcardmanageontagsfiletothatcategorizewillyourbecontacts.chargedUsefor'RestoretheDefaults'transaction.to add standard business tags." -
OrderHeaderSummary:Actions:Displaysthe -
Subtotal,Restore
Tax,Defaults:andButtonthetofinalresetTotalorAmountpopulateDue.default system tags. -
Action: Click the brown Pay & Subscribe button to finalize the order and update your workspace limits.
Tags Settings
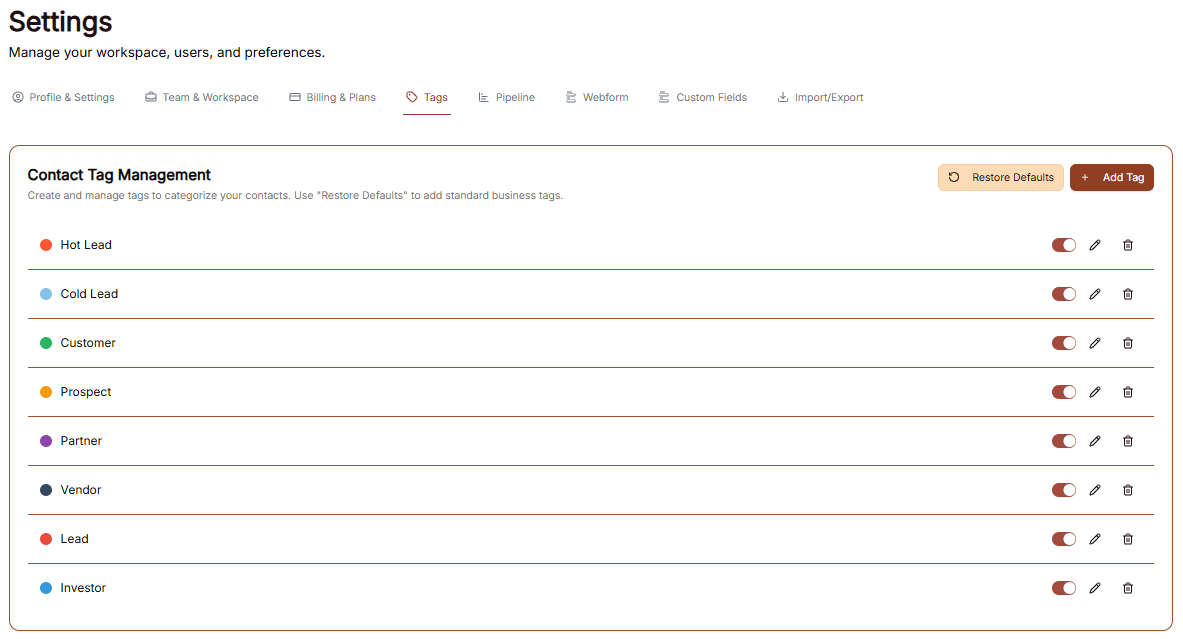
The Settings area includes a dedicated section for managing your contact categorization through the Tags menu. This allows you to label and organize your contacts based on their relationship to your business.
Contact Tag Management
Existing Tags: View your current list of tags, such as Hot Lead, Cold Lead, Customer, Prospect, Partner, Vendor, Lead, and Investor.
Toggle Status: Use the toggle switch next to each tag to quickly enable or disable it within your workspace.
Edit Tag: Click the pencil icon to rename a tag or change its associated color for better visual organization.
Delete Tag: Click the trash can icon to permanently remove a tag from your system.
Customizing Your Tags
You can further tailor your labeling system using the management buttons at the top right of the list:
Add Tag: Click the brown + Add Tag: Primary button to create a brand-new contact category specifictag.
Default Tag List & Row Controls Each tag item displays a custom color badge, label name, and individual management toggles/actions:
Hot Lead (Red Dot)
RestoreCold Defaults:Lead Use(Light thisBlue buttonDot)
Customer a(Green standardDot)
Prospect tags(Orange toDot)
Partner you(Purple needDot)
Vendor point.(Dark Navy Dot)
Lead (Red Dot)
Investor (Medium Blue Dot)
VIP (Bright Blue Dot)
Pipeline
Row SettingsAction
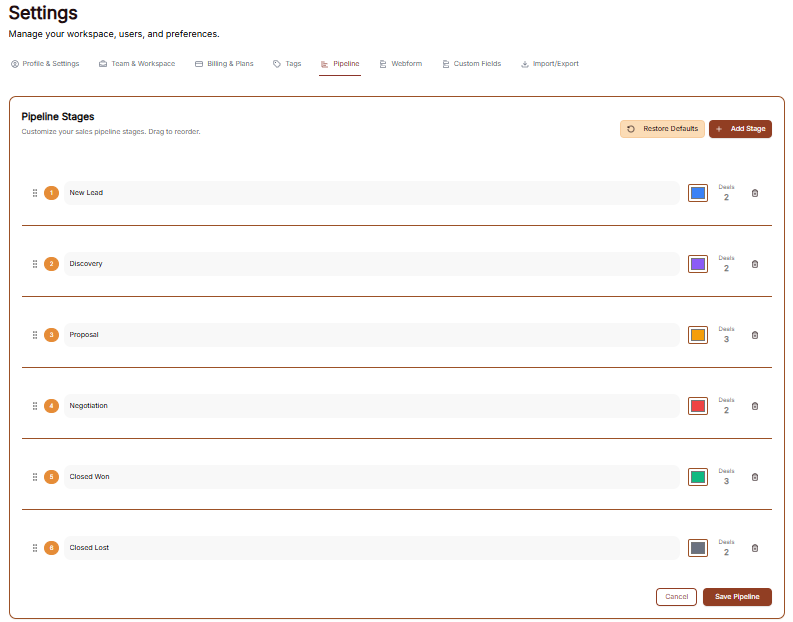
The(Right Pipeline section in Settings allows you to customize the stages of your sales process to match your specific workflow.
Managing Pipeline Stages
In the Pipeline Stages tab, you can define the progression of your deals from initial contact to completion:Side)
-
CurrentActiveStages:ToggleViewSwitch:yourEnablesactiveorpipelinedisablesstages,thesuchtagasforNewcontactLead,categorizationDiscovery,acrossProposal,theNegotiation, Closed Won, and Closed Lost.CRM. -
ReorderPencilStages:Icon:UseEdits thedrag-and-droptaghandlename(sixordots)assignedoncolor badge.
Trash Bin Icon: Deletes the lefttag ofentry eachfrom the system.
BuildRunKit CRM: CRM Settings - Pipeline Tab
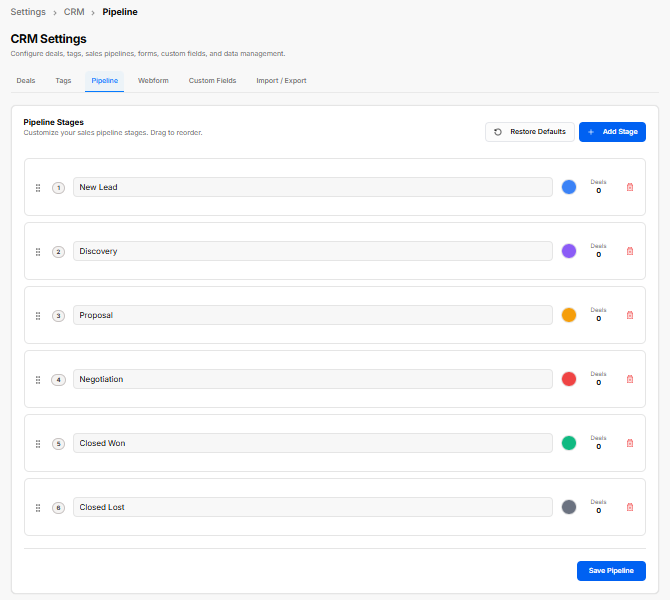
Location & Header
Breadcrumb Trail (Traction Navigation Path): Settings > CRM > Pipeline
Page Heading: CRM Settings
Sub-description: "Configure deals, tags, sales pipelines, forms, custom fields, and data management."
Active Tab: Pipeline
Pipeline Stages Section
Section Header: Pipeline Stages
Section Description: "Customize your sales pipeline stages. Drag to reorder."
Header Actions:
Restore Defaults: Button to reset stage order, names, and color coding to default presets.
+ Add Stage: Primary button to append a new stage to change the order of your sales process.
StageConfigured Colors:Stages & Controls Each stage isrow associatedincludes withdrag-and-drop ahandles, specificsequence colornumbering, fortext easycustomization, visualstatus identificationcolors, indeal thecounters, mainand Pipelinedelete view.actions:
Stage 1: New Lead (Blue Circle Dot | Deals Count: 0)
DealStage 2: Discovery (Purple Circle Dot | Deals Count: Monitor0)
Stage 3: Proposal (Orange Circle Dot | Deals Count: 0)
Stage 4: Negotiation (Red Circle Dot | Deals Count: 0)
Stage 5: Closed Won (Green Circle Dot | Deals Count: 0)
Stage 6: Closed Lost (Grey Circle Dot | Deals Count: 0)
Row Control Elements
Drag Handle (::): Reorders the stage position in the Kanban sequence.
Sequence Badge: Displays the numerical step order (1 through 6).
Stage Name Field: Editable text box to update stage titles.
Color Picker Circle: Assigns custom badge colors for Kanban board identification.
Deals Counter: Tracks the number of open deals are currently assignedsitting toin each specificthat stage.
DeleteTrash Stage:Bin ClickIcon: Removes the trash can icon to remove aselected stage that is no longer needed in your process.row.
Customizing Your Workflow
You can modify the structure of your sales pipeline using the primary management tools:Actions
-
AddSaveStage:Pipeline:ClickPrimarythe brown + Add Stageaction buttonat the top right to create a new step in your sales cycle.
Restore Defaults: Use this button to reset your pipeline to a standard set of business stages.
Save Pipeline: Once you have finished making adjustments, click the brown Save Pipeline buttonlocated at the bottom right to apply yourall changes.pipeline structural changes across the CRM.
BuildRunKit CRM: CRM Settings - Webform
Tab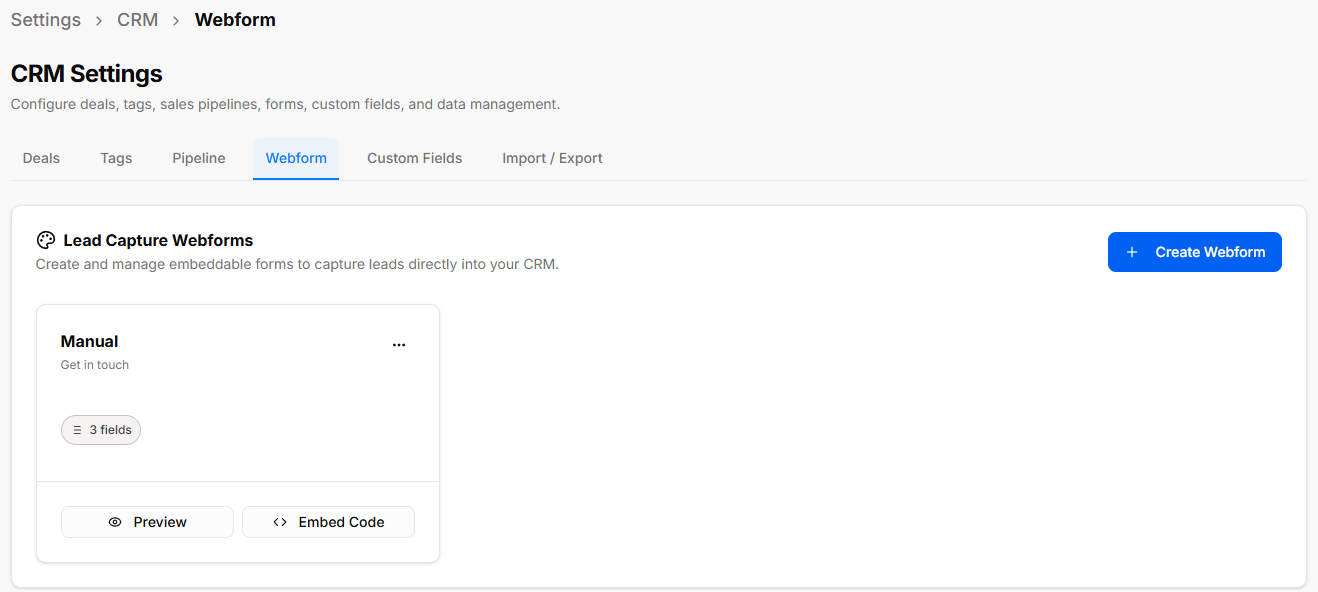
TheLocation & Header
Breadcrumb Trail (Traction Navigation Path): Settings > CRM > Webform
Page Heading: CRM Settings
Sub-description: create"Configure deals, tags, sales pipelines, forms, custom fields, and data management."
Active Tab: Webform
Lead Capture Webforms Section
Section Header: Lead Capture Webforms
Section Description: "Create and manage custom contactembeddable forms to embedcapture onleads directly into your website, streamlining how you capture new leads.CRM."
Managing
InHeader the main Webforms tab, you can oversee your collection of active forms:Actions:
-
Create Webform: Click the brown+ Create Webform: Primary button tostartopenbuildingthe webform creation wizard.
Configured Webform Cards Saved lead capture forms display as individual summary cards with the following details and controls:
Form Title & Subheading: Displays the internal form name (e.g., Manual) and the public heading (e.g., Get in touch).
Card Action Menu (...): Context menu containing options to Edit Webform or Delete.
Field Counter Badge: Displays the total number of configured input fields (e.g., 3 fields).
Card Quick Actions:
Preview: Launches a newmodal showing the live public layout of the form.
FormEmbed List:Code: ViewGenerates allcode existingsnippets formsfor andwebsite their current status within your workspace.embedding.
Creating
Basic Information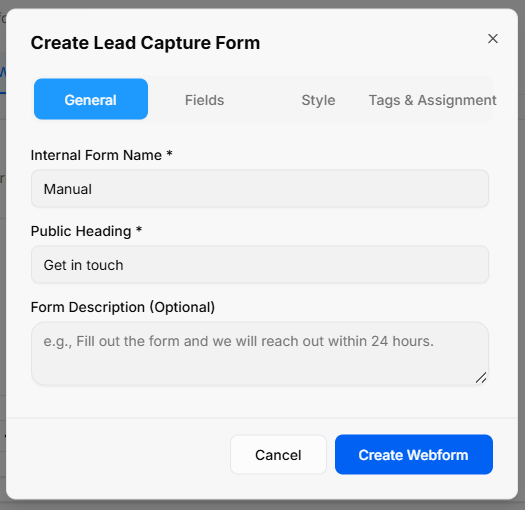
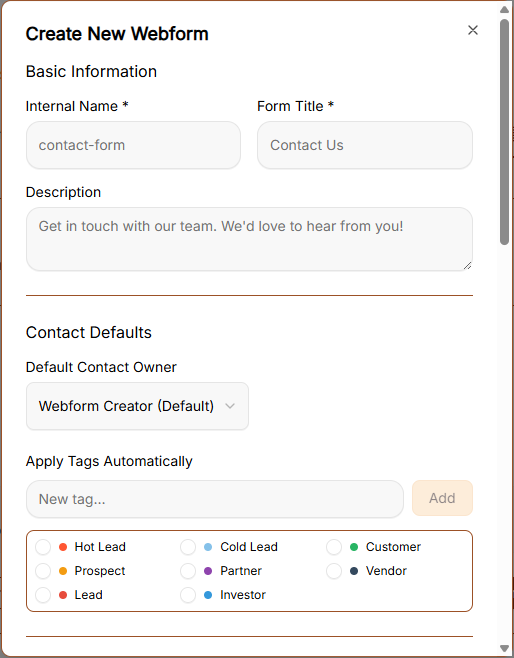
Clicking + Create Webform (or selecting Edit Webform) opens the multi-tab setup modal:
1. General Tab
-
Internal
Name:FormInputNamea*:uniqueRequiredidentifiertext field for internaltrackingworkspace identification (e.g.,"contact-form"Manual). -
FormPublicTitle:HeadingDefine*: Required text field for thepublic-facingmain title displayedattothewebsitetop of your formvisitors (e.g.,"ContactGetUs"in touch). -
Description:FormProvideDescriptiona(Optional):briefMulti-linepublictextmessage or instructionsfield foryourvisitorvisitorsinstructions (e.g.,"GetFillinouttouchthewithformourandteam.weWe'dwilllovereachtoouthearwithinfrom24you!"hours.).
Contact2. DefaultsFields & AutomationTab
-
DefaultActive Form Fields: Managed list of fields currently enabled on the form (e.g., First Name, Last Name, Email).
Available Contact Owner (Auto-Assignment)Fields: UseSystem thefields dropdownthat menucan tobe assignindividually atoggled defaulton teamor member responsible for new leads generated through this form.off:
-
SystemFirstBehavior:NameNew
Last routedName
Email Address
Phone Number
Company
Address
Job Title
Message
3. Style Tab
Background Color: Color picker to set the main container background.
Text Color: Color picker to set the typography shade.
Submit Button Text: Custom text field for the call-to-action button (e.g., Submit, Send Message).
Button Background Color: Color picker to set the primary button color.
Button Text Color: Color picker to adjust text contrast inside the submit button.
Automatic Lead Processing: Automatically assigns tags and team owners upon submission.
Associate Contact Tags: Multi-select choices using active global tags (Hot Lead, Cold Lead, Customer, Prospect, Partner, Vendor, Lead, Investor, VIP).
Create Tag Action: Inline shortcut button to create a new category tag directly from this tab.
Default Lead Owner: Dropdown selector to automatically assign newly captured leads to thisa person.designated Ifteam anmember.
Wizard Modal Actions
Cancel: Discards changes and exits the form,modal.
Create remainsWebform unchanged/ Save Changes: Saves the setup and generates/updates the lead capture form.
BuildRunKit CRM: CRM Settings - Custom Fields Tab
Location & Header
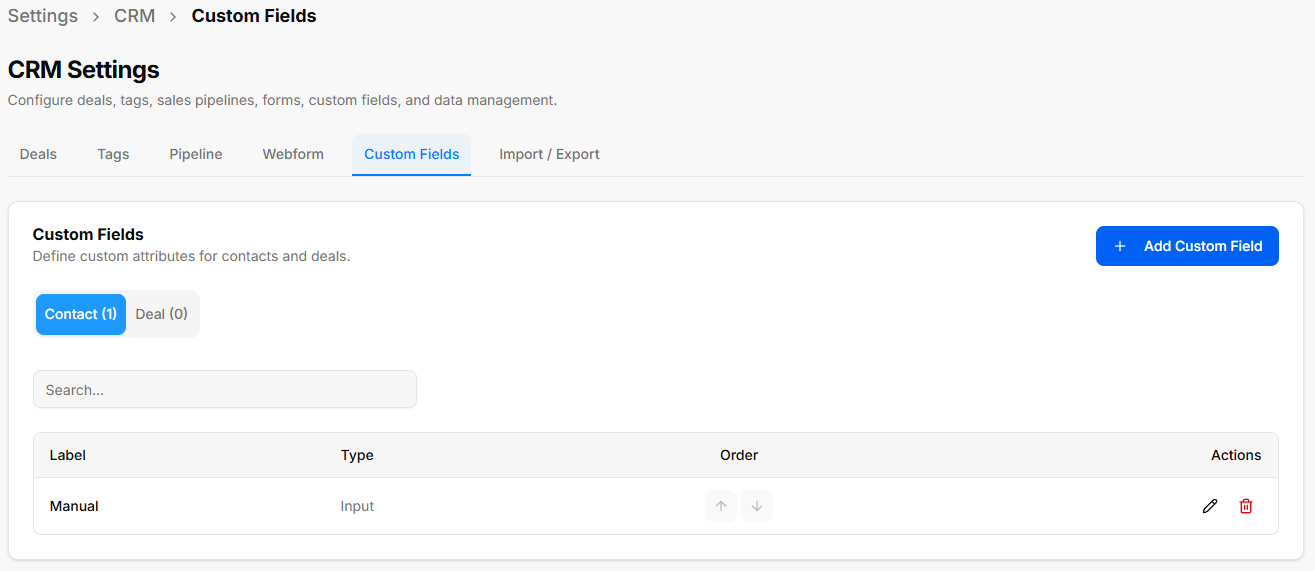
Breadcrumb Trail (Traction Navigation Path): Settings > CRM > Custom Fields
Page Heading: CRM Settings
Sub-description: "Configure deals, tags, sales pipelines, forms, custom fields, and data management."
Active Tab: Custom Fields
Custom Fields Management Section
Section Header: Custom Fields
Section Description: "Define custom attributes for contacts and deals."
Header Actions:
+ Add Custom Field: Primary button to preventopen workflowthe disruptions.field creation modal.
ApplyModule TagsScope AutomaticallySwitches:
Contact (Auto-Tagging)Count): Select tagsSwitch to applyview automaticallyand manage attributes applied to contactsclient uponcontact submission.records Options(e.g., includeContact ).Hot(1)
Deal Customer,(Count): Prospect,Switch Partner,to Vendor, Lead, Investor,view and VIP.manage attributes applied to sales opportunities (e.g., Deal (0)).
Search Field: Text input (Search...) to quickly filter created fields by label.
Custom Fields Data Table
Label: Display title of the field (e.g., Manual).
Type: Input format assigned to the field (e.g., Input).
Order: Up/Down arrow buttons (↑ ↓) to reorder field positioning on record forms.
Actions:
Pencil Icon: Edits existing field label, placeholder, or options.
Trash Bin Icon: Deletes the custom field attribute.
Add / Edit Custom Field Modal
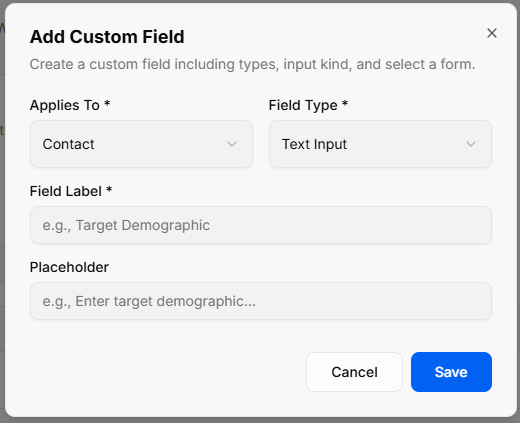
Clicking + Add Custom Field opens a modal to configure tailored data fields:
Modal Header: Add Custom Field
Modal Description: "Create a custom field including types, input kind, and select a form."
Applies To *: Dropdown selector to choose the target record type (Contact or Deal).
Field Type *: Dropdown selector to define input behavior:
-
SystemTextBehavior:InputIf
Long Text
Number
Date Picker
Dropdown Select
Checkbox
Switch
Radio Group
Color
Field Label *: Required text field for the contactvisible alreadyfield existstitle in(e.g., yourTarget database,Demographic).
Placeholder: Text field for prompt text inside empty inputs (e.g., Enter target demographic...).
Modal Actions:
Cancel: Discards changes and closes modal.
Save: Stores and deploys the custom field across selected records.
BuildRunKit CRM: CRM Settings - Import / Export Tab
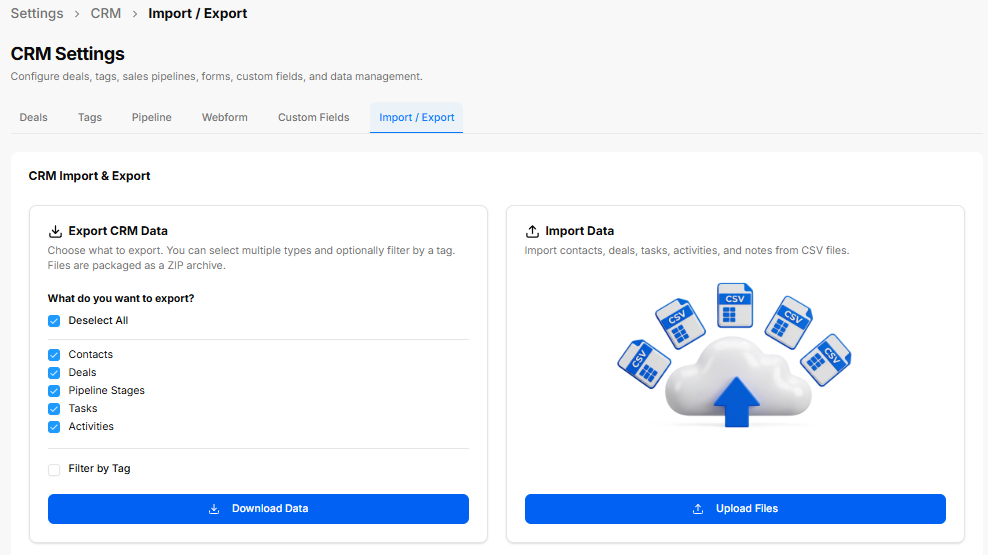
Location & Header
Breadcrumb Trail (Traction Navigation Path): Settings > CRM > Import / Export
Page Heading: CRM Settings
Sub-description: "Configure deals, tags, sales pipelines, forms, custom fields, and data management."
Active Tab: Import / Export
CRM Import & Export Dashboard
The dashboard provides side-by-side modules for exporting system backups and importing bulk data:
Export CRM Data Panel:
Description: "Choose what to export. You can select multiple types and optionally filter by a tag. Files are appendedpackaged withoutas deletinga anyZIP ofarchive."
Select All / Deselect All Toggle: Master checkbox to select or deselect all record categories.
Export Categories Checkboxes: Selectable data sets (Contacts, Deals, Pipeline Stages, Tasks, Activities).
Filter by Tag Checkbox: Optional toggle to scope exports to specific contact tags.
Download Data Button: Primary action button to generate and export the compressed ZIP archive.
Import Data Panel:
Description: "Import contacts, deals, tasks, activities, and notes from CSV files."
Upload Files Button: Primary action button to open the step-by-step Import Assistant modal.
FormImport FieldsAssistant Wizard
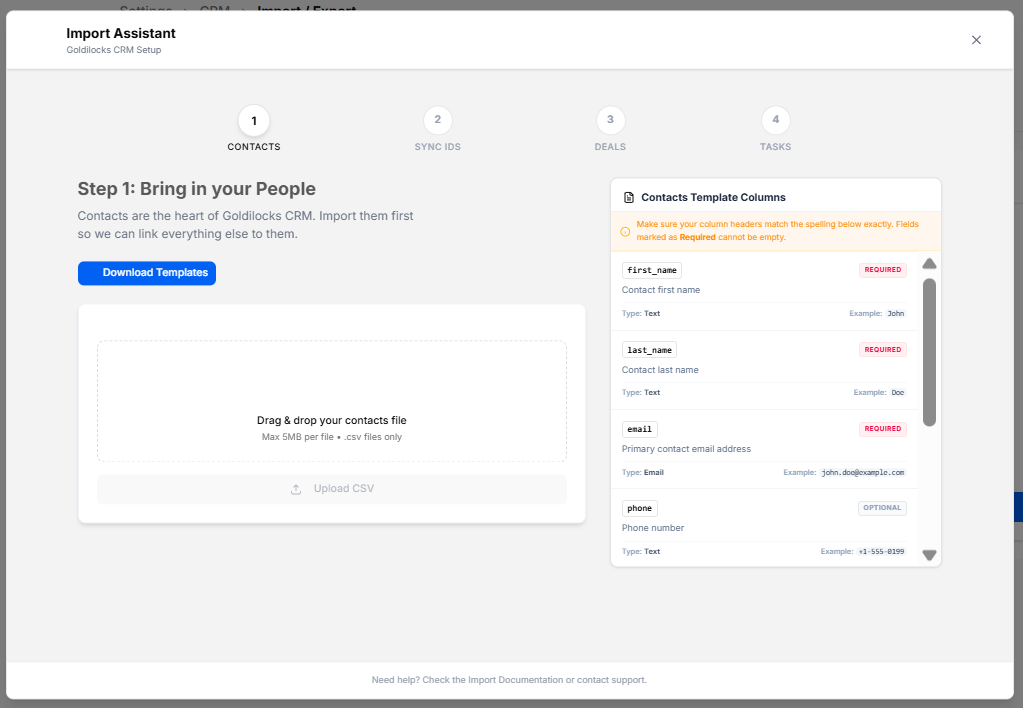
Clicking Upload Files launches the 4-step guided import tool:
Progress Indicator Steps
CONTACTS (Currently Active)
SYNC IDS
DEALS
TASKS
Step 1: Bring in your People Panel
-
FieldHeadingAddition:&UseSubtext: "Step 1: Bring in your People — Contacts are theAdd field dropdown menu at the top rightheart oftheGoldilockssectionCRM. Import them first so we can link everything else tointroduce new data points.them." -
StandardDownloadFields:TemplatesArrangeButton:andDownloadsconfigurepre-formattedcoreCSVcontacttemplatefields,filesincludingtoFirstensureName,correctLastcolumnName, and Email Address.matching. -
FieldFileLabelsDrag &Placeholders:DropCustomizeZone:theTargetvisiblearealabelsupportingtextfileanduploadstheuptemporarytoplaceholder5MBhintperinside the boxfile (e.g.,.csv"[email protected]")files only). -
Requirements:UploadToggleCSVtheButton:RequiredPrimaryfield switchbutton todetermineselectifandaprocessfieldlocalmust.csvbe completed before submission. Mandatory fields display a red Required badge.
Removal: Click the trash can icon on any field block to delete it from the form layout.files.
StylingContacts &Template SubmissionColumns DetailsReference Sidebar A reference guide detailing exact column mapping requirements:
-
BackgroundNoticeColor:Callout:Define"Make sure your column headers match theprimaryspellingblockbelowcolorexactly.usingFieldshexmarkedcodesas(e.g.,Required#ffffff).cannot be empty." -
Field Schema List:
-
first_name(REQUIRED): Contact first name | Type: TextColor:|SetExample:the visual hex code for standard form labeling (e.g., #333333).John -
Button Text: Customize the text displayed inside the submission buttonlast_name(e.g.,REQUIRED):"Submit").Contact last name | Type: Text | Example: Doe -
Button Background: Select a hex code to brand the main button elementemail(e.g.,REQUIRED):#3b82f6).Primary contact email address | Type: Email | Example: [email protected] -
Buttonphone(OPTIONAL): Phone number | Type: TextColor:|SpecifyExample:the hex value for the text inside the submission button (e.g., #ffffff) to ensure proper visual contrast.
Live Preview: Review the interactive button component at the bottom of the panel to verify color combinations before deploying.
Finalizing Your Form
Cancel: Click Cancel to discard changes and close the form builder.
Create Webform: Click the brown Create Webform button to save your settings and activate the form.+1-555-0199
Custom
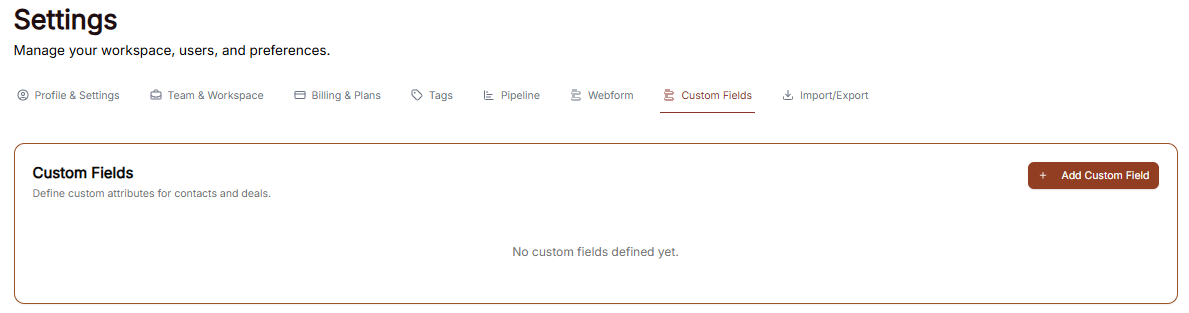
The Custom Fields section in Settings allows you to define unique attributes for your records, ensuring you can capture specific data points that are important to your business but not included in the standard fields.
Managing Custom Fields
In the main Custom Fields tab, you can oversee all specialized data points you have created for your workspace:Link
-
AddDocumentationCustomAccess:Field:"NeedClickhelp? Check thebrownImport+DocumentationAddorCustomcontactField button at the top right to define a new attribute.
Field Overview: This area displays a list of all current custom fields. If none have been created yet, the screen will show a support."No custom fields defined yet" message.
Adding a Custom Field
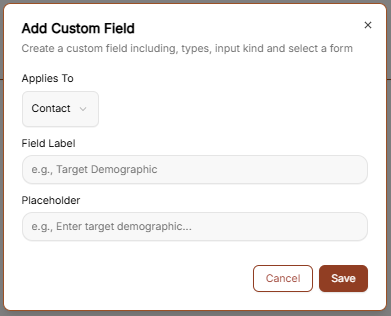
When you create a new field, you can specify exactly how it functions and where it appears:
Applies To: Use the dropdown menu to select whether the new field should be attached to a Contact or a Deal.
Field Label: Enter the name of the field as you want it to appear in the interface (e.g., "Target Demographic").
Placeholder: Customize the hint text that appears inside the input box to guide data entry (e.g., "e.g., Enter target demographic...").
Save: Click the brown Save button to finalize the field and add it to your records.
Import & Export
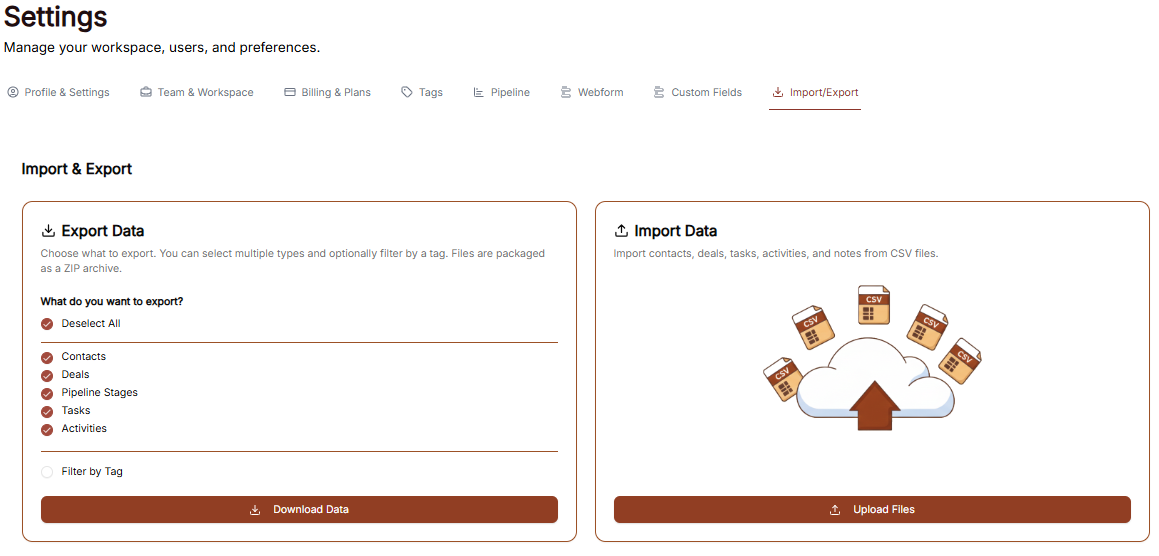
The Import/Export section allows you to migrate data into your workspace or download your current records for external use.
Data Import Process
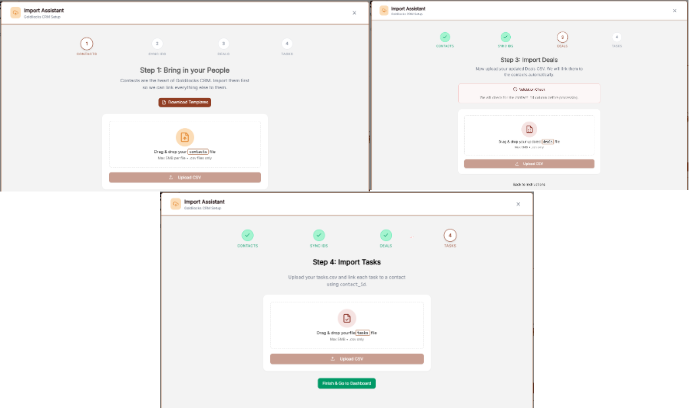
To ensure your data is formatted correctly before uploading, you can use the built-in templates provided by the CRM:
Step 1: Download Templates: Before you begin your upload, use the Download Template links for Contacts, Deals, or Tasks. These files contain the correct column headers to make mapping seamless.
Step 2: Upload File: Once your template is filled out, select the appropriate category and upload your file.
Step 3: Map Fields: Align your spreadsheet columns with the CRM fields.
Step 4: Preview & Finish: Review your data sample, then complete the import to add the records to your workspace.
Importing Tasks
When you reach the Tasks portion of the tool, you have two final choices:
Upload Tasks: If you have task data ready in the template, click this button to process it.
Finish and go to Dashboard: Click this to exit the setup and return to your main dashboard.
Data Export
The export tool allows you to create portable backups of your information:
Select Records: Choose to export your Contacts, Deals, or Tasks.
Export Action: Click the brown Export Data button.
File Format: Your records will automatically download as a ZIP file. You must extract this folder on your computer to access the individual spreadsheet files inside.