# User Profile & Settings

## User Profile &amp; Settings

<div drawio-diagram="272"><img src="https://library.buildrunkit.com/uploads/images/drawio/2026-05/drawing-4-1778678125.png" alt=""/></div>

[![Screenshot 2026-05-12 130424.png](https://library.buildrunkit.com/uploads/images/gallery/2026-05/scaled-1680-/screenshot-2026-05-12-130424.png)](https://library.buildrunkit.com/uploads/images/gallery/2026-05/screenshot-2026-05-12-130424.png)

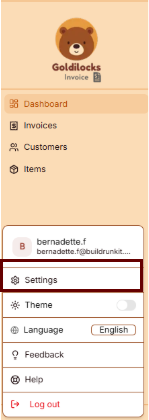
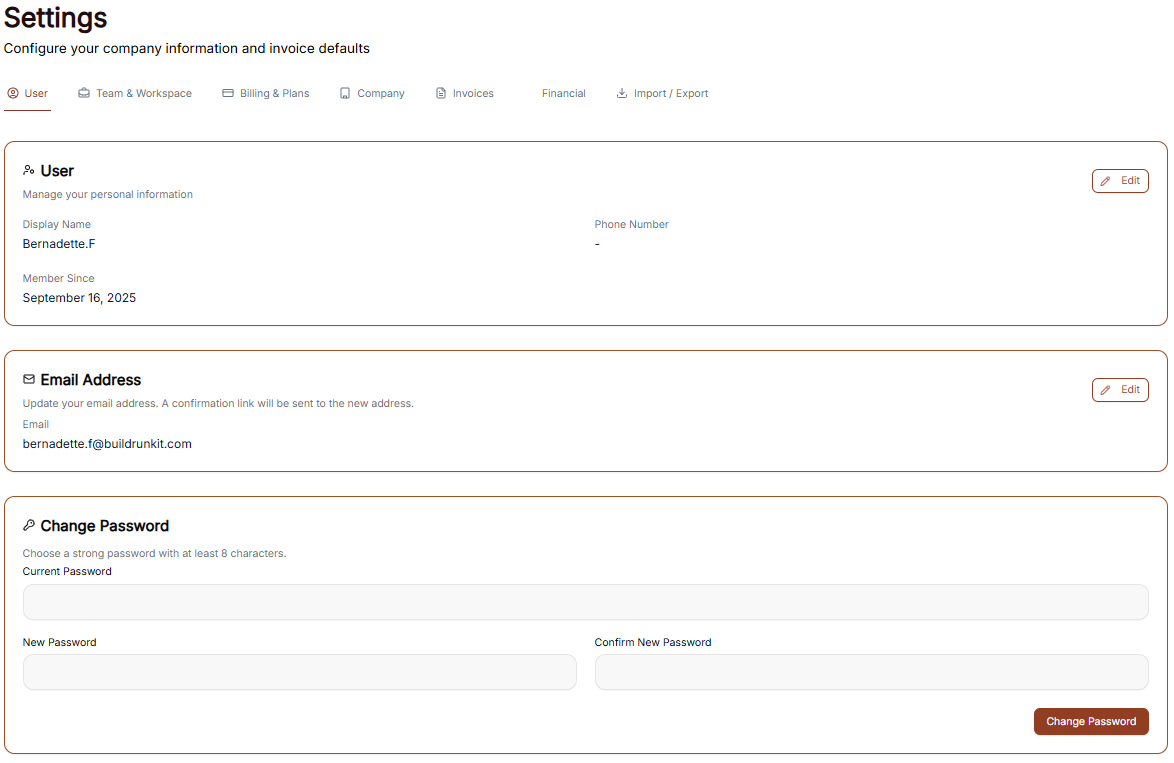
The Settings area allows you to manage your personal information, account security, and how the interface appears to you.

### Managing Personal Information

Under the User tab, you can view and update your primary account details:

<div _ngcontent-ng-c4166715710="" class="container" id="bkmrk-user-profile%3A-this-s"><div _ngcontent-ng-c872397921="" aria-busy="false" aria-live="polite" class="markdown markdown-main-panel enable-updated-hr-color" dir="ltr" inline-copy-host="">- User Profile: This section displays your Display Name, your Phone Number, and the date you became a member. Click the Edit button to make changes to your name or phone details.
- Email Address: View the primary email associated with your account. You can update this by clicking Edit, which will trigger a confirmation link to your new address.

</div></div>### Account Security

You can update your login credentials at any time in the Change Password section:

<div _ngcontent-ng-c4166715710="" class="container" id="bkmrk-current-password%3A-en"><div _ngcontent-ng-c872397921="" aria-busy="false" aria-live="polite" class="markdown markdown-main-panel enable-updated-hr-color" dir="ltr" inline-copy-host="">- Current Password: Enter your existing password for verification.
- New Password: Create a new password containing at least 8 characters.
- Confirm: Re-enter the new password to ensure it matches, then click the brown Change Password button to finalize.

---

</div></div>### Interface Preferences

[![Screenshot 2026-05-12 130310.png](https://library.buildrunkit.com/uploads/images/gallery/2026-05/scaled-1680-/screenshot-2026-05-12-130310.png)](https://library.buildrunkit.com/uploads/images/gallery/2026-05/screenshot-2026-05-12-130310.png)  
[![Screenshot 2026-05-12 130338.png](https://library.buildrunkit.com/uploads/images/gallery/2026-05/scaled-1680-/screenshot-2026-05-12-130338.png)](https://library.buildrunkit.com/uploads/images/gallery/2026-05/screenshot-2026-05-12-130338.png)

You can customize the look and language of your workspace through the Preferences menu.

#### Language Settings

Choose the primary language for your interface:

<div _ngcontent-ng-c4166715710="" class="container" id="bkmrk-english%3A-use-the-int"><div _ngcontent-ng-c872397921="" aria-busy="false" aria-live="polite" class="markdown markdown-main-panel enable-updated-hr-color" dir="ltr" inline-copy-host="">- English: Use the interface in English.
- Español: Usar la interfaz en español.

</div></div>#### Theme Selection

Adjust the visual appearance of the application to match your working environment:

<div _ngcontent-ng-c4166715710="" class="container" id="bkmrk-light-theme%3A-a-brigh"><div _ngcontent-ng-c872397921="" aria-busy="false" aria-live="polite" class="markdown markdown-main-panel enable-updated-hr-color" dir="ltr" inline-copy-host="">- Light Theme: A bright interface with a light-colored background.
- Dark Theme: A high-contrast interface with a dark background, ideal for low-light environments.

</div></div>## Workspace Management

[![Screenshot 2026-05-12 131222.png](https://library.buildrunkit.com/uploads/images/gallery/2026-05/scaled-1680-/screenshot-2026-05-12-131222.png)](https://library.buildrunkit.com/uploads/images/gallery/2026-05/screenshot-2026-05-12-131222.png)

The Workspace settings allow you to control the environments you belong to, manage your team, and update workspace identities.

### All Workspaces

This tab provides an overview of every workspace your account is currently associated with.

- Status &amp; Plans: You can see the name of each workspace and its current subscription plan (e.g., "Custom" or "Enterprise").
- Leaving a Workspace: By clicking the three dots (actions menu) next to a workspace, you can select Exit to remove yourself from that environment.

### Edit Workspace

This is where you manage the primary identity of your current business environment.

- Changing the Name: Use the Edit Workspace section to update the display name of the workspace.
- Save Changes: Ensure you click the brown Save Changes button after renaming to apply the update across the suite.

### Manage Workspace Members

Control who has access to your workspace in this section.

- Member List: View all users, their email addresses, and their assigned roles (e.g., Owner).
- Invite Members: Click the + Invite member button at the top right to add a new person to the team via email.
- Removing Users: To revoke access, click the three dots (actions menu) next to a member's name and select Remove user.

## Subscription &amp; Billing

[![Screenshot 2026-05-12 131511.png](https://library.buildrunkit.com/uploads/images/gallery/2026-05/scaled-1680-/screenshot-2026-05-12-131511.png)](https://library.buildrunkit.com/uploads/images/gallery/2026-05/screenshot-2026-05-12-131511.png)

The Subscription area is where you manage your workspace plan, tracking limits, and payment details to ensure uninterrupted access to the Goldilocks Suite.

### Plan Overview &amp; Usage

In the Subscription tab, you can monitor your current plan's status and usage limits:

- Active Plan: View your current subscription tier (e.g., "Custom").
- Billing Cycle: Confirm the cost of your plan and the frequency of payments (e.g., "$0.00 / Monthly").
- Usage Trackers: Monitor how much of your plan you have used, including your Invoices, Customers, and Items counts.
- Plan Actions: You can click Change Plan to upgrade or downgrade your service level, or Cancel Subscription if you wish to stop your recurring payments.

### Payment Methods

The Billing tab allows you to manage the credit cards or accounts associated with your workspace:

- Saved Methods: View your currently active payment card, including the brand (e.g., Visa), the last four digits, and the expiration date.
- Primary Indicator: Your default payment method will be clearly marked with a "Primary" badge.
- Managing Cards: Click the three dots (actions menu) next to a saved card to remove it from your account.
- Adding New Payments: Click the brown + Add payment method button to securely link a new card for future billing cycles.

## Subscription &amp; Billing

[![Screenshot 2026-05-12 131511.png](https://library.buildrunkit.com/uploads/images/gallery/2026-05/scaled-1680-/aiUscreenshot-2026-05-12-131511.png)](https://library.buildrunkit.com/uploads/images/gallery/2026-05/aiUscreenshot-2026-05-12-131511.png)

The Subscription area is your hub for managing plan access, tracking workspace limits, and handling payments.

### Subscription Overview

This tab provides a high-level view of your current standing:

- Active Plan: Displays the name of your current plan (e.g., "Custom").
- Cost Details: Shows the recurring price and billing frequency (e.g., "$0.00 / Monthly").
- Usage Trackers: Three progress bars track your real-time usage for Invoices, Customers, and Items against your plan’s total capacity.
- Management Buttons: \* Change Plan: Opens the tier selection menu.
    
    
    - Cancel Subscription: Initiates the process to stop recurring payments.

### Changing Your Plan

[![Screenshot 2026-05-12 133144.png](https://library.buildrunkit.com/uploads/images/gallery/2026-05/scaled-1680-/screenshot-2026-05-12-133144.png)](https://library.buildrunkit.com/uploads/images/gallery/2026-05/screenshot-2026-05-12-133144.png)

Clicking Change Plan reveals the available subscription tiers:

- Billing Toggle: A switch at the top to toggle between Monthly and Yearly pricing.
- Plan Tiers: Choose between Free, Plus, and Pro.
- Tier Limits: Each column details the specific limits for Invoices, Customers, Items, and Workspace Members.
- Action: Click the brown Choose Plan button under your desired tier to proceed.

### Add-ons

[![Screenshot 2026-05-12 131713.png](https://library.buildrunkit.com/uploads/images/gallery/2026-05/scaled-1680-/screenshot-2026-05-12-131713.png)](https://library.buildrunkit.com/uploads/images/gallery/2026-05/screenshot-2026-05-12-131713.png)

The Add-ons tab allows for modular upgrades without changing your full plan:

- Available Features: You can purchase extra Invoices, Customers, Items, or Workspace Members.
- Pricing: Each add-on lists its specific monthly cost.
- Action: Click the brown Buy button next to the relevant feature to initiate the purchase.

### Checkout Process

[![Screenshot 2026-05-12 132721.png](https://library.buildrunkit.com/uploads/images/gallery/2026-05/scaled-1680-/screenshot-2026-05-12-132721.png)](https://library.buildrunkit.com/uploads/images/gallery/2026-05/screenshot-2026-05-12-132721.png)

The Checkout page is the final step for any plan change or add-on purchase:

- Back to subscription: A link at the top left to return without purchasing.
- Payment Method: Confirms the card on file that will be charged for the transaction.
- Order Summary: Displays the Subtotal, Tax, and the final Total Amount Due.
- Action: Click the brown Pay &amp; Subscribe button to finalize the order and update your workspace limits.

## Company Information

[![Screenshot 2026-05-19 122804.png](https://library.buildrunkit.com/uploads/images/gallery/2026-05/scaled-1680-/screenshot-2026-05-19-122804.png)](https://library.buildrunkit.com/uploads/images/gallery/2026-05/screenshot-2026-05-19-122804.png)

This information will appear on your invoices and statements.

- Logo: Displays your current business logo image.
    
    
    - Click the Change Image button to upload a new logo (Max size: 5MB).
    - Click the red X icon to remove the current logo.
- Company Name: A text field to enter your business name.
- Street: A text field to enter your street address.
- Number: A text field to enter your building or unit number.
- ZIP Code: A text field to enter your postal code.
- City: A text field to enter your city.
- State: A text field to enter your state.
- Country: A text field to enter your country.

---

This address will appear on your invoices as the 'Bill From' information.

- Save: Click the brown button at the bottom left to save your updates.

## Invoices Settings

[![Screenshot 2026-05-12 134255.png](https://library.buildrunkit.com/uploads/images/gallery/2026-05/scaled-1680-/screenshot-2026-05-12-134255.png)](https://library.buildrunkit.com/uploads/images/gallery/2026-05/screenshot-2026-05-12-134255.png)

The Invoices tab in your settings allows you to configure the numbering and default terms for your billing documents.

### Invoicing Preferences

- Invoice Number Prefix: Enter the text that will appear before every invoice number (e.g., "INV"). The system notes that a prefix like 'INV' will create a number like 'INV-10001'.
- Next Invoice Number: Displays the numerical value that will be assigned to your very next invoice.
- Default Payment Terms: Select the standard deadline for payments from the dropdown menu. Options include:
    
    
    - Due on Receipt
    - Net 15
    - Net 30 (currently selected)
    - Net 60
    - Net 90
- Save: Click the brown Save button to apply any changes made to these fields.

## Financial

[![Screenshot 2026-05-19 123334.png](https://library.buildrunkit.com/uploads/images/gallery/2026-05/scaled-1680-/screenshot-2026-05-19-123334.png)](https://library.buildrunkit.com/uploads/images/gallery/2026-05/screenshot-2026-05-19-123334.png)

The Financial settings tab allows you to configure your baseline currency and tax rules for all billing operations.

- Default Currency: A dropdown menu to select the primary currency used for generating invoices (e.g., USD - US Dollar).
- Default Tax Rate (%): A text field to enter the standard tax percentage applied automatically to taxable line items.
    
    
    - *Note:* Enter the numeric value directly without the percentage sign (e.g., 8.25 for 8.25%).

---

- Save: Click the brown button at the bottom left to finalize and apply your default financial configurations.

<div _ngcontent-ng-c4166715710="" class="container" id="bkmrk--15"><div _ngcontent-ng-c872397921="" aria-busy="false" aria-live="polite" class="markdown markdown-main-panel enable-updated-hr-color" dir="ltr" id="bkmrk--16" inline-copy-host=""></div></div>