Goldilocks Projects
- Goldilocks Projects: Overview and Account Setup
- Goldilocks Projects Dashboard
- Managing Your Projects
- Managing Your Milestones
- Managing Your Tasks
- Managing Your Activities
- User Profile & Settings
- Feedback and help
Goldilocks Projects: Overview and Account Setup
Getting Started
From the main landing page, you have the following options to begin:
-
Get Started Free: Click this button to create your account.
-
See Plans: View different pricing and feature tiers available for your needs.
-
Go to App: If you already have an account, use this button in the top right corner to log in.
Account Setup
Your BuildRunKit account gives you unified access to the entire suite, including CRM, Projects, and Invoices.
Creating a Free Account
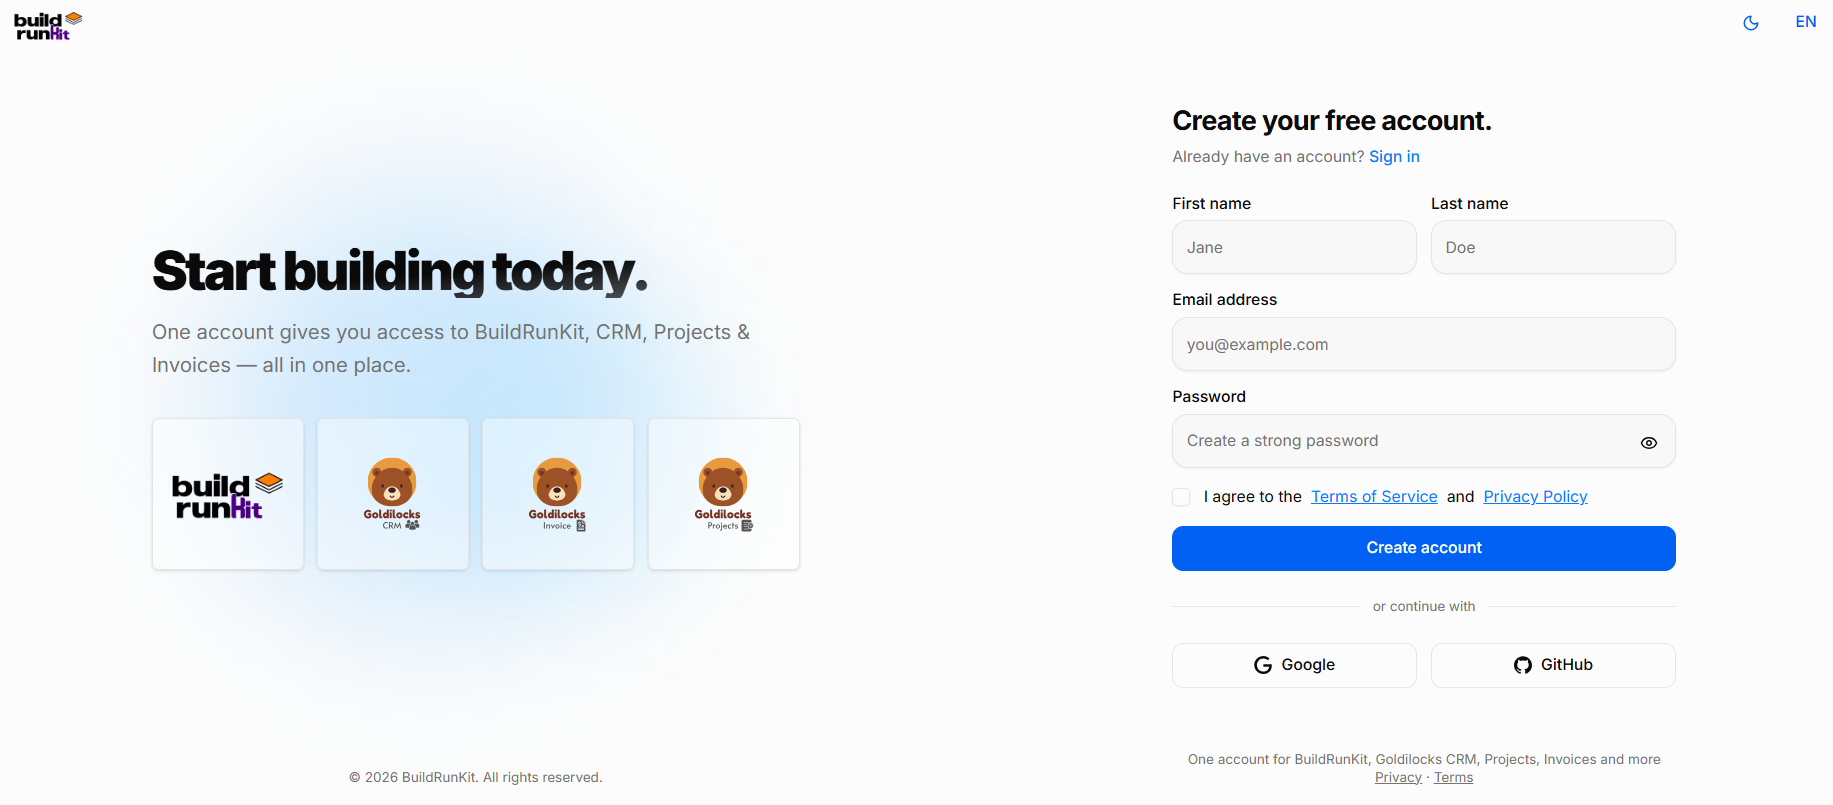
To set up a new account, fill in the following information:
-
First name & Last name: Enter your personal details.
-
Email address: Provide a valid email to be used for your account.
-
Password: Create a strong password (click the eye icon to toggle visibility).
-
Terms & Privacy: You must check the box to agree to the Terms of Service and Privacy Policy.
-
Create account: Click the blue button to complete registration.
Signing In
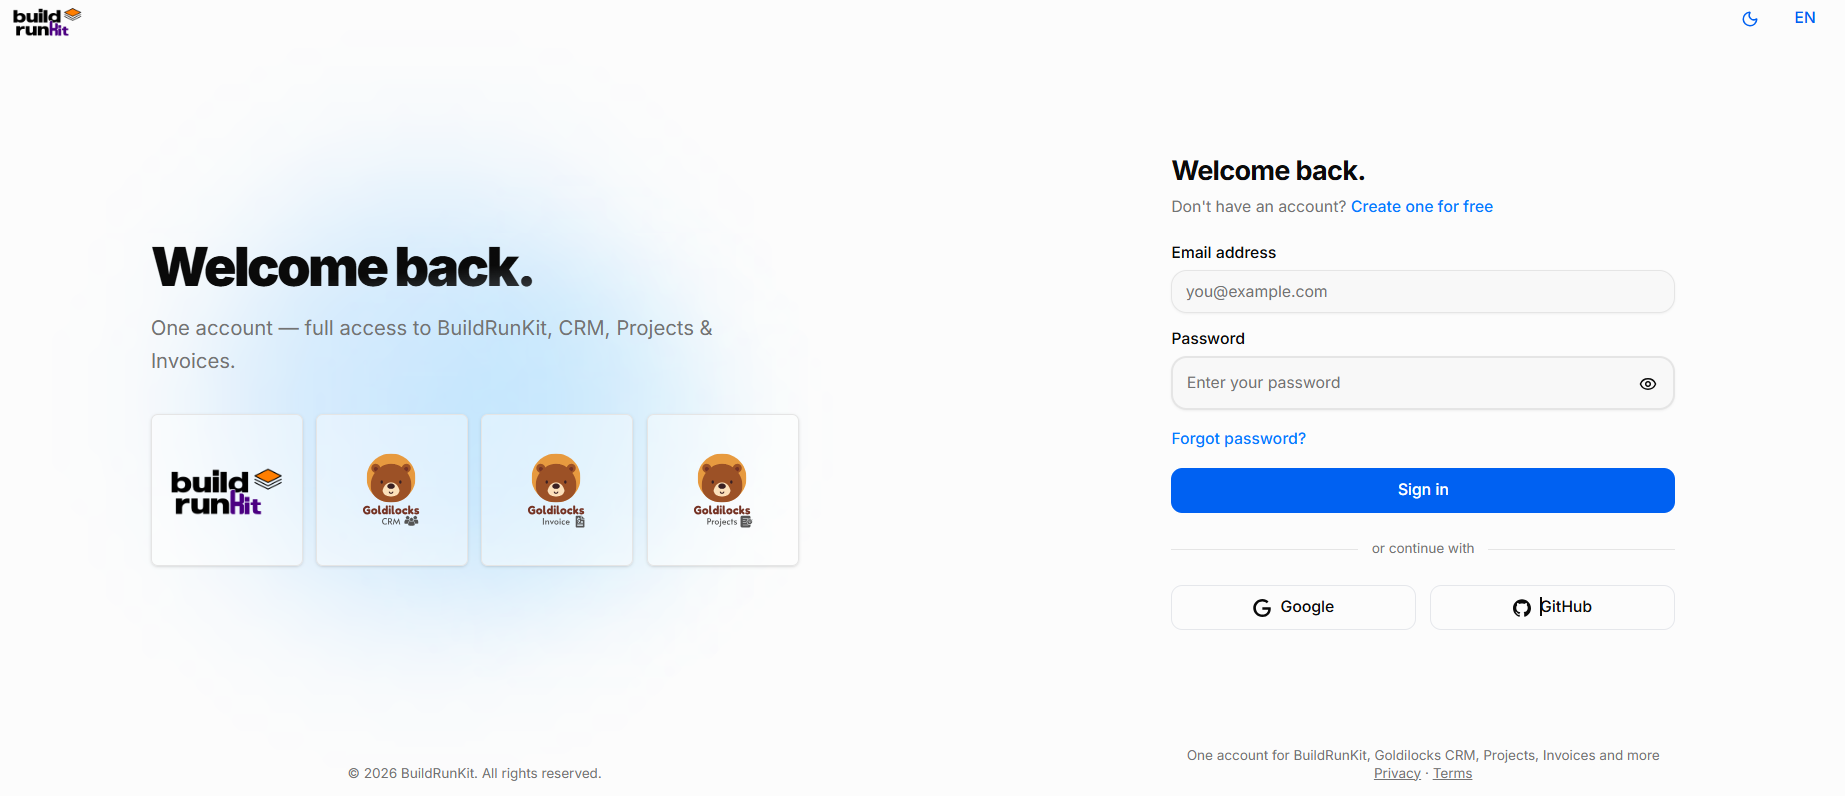
If you already have an account, navigate to the "Welcome back" screen:
-
Email and Password: Enter your registered credentials.
-
Forgot password?: Use this link if you need to reset your access.
-
Sign in: Click the blue button to access your dashboard.
Alternative Login Options
If you registered using a third-party account, you can log in instantly by clicking:
-
Google
-
GitHub
Note: If you are on this page by mistake and need to register, click the "Create one for free" link at the top right of the login box.
Goldilocks Projects Dashboard
Goldilocks Projects Dashboard
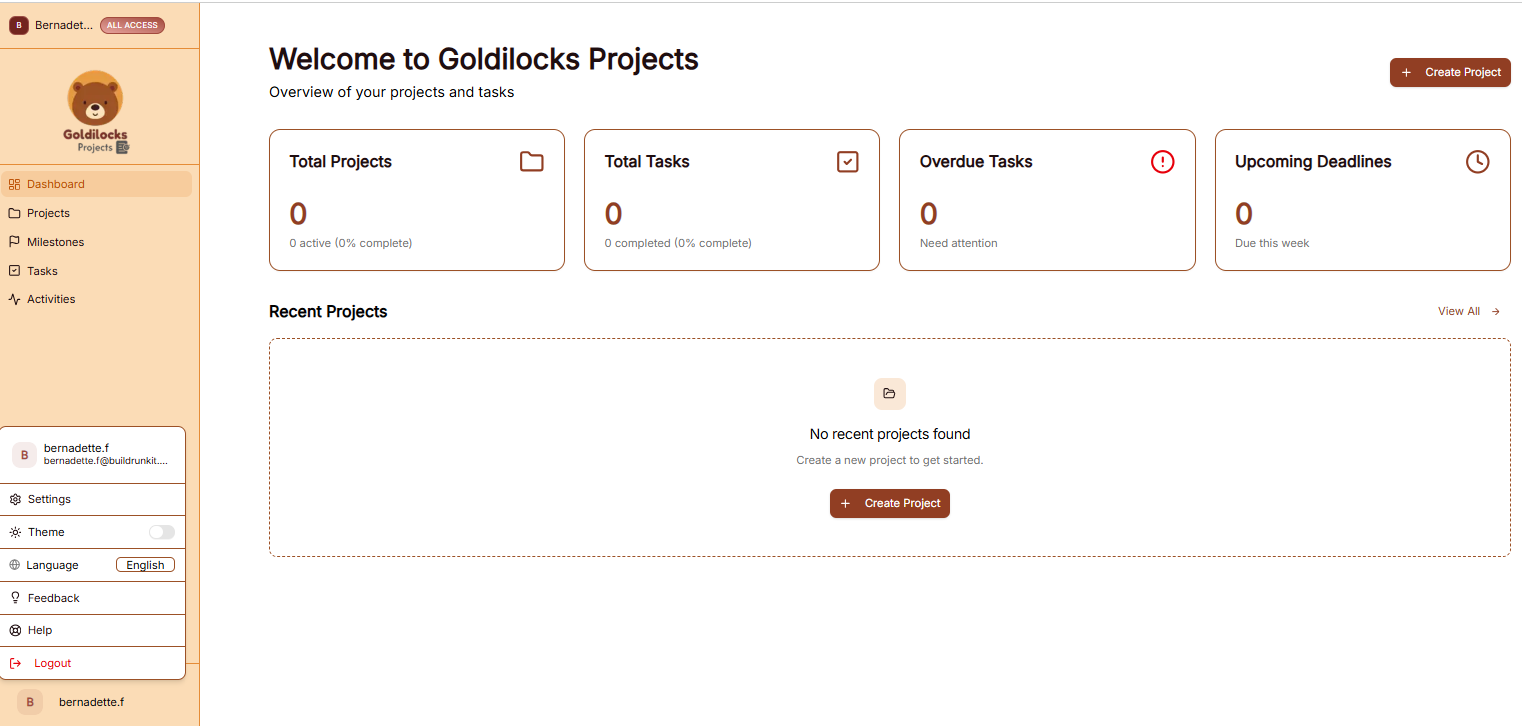
Once you have successfully signed in, you will be greeted by the Dashboard. This page is designed to give you an "at a glance" view of your latest project progress and provide fast jumps into your most important management workflows.
Managing Your Workspace
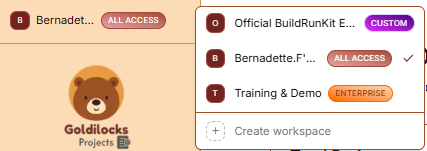
At the very top of the left sidebar, you will see your current workspace name. BuildRunKit allows you to manage multiple project environments from a single account.
How to Switch Workspaces:
-
Click the Workspace Selector: Click on the workspace name at the top of the sidebar.
-
Select from the List: A dropdown menu will appear showing all workspaces you have access to, labeled with their specific access level (e.g., "Official BuildRunKit..." with a CUSTOM tag or "Training & Demo" with an ENTERPRISE tag).
-
Instant Switch: Click on the desired name to instantly switch all project data (Tasks, Milestones, and Activities) to that workspace.
-
Create New: You can also click "+ Create workspace" at the bottom of this menu to start a brand new project environment.
Activity Overview Cards
The top cards provide a quick count of your latest synced data and task health:
-
Total Projects: Shows the total count of active projects and an overall completion percentage.
-
Total Tasks: Displays the total number of tasks in the workspace and how many are finished.
-
Overdue Tasks: Highlights the number of tasks that have passed their due dates and "Need attention."
-
Upcoming Deadlines: Tracks tasks that are scheduled to be completed within the current week.
Quick Action Sections
-
Recent Projects: This section displays your most recently accessed projects. If you are just starting, click the brown "Create Project" button in the center of the dashboard to begin your first workflow.
-
View All: Click the "View All →" link to see a full list of every project in your workspace.
Navigation Sidebar
-
Dashboard: Returns you to this overview page.
-
Projects: View and manage your full list of ongoing and archived projects.
-
Milestones: Track major goals and roadmap targets.
-
Tasks: Access your full task list and manage individual to-dos.
-
Activities: View a log of recent updates and changes across the workspace.
Managing Your Projects
Managing Projects
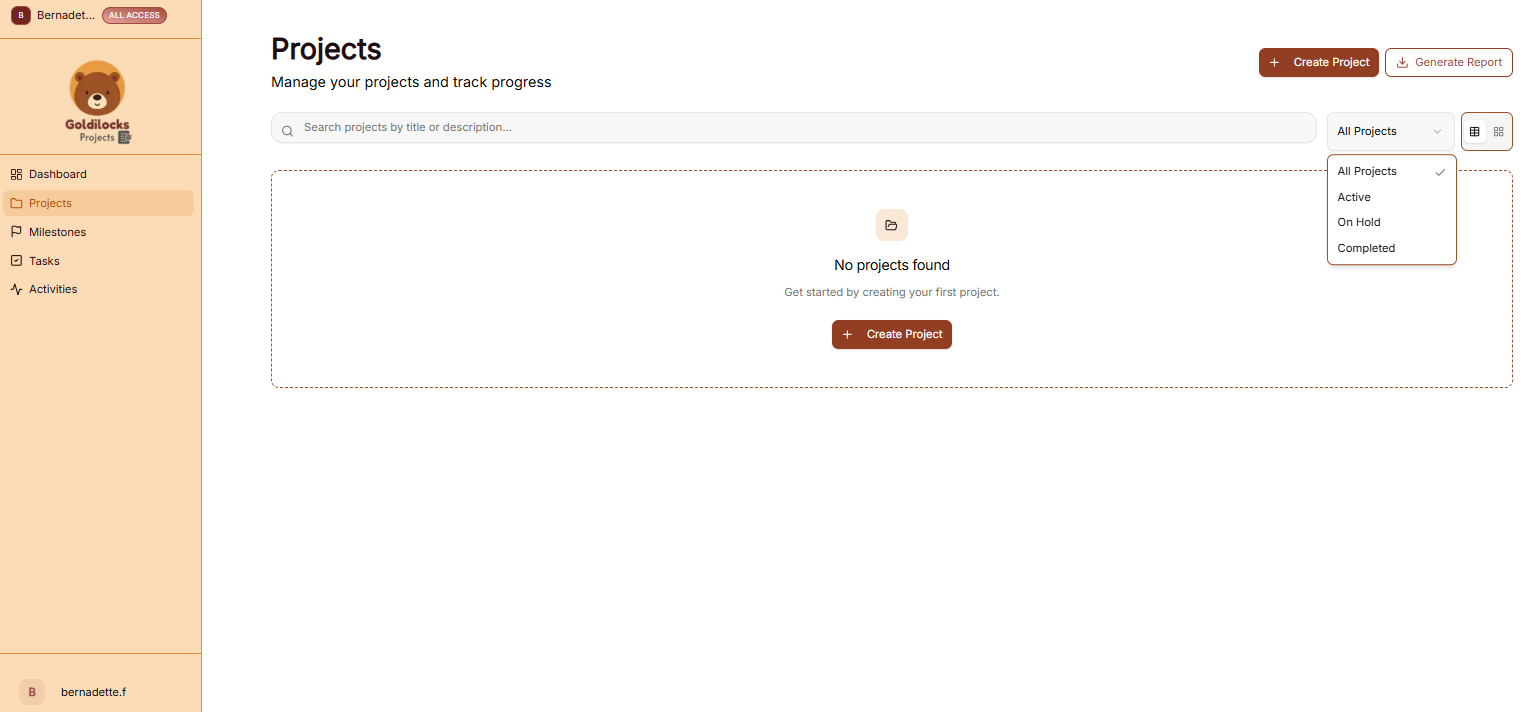
The Projects page is designed to help you manage your high-level initiatives and track their progress through a searchable list or grid view.
Managing Your Projects
At the top of the Projects page, you have several tools to organize and filter your workspace:
-
Search: Use the search bar to find projects by title or description.
-
Filter by Status: Use the dropdown menu to filter your view. Options include:
-
All Projects
-
Active
-
On Hold
-
Completed
-
-
View Toggle: Switch between a List View or Grid View using the icons next to the status filter.
-
Generate Report: Click this button to export your project data.
Creating a New Project
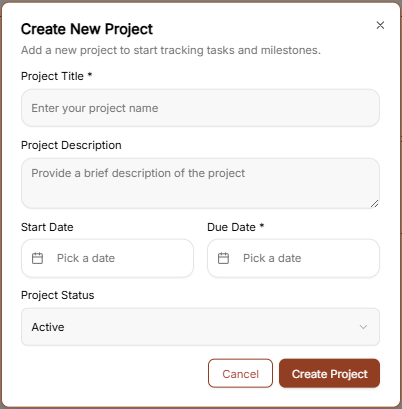
To start a new initiative, click the brown "+ Create Project" button. This opens a configuration window:
-
Project Title *: Enter a unique name for your project (Required).
-
Project Description: Provide a brief summary of the project’s goals or scope.
-
Start Date: Select the date when work on the project begins.
-
Due Date *: Select the final deadline for the project (Required).
-
Project Status: Use the dropdown to set the current state (e.g., Active).
-
Create Project Button: Click the brown button to save and launch your project.
Exporting Data
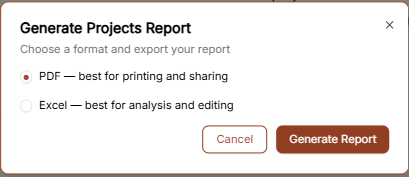
When you click Generate Report, a pop-up window allows you to choose your preferred export format:
-
PDF: Best for printing and sharing official progress updates.
-
Excel: Best for deep analysis and manual data editing.
-
Generate Report Button: Finalize the export in your chosen format.
Managing Your Milestones
Managing Your Milestones
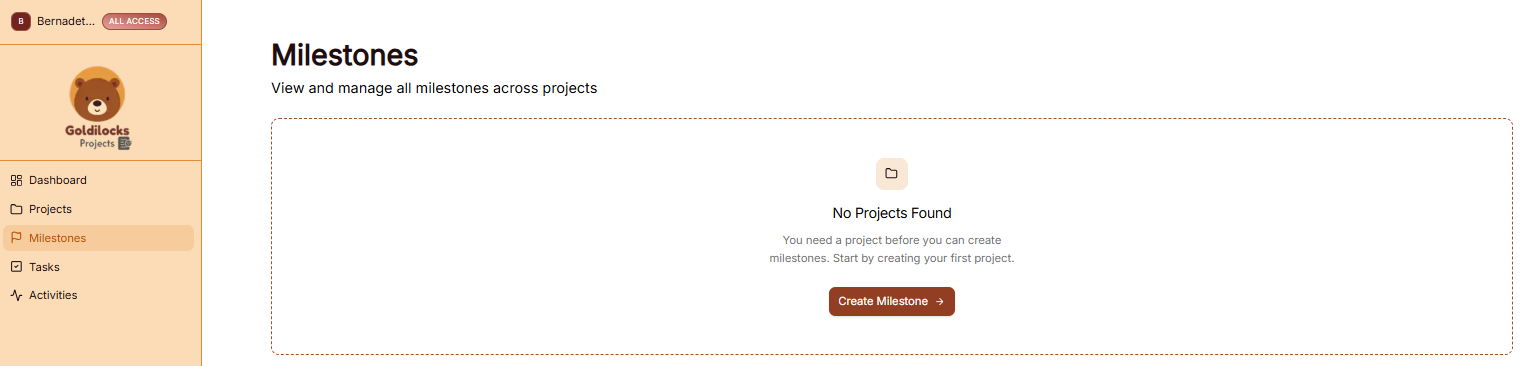
The Milestones module allows you to track major goals and key phases across your various projects. This ensures that high-level targets are visible and manageable.
Managing Your Milestones
The Milestones page is designed to give you a clear view of your project roadmaps and upcoming deadlines.
Important: Before you can create a milestone, you first need to create a project. BuildRunKit requires a project to act as the "home" for any milestone you define. If no projects exist in your workspace, the platform will prompt you to create your first project before proceeding.
How to Create a Milestone
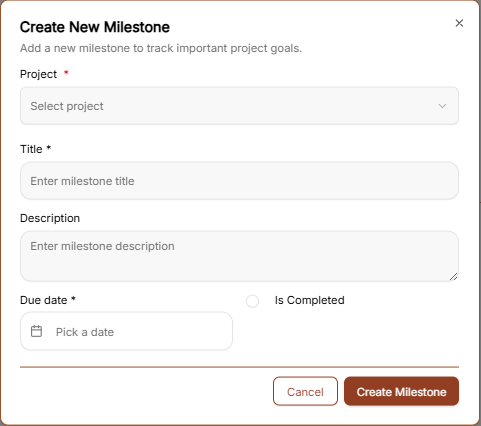
To define a new project goal, click the brown "Create Milestone →" button to open the configuration window:
-
Project *: Use the dropdown menu to select the specific project this milestone belongs to (Required).
-
Title *: Enter a clear name for the milestone (e.g., "Beta Launch" or "Design Approval") (Required).
-
Description: Provide a detailed summary of what this milestone entails.
-
Due Date *: Select the target deadline for reaching this milestone (Required).
-
Is Completed: A checkbox used to mark the milestone as finished once the goal is met.
-
Create Milestone Button: Click the brown button at the bottom to save the milestone to your project roadmap.
Managing Your Tasks
Managing Your Tasks
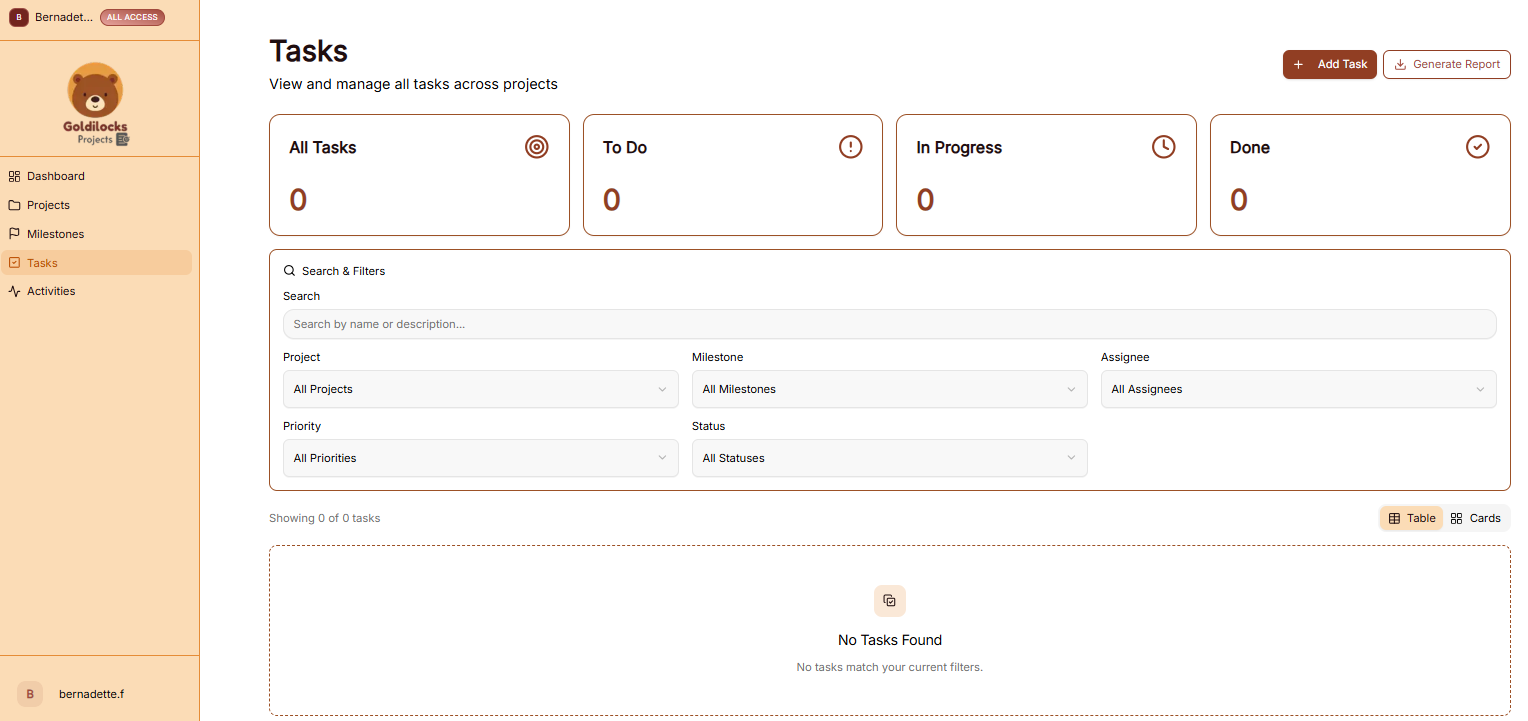
The Tasks module is where you manage individual work items to ensure your projects stay on schedule. This section provides a centralized view of all to-dos across your various initiatives.
Managing Your Tasks
The Tasks page allows you to organize and filter your workload to stay focused on high-priority items:
Important: Before creating tasks, you first need to create a project. All tasks must be assigned to an existing project to ensure they are properly tracked and organized.
How to Create a Task
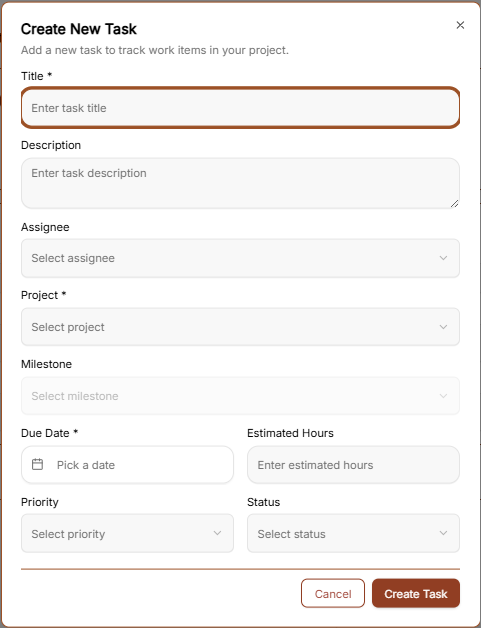
To add a new work item, click the brown "+ Add Task" button in the top right corner to open the creation form:
-
Title *: Enter a clear name for the task (Required).
-
Description: Provide details about what needs to be done.
-
Assignee: Use the dropdown to select which team member is responsible for the task.
-
Project *: Select the project this task belongs to (Required).
-
Milestone: Optionally link the task to a specific project milestone.
-
Due Date *: Select the deadline for this task (Required).
-
Estimated Hours: Enter the predicted time required to complete the task.
-
Priority: Set the urgency level (e.g., Low, Medium, High).
-
Status: Set the current phase of the task (e.g., To Do, In Progress).
-
Create Task Button: Click the brown button to save the task to your project.
Exporting Task Data
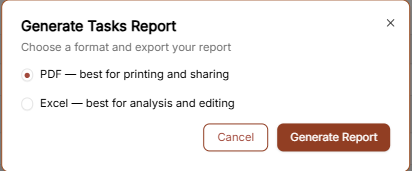
Click the "Generate Report" button to export your task list. You can choose between two formats:
-
PDF: Best for printing and sharing task summaries.
-
Excel: Best for detailed analysis and manual editing of task data.
Managing Your Activities
Managing Your Activities
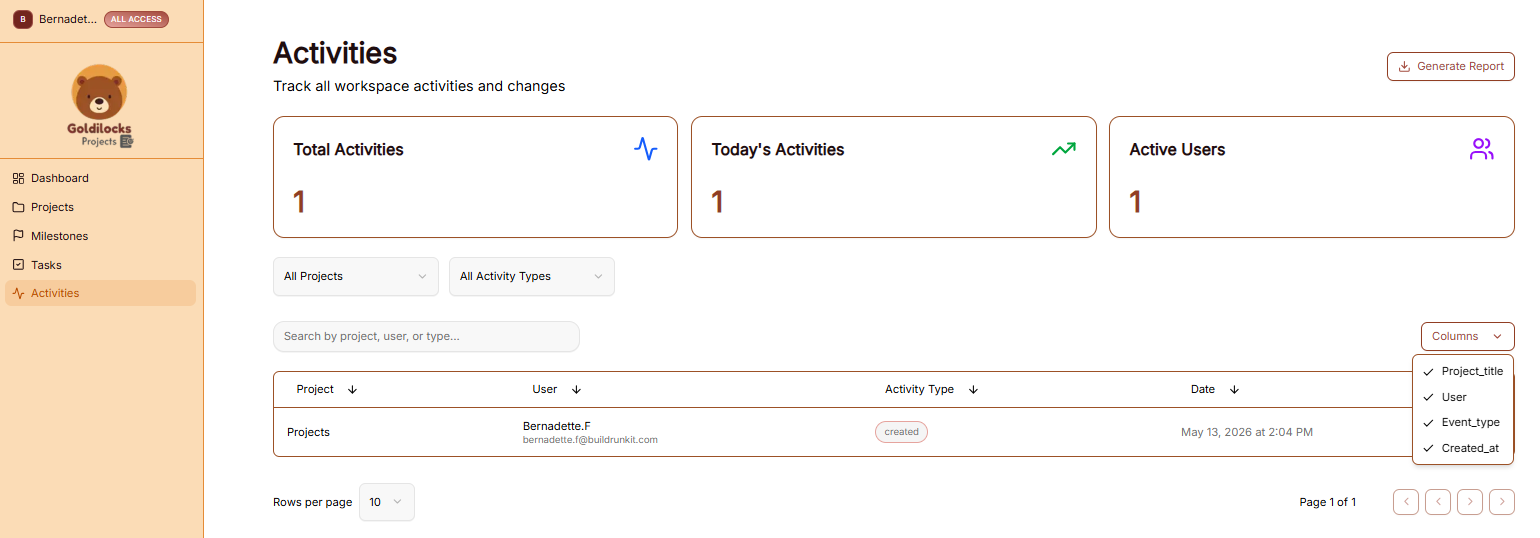
The Activities module provides a complete audit trail for your workspace, allowing you to track all project-related changes and team interactions in real time.
Managing Your Activities
The Activities page serves as a centralized log to help you monitor productivity and workspace history:
Exporting Activities Data
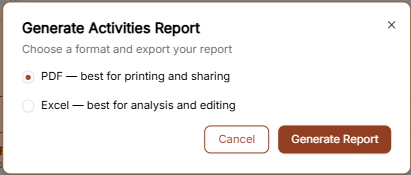
Click the "Generate Report" button in the top right corner to export the audit log. You can select your preferred format in the pop-up window:
-
PDF: Recommended for printing and sharing official workspace audits.
-
Excel: Recommended for detailed data analysis and filtering.
User Profile & Settings
User Profile & Settings

The Settings area allows you to manage your personal information, account security, and how the interface appears to you.
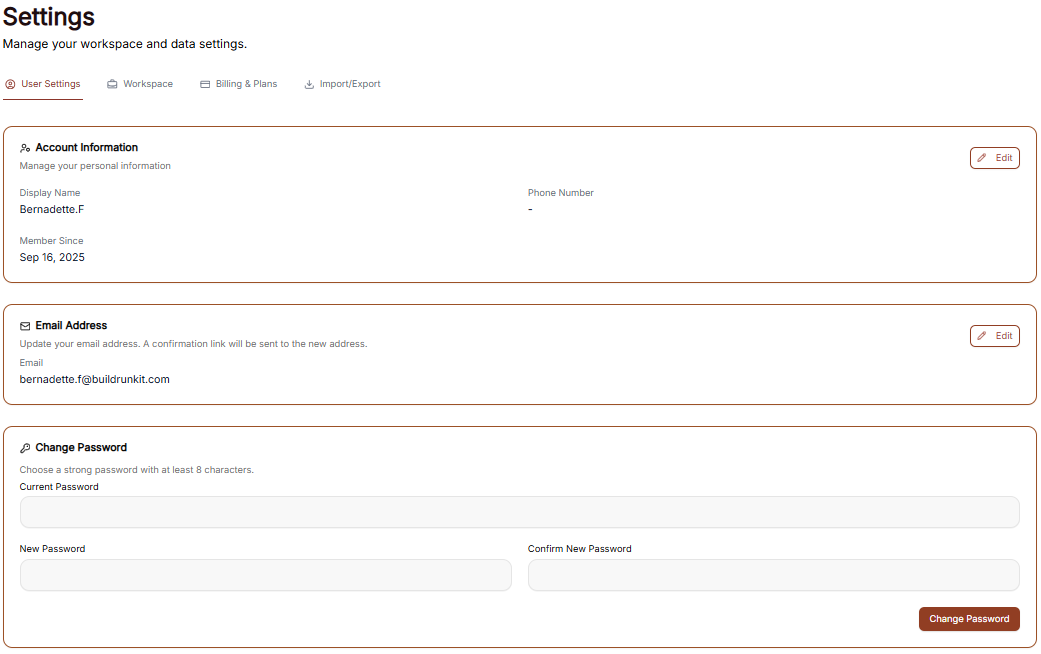
Managing Personal Information
Under the User Profile tab, you can view and update your primary account details:
-
User Profile: This section displays your First Name, Last Name, and Email Address. Enter your details into the text fields to keep your account information current.
-
Update Profile: After making changes to your name or email, click the brown Update Profile button at the bottom of the form to save your details.
Account Security
You can update your login credentials at any time in the Security section:
-
Current Password: Enter your existing password for verification.
-
New Password: Create a new password in the provided field.
-
Confirm New Password: Re-enter the new password to ensure it matches.
-
Update Password: Click the brown Update Password button to finalize your new credentials.
Interface Preferences
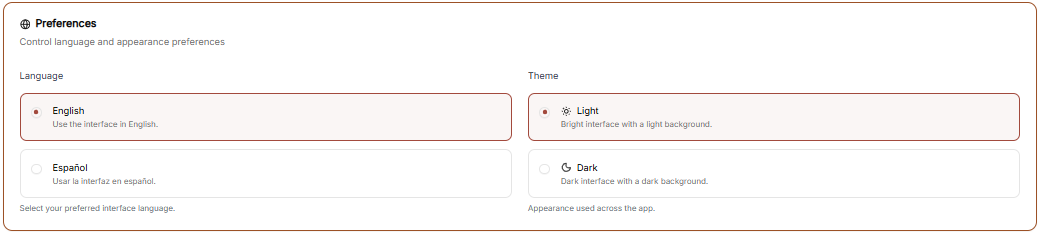
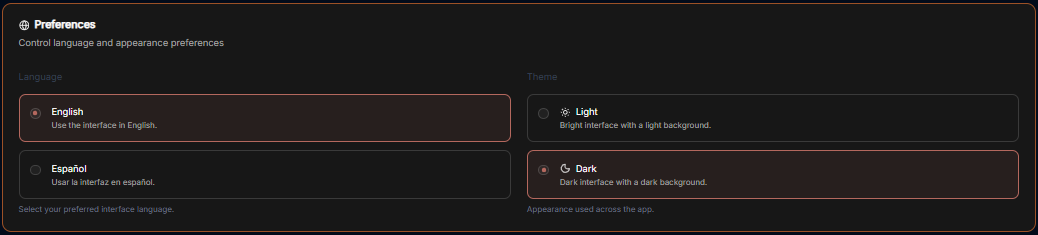
You can customize the look of your workspace through the General Settings menu.
Theme Selection Adjust the visual appearance of the application to match your working environment:
-
Dark Mode: Use the toggle switch to enable or disable the high-contrast dark theme.
-
Light Theme: When toggled off, the interface uses a bright background.
-
Dark Theme: When toggled on, the interface uses a dark background, ideal for low-light environments.
-
Workspace Management
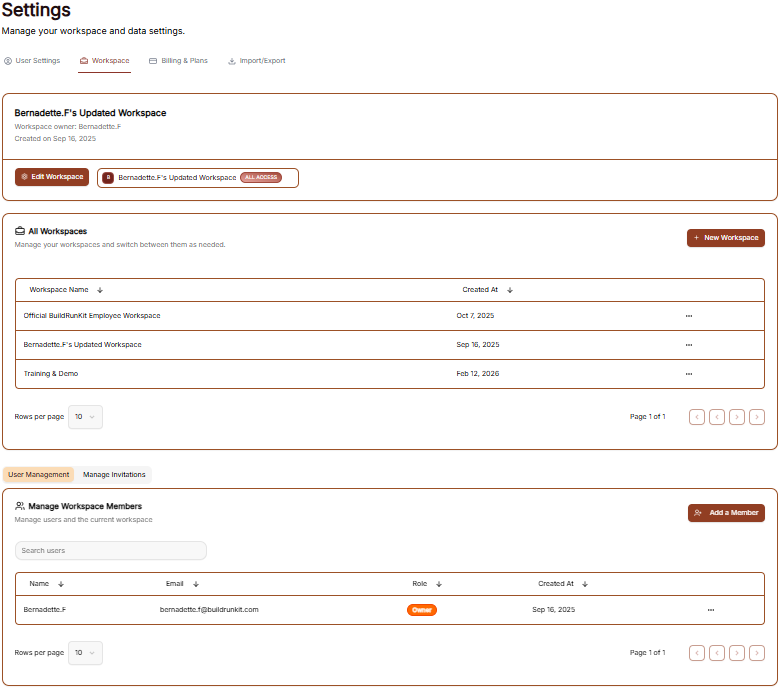
The Workspaces settings allow you to manage the different environments you belong to and see your current access levels.
All Workspaces
This tab provides an overview of the workspace your account is currently associated with.
-
Workspace Details: You can see the name of the workspace (e.g., "Goldilocks Projects") and its current subscription plan (e.g., "Free").
-
Actions: By clicking the three dots (actions menu) next to the workspace, you can manage your involvement in that environment:
-
Exit: Select this to remove yourself from the workspace.
-
Manage Workspace Members
Control who has access to your workspace in this section.
-
Member List: View all users, their email addresses, and their assigned roles.
-
User: Displays the name of the member (e.g., "Bernadette F").
-
Email: Displays the email address associated with the member.
-
Role: Shows the permissions level of the user (e.g., "Owner").
-
-
Invite Members: Click the brown "+ Invite member" button at the top right to add a new person to the team via email.
-
Removing Users: To revoke access, click the three dots (actions menu) next to a member's name and select Remove user.
Billing & Plans
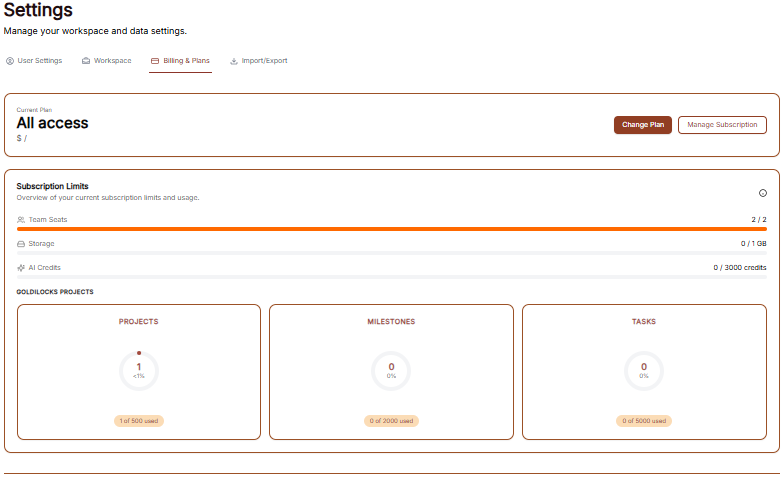
The Billing & Plans section provides a complete overview of your current subscription, usage limits, and available upgrades to ensure your workspace has the resources it needs.
Current Plan Overview
At the top of the page, you can see the status of your primary subscription:
-
Plan Type: Displays your current level of access (e.g., "All access").
-
Change Plan: Click this brown button to browse different subscription tiers.
-
Manage Subscription: Click this white button to update payment methods or view billing history.
Subscription Limits
Track your real-time resource consumption through the Subscription Limits dashboard:
-
Resource Progress Bars: Visual indicators show your usage for:
-
Team Seats: Displays the number of active members out of your total limit (e.g., 2 / 2).
-
Storage: Shows how much data you have used (e.g., 0 / 1 GB).
-
AI Credits: Tracks your monthly or evergreen AI usage (e.g., 0 / 3000 credits).
-
-
Module Statistics: Detailed cards provide a breakdown of specific workspace items:
-
Projects: Tracks active initiatives (e.g., 1 of 500 used).
-
Milestones: Tracks project phases (e.g., 0 of 2000 used).
-
Tasks: Tracks individual work items (e.g., 0 of 5000 used).
-
Available Add-ons & Expansions
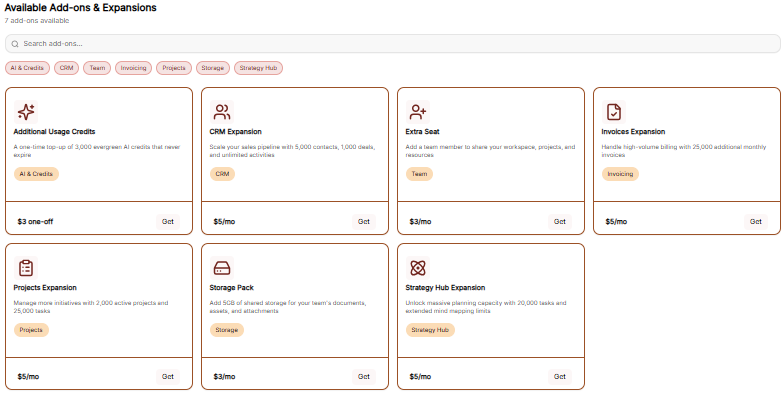
Customize your workspace by adding specific resources without changing your entire plan:
-
Search & Filter: Use the search bar or category tags (AI & Credits, CRM, Team, Invoicing, etc.) to find specific upgrades.
-
Add-on Options:
-
Additional Usage Credits: A one-time top-up of 3,000 evergreen AI credits ($3 one-off).
-
CRM Expansion: Increase capacity for contacts, deals, and activities ($5/mo).
-
Extra Seat: Add a new team member to your workspace ($3/mo).
-
Invoices Expansion: Handle high-volume billing with 25,000 additional monthly invoices ($5/mo).
-
Projects Expansion: Manage 2,000 active projects and 25,000 tasks ($5/mo).
-
Storage Pack: Add 5GB of shared storage for documents and assets ($3/mo).
-
Strategy Hub Expansion: Unlock 20,000 tasks and extended mind mapping limits ($5/mo).
-
-
Purchasing: Click the "Get" button on any card to add the expansion to your account.
Checkout Process
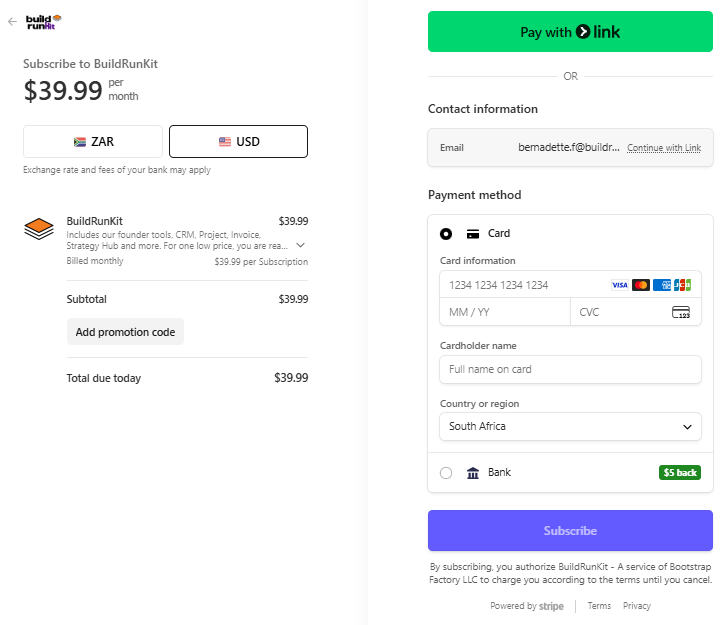
The Checkout page is the final step for any plan change or add-on purchase:
-
Back to subscription: A link at the top left to return without purchasing.
-
Payment Method: Confirms the card on file that will be charged for the transaction.
-
Order Summary: Displays the Subtotal, Tax, and the final Total Amount Due.
-
Action: Click the brown Pay & Subscribe button to finalize the order and update your workspace limits.
Import & Export
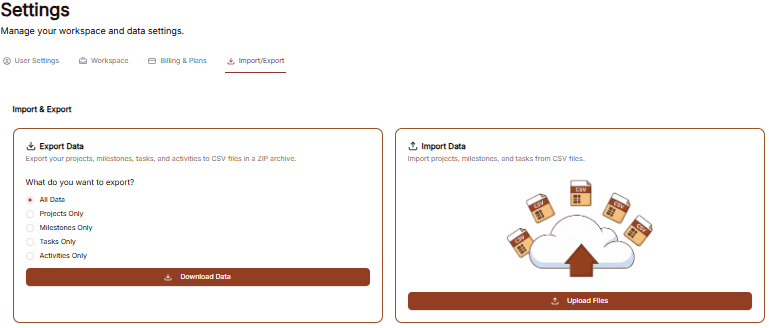
The Import/Export section allows you to manage your data by downloading it for external use or uploading existing records into the Goldilocks Projects ecosystem.
Exporting Your Data
You can export your workspace records into CSV files, which are compiled into a single ZIP archive for easy download.
-
Selection Options: Choose what data you wish to download by selecting All Data, or specific categories including Projects Only, Milestones Only, Tasks Only, or Activities Only.
-
Download: Click the brown Download Data button to generate and save your ZIP file.
-
Activities Reports: For specialized reporting, you can choose to generate an Activities Report in PDF (best for printing and sharing) or Excel (best for analysis and editing) formats.
Importing Your Data
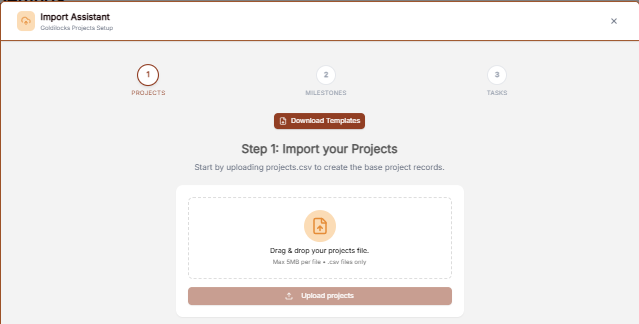
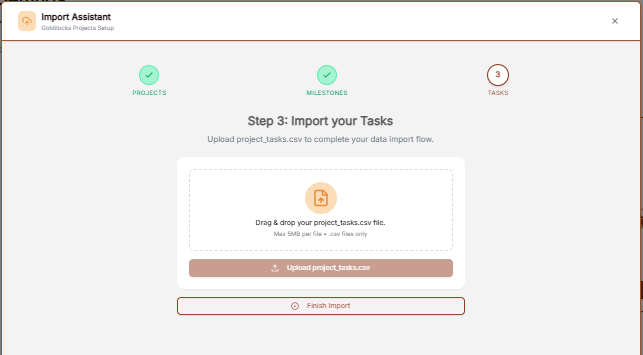
The Import Assistant guides you through a multi-step process to ensure all data is mapped correctly between projects, milestones, and tasks.
-
Step 1: Import Projects: Start by dragging and dropping your
projects.csvfile to create the base project records. Projects are a required component of the import process. -
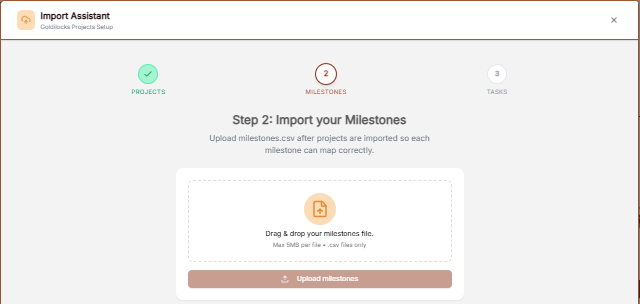
Step 2: Import Milestones: Once projects are imported, upload your
milestones.csvfile so each milestone can map correctly to its parent project. Milestones are also a required component of the import. -
Step 3: Import Tasks (Optional): After the milestones are imported, you have the option to upload a
project_tasks.csvto complete your data flow. -
Finalizing: You can choose to click Finish Import immediately after successfully importing your milestones, or you can continue to the task import step if you have task data to include.
Technical Note: All import files must be in .csv format with a maximum size of 5MB per file.
Feedback and help
Feedback and help

This section allows you to communicate with the team and access support resources directly within the platform.
Sidebar Menu
-
Feedback: The primary link to open the feedback submission window.
-
Help: The link located directly underneath "Feedback" for support resources.
Feedback
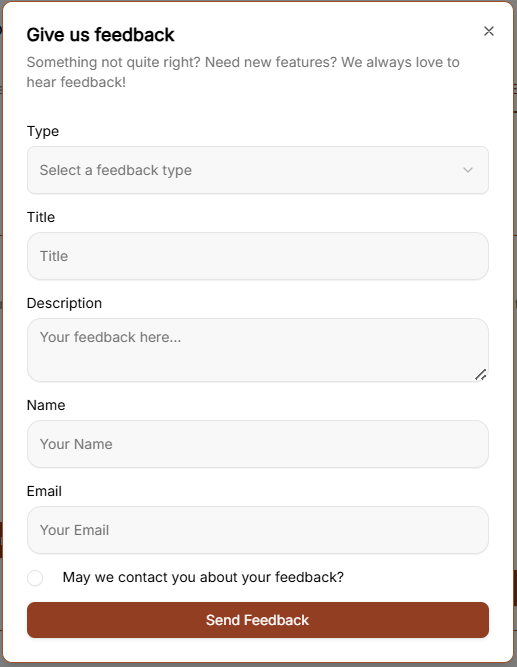
Clicking Feedback opens a window with the following fields:
-
Category: A dropdown menu to select the nature of your message. The options include:
-
Bug Report
-
Feature Request
-
General Feedback
-
Question
-
-
Subject: A text input field to summarize your feedback.
-
Message: A large text area for providing the full details of your report or suggestion.
-
Send Feedback: The brown button at the bottom of the form used to submit your information.
Help
To access the support portal, click the Help option located at the bottom of the navigation sidebar. This opens the Support Center in a new window.
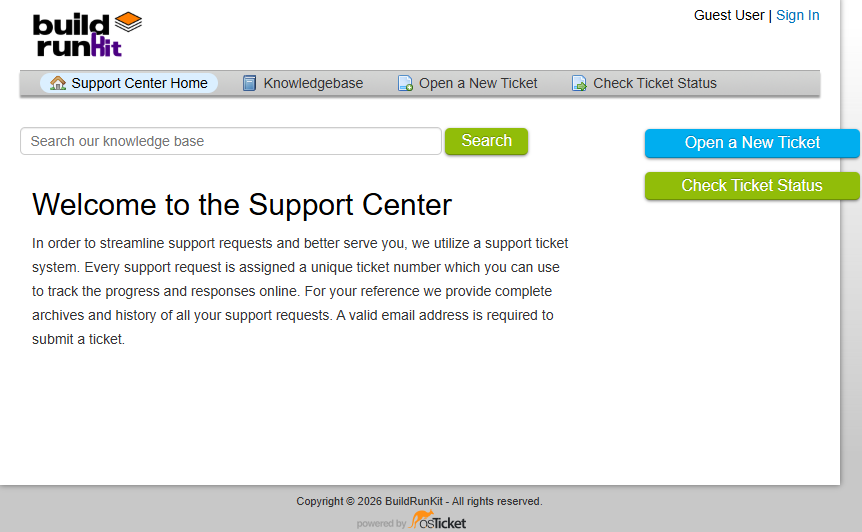
Support Center Home
The main landing page of the Support Center provides a centralized location for managing support requests:
-
Search: A search bar is located at the top to search the knowledge base for specific information.
-
Support Ticket System: The platform uses a ticket system where every request is assigned a unique number to track progress online.
-
Email Requirement: A valid email address is required to submit a new ticket.
Navigation Menu
-
Support Center Home: Returns you to the main welcome page.
-
Knowledgebase: Provides access to categorized FAQs and documentation.
-
Open a New Ticket: Opens a form to submit a direct support request.
-
Check Ticket Status: Allows you to view the progress of existing tickets using your email and ticket number.
Knowledgebase
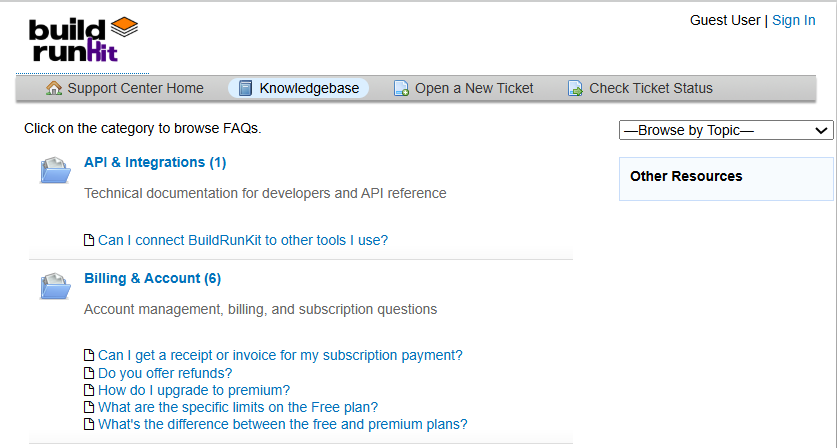
The Knowledgebase tab allows you to browse support articles by category to find answers to common questions.
-
Browse by Topic: Use the dropdown menu on the right to jump directly to a specific help topic.
Open a New Ticket
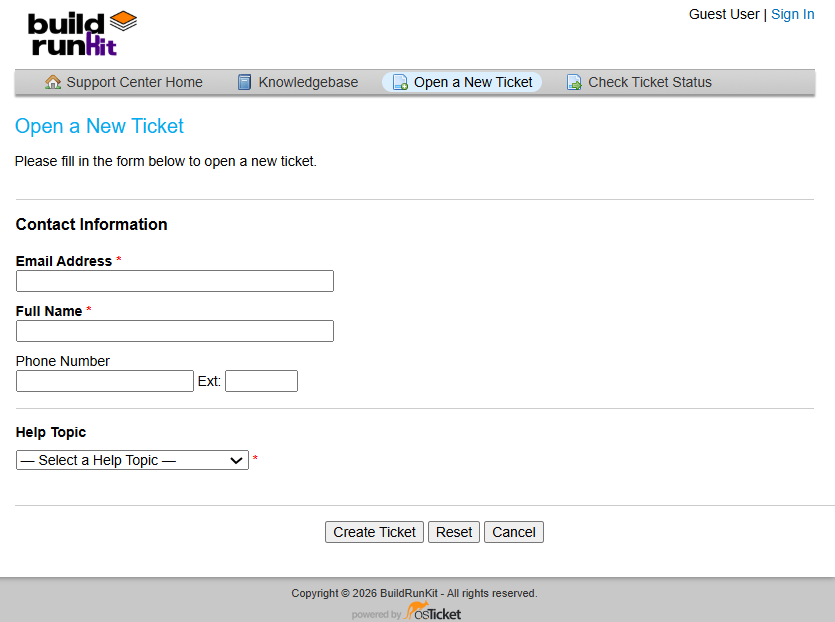
This section allows you to submit a formal support request to the team.
Contact Information
-
Email Address *: A required field to enter your contact email.
-
Full Name *: A required field to provide your name.
-
Phone Number: An optional field with a separate box for an Ext: (extension).
Ticket Details
-
Help Topic *: A required dropdown menu where you must "-Select a Help Topic -" to categorize your request.
Form Actions
-
Create Ticket: Click this button to submit your request.
-
Reset: Click this button to clear all information currently entered in the form.
-
Cancel: Click this button to exit the ticket creation process.
Check Ticket Status
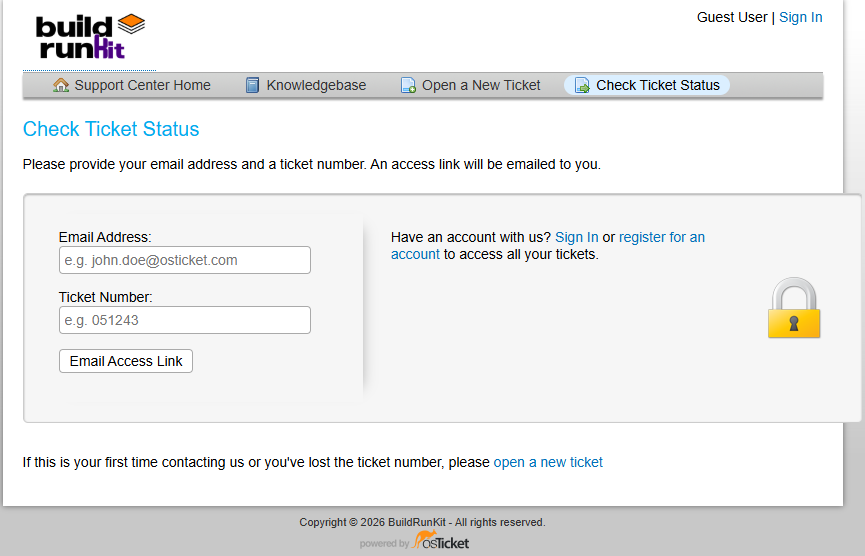
This section allows you to track the progress of your existing support requests.
Check Status via Email To access a specific ticket, provide the following details to receive an access link via email:
-
Email Address: Enter the email address associated with your ticket (e.g., [email protected]).
-
Ticket Number: Enter the unique ID assigned to your request (e.g., 051243).
-
Email Access Link Button: Click this to have the login link sent to your inbox.
Account Access
-
Sign In / Register: If you have an account, you can Sign In or register for an account to view a complete history of all your tickets in one place.
-
Security: This form is protected, indicated by the padlock icon on the right.
Troubleshooting
-
First-time contact: If you have never contacted support before or have lost your ticket number, click the open a new ticket link at the bottom of the page.