Goldilocks Invoice
- Goldilocks Invoice: Overview and Account Setup
- Goldilocks Invoice Dashboard
- Managing Invoices
- Managing Customers
- Items Catalog
- User Profile & Settings
- Feedback and help
Goldilocks Invoice: Overview and Account Setup
Goldilocks Invoice: Introduction
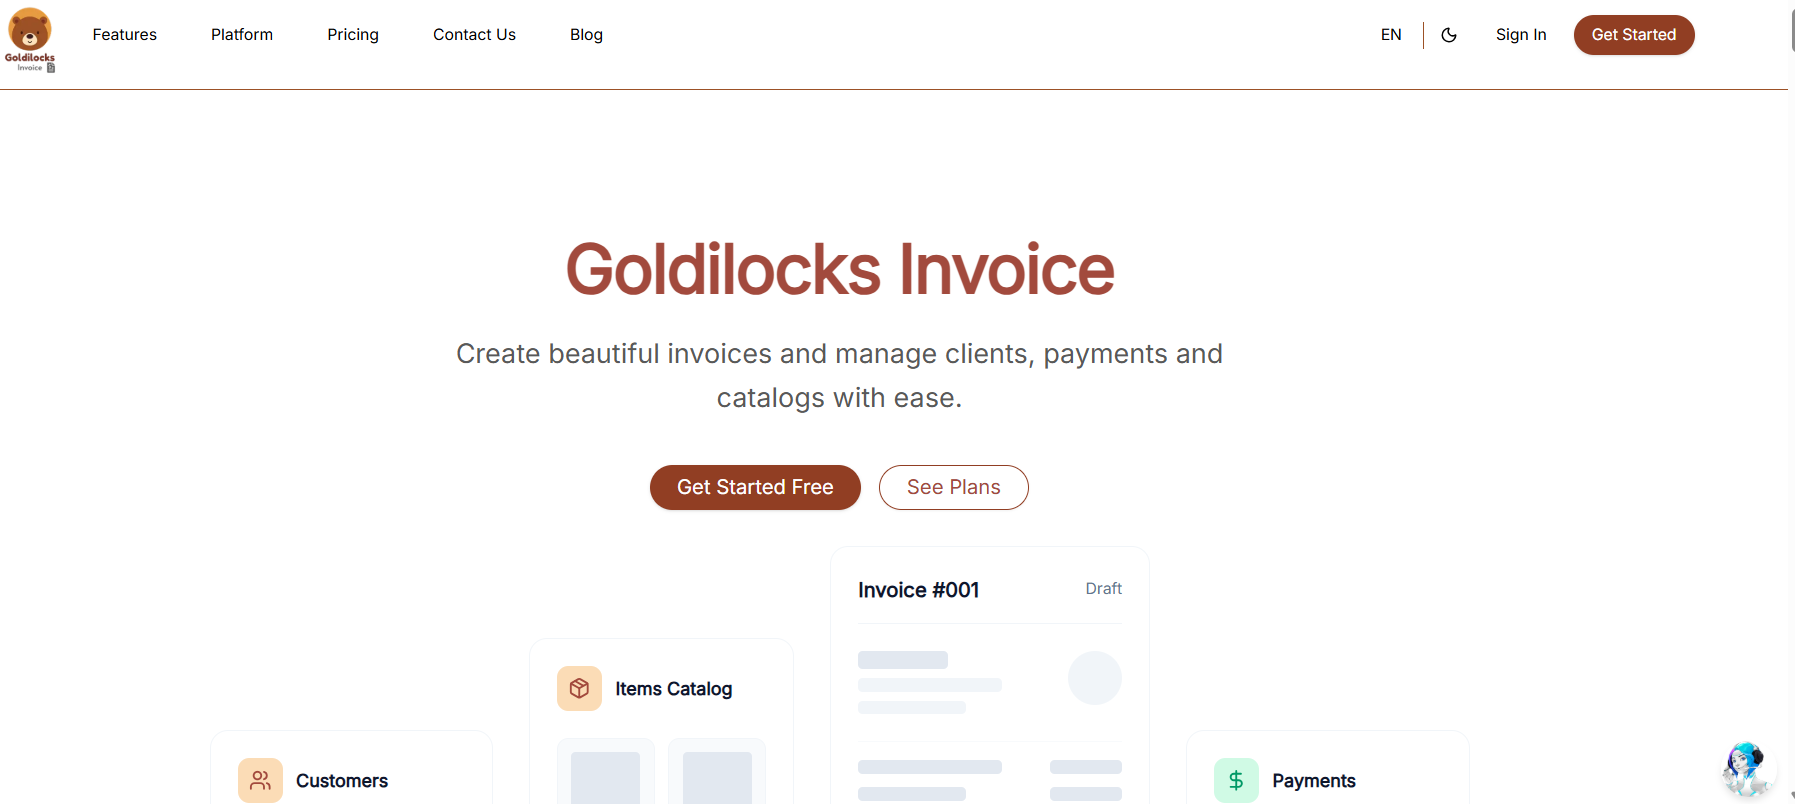
Goldilocks Invoice is the professional billing and payment management module within the BuildRunKit ecosystem. Designed specifically for founders and growing teams, it provides a "just right" balance of professional features and ease of use, allowing you to manage your revenue without the complexity of traditional accounting software.
Getting Started
BuildRunKit is a unified workspace designed to help you plan, build, and run your business. One account gives you full access to the core platform plus the Goldilocks Suite (CRM, Invoices, and Projects).
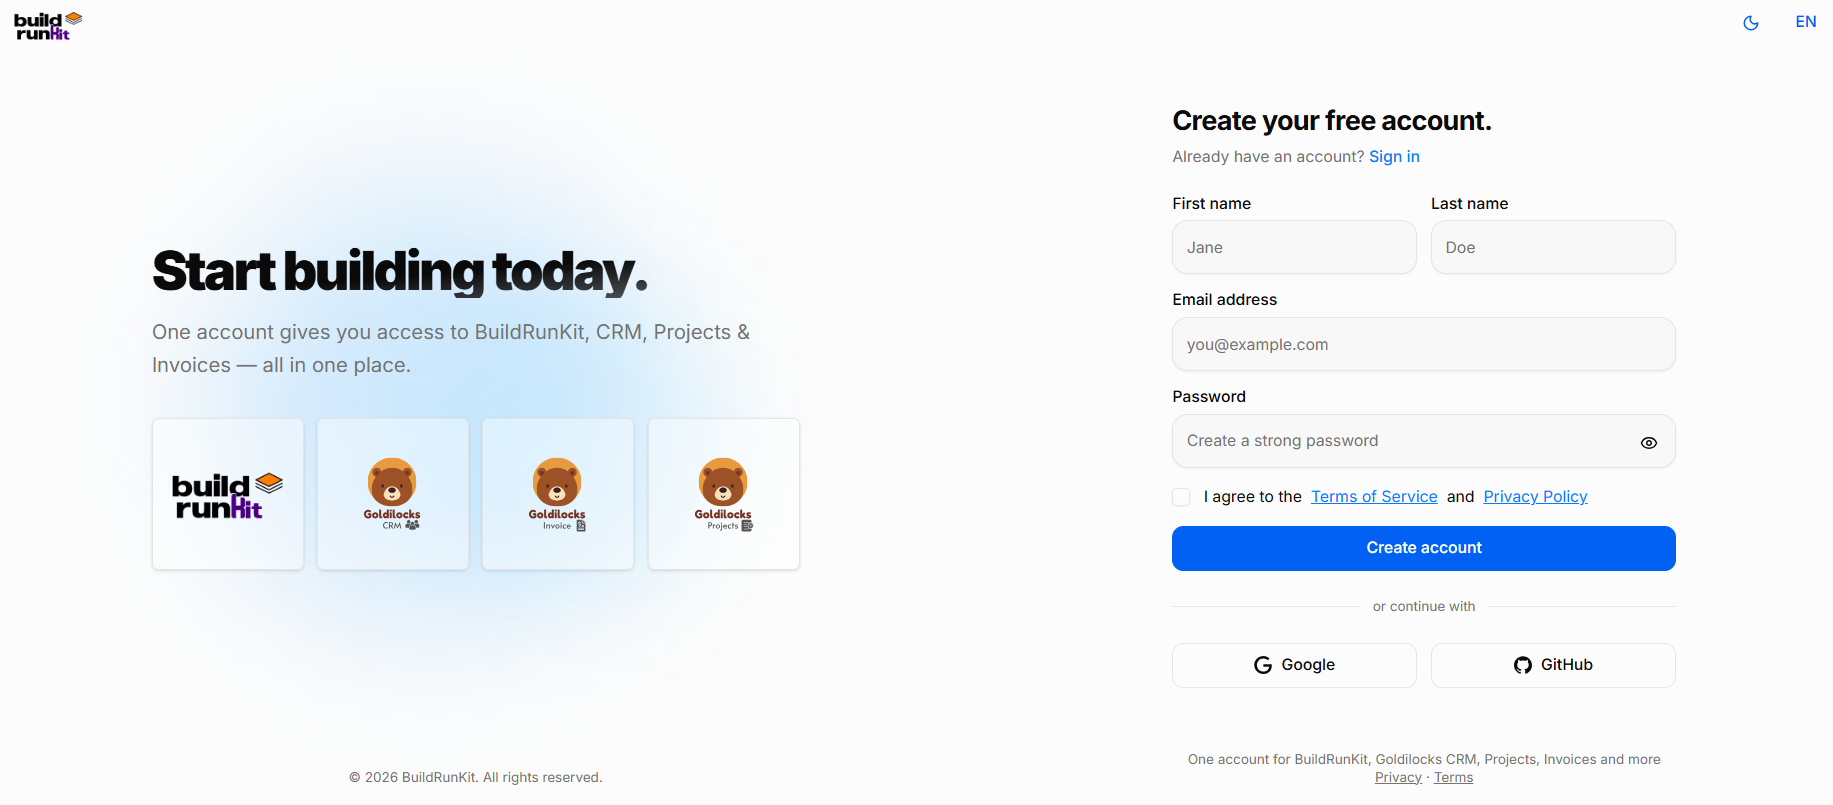
Creating Your Free Account
Using Email Registration:
-
Name: Enter your First name and Last name in the designated fields.
-
Email Address: Provide your primary work email address.
-
Password: Create a strong, secure password. You can click the eye icon to reveal the text and double-check your typing.
-
Terms & Privacy: Review the Terms of Service and Privacy Policy, then check the box to confirm your agreement.
-
Create Account: Click the blue Create account button to finalize your registration.
-
Google
-
GitHub
Accessing Your Account
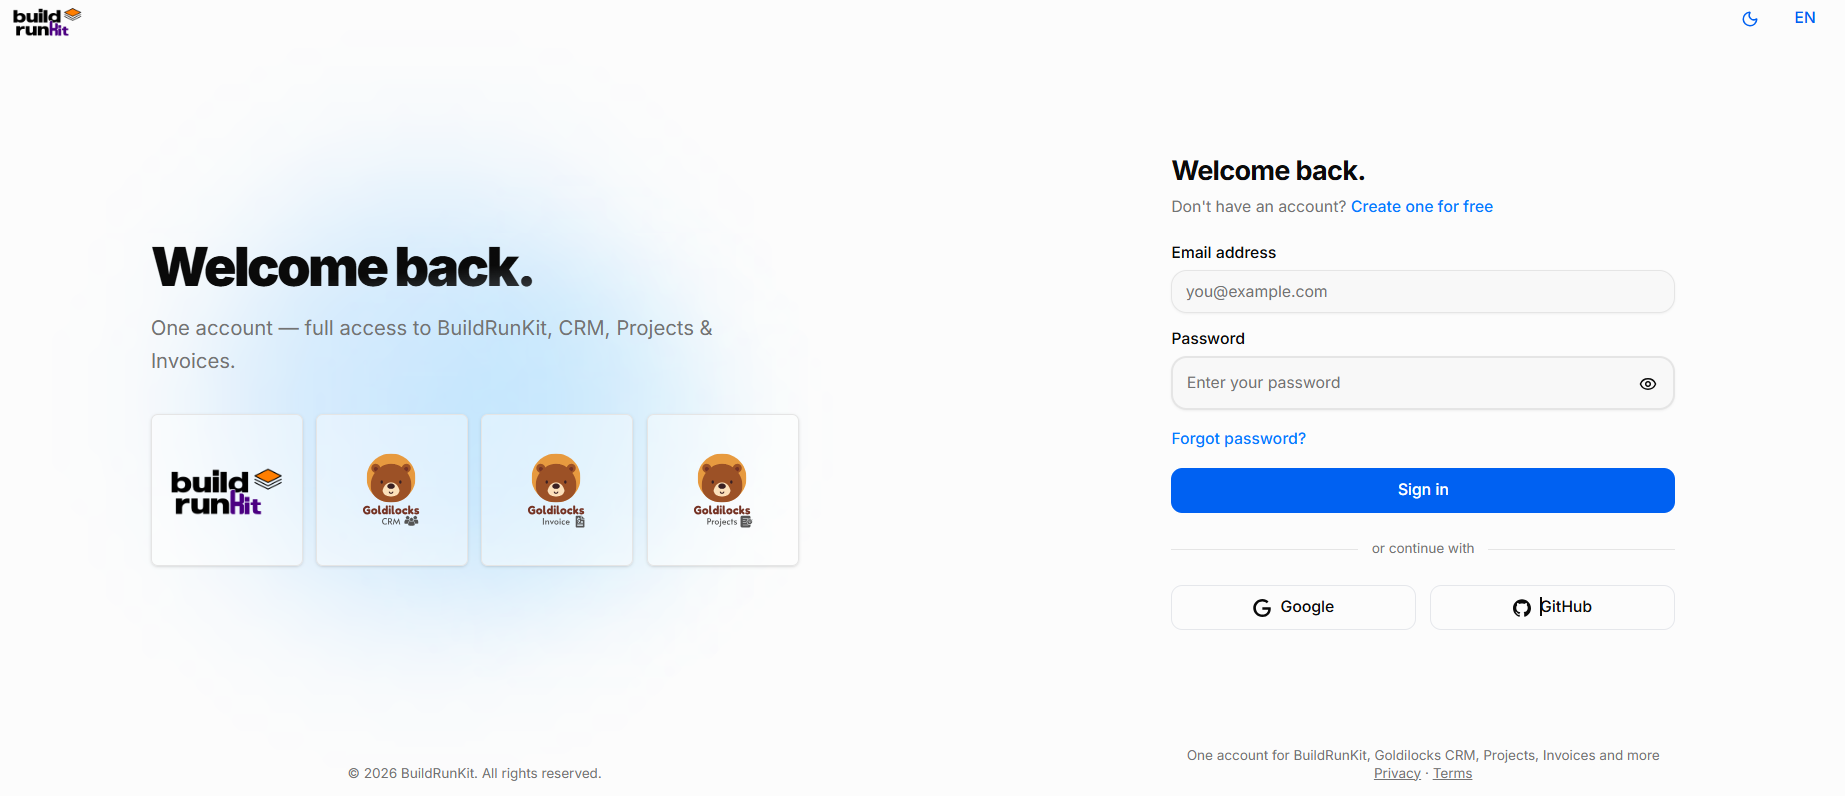
Once you have created your account, you can return to BuildRunKit at any time by using the Sign In screen. This grants you full access to the core platform, including the Goldilocks Suite (CRM, Projects, and Invoices).
How to Sign In
-
Email Address: Enter the email address associated with your account in the first field.
-
Password: Enter your secure password.
-
Tip: Click the eye icon on the right side of the password field to temporarily reveal the text and ensure it is typed correctly.
-
-
Forgot Password?: If you cannot remember your credentials, click the blue "Forgot password?" link just above the Sign In button. A reset link will be sent to your registered email address.
-
Complete Access: Click the blue Sign In button to enter your workspace.
Alternative Login Options
If you registered using a third-party account, you can log in instantly by clicking:
-
Google
-
GitHub
Note: If you are on this page by mistake and need to register, click the "Create one for free" link at the top right of the login box.
Goldilocks Invoice Dashboard
Goldilocks Invoice Dashboard

Once you have successfully signed in, you will be greeted by the Dashboard. This page is designed to give you a "at a glance" view of your latest activity and provide fast jumps into your most important billing workflows.
Managing Your Workspace
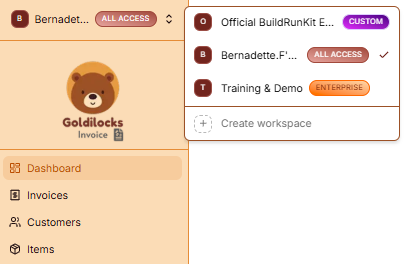
At the very top of the left sidebar, you will see your current workspace name. BuildRunKit allows you to manage multiple business environments from a single account.
How to Switch Workspaces:
-
Click the Workspace Selector: Click on the workspace name at the top of the sidebar.
-
Select from the List: A dropdown menu will appear showing all workspaces you have access to (such as "Official BuildRunKit Employee Workspace" or "Training & Demo").
-
Instant Switch: Click on the desired name to instantly switch all data (Invoices, Customers, and Items) to that workspace.
-
Create New: You can also click "+ Create workspace" at the bottom of this menu to start a brand new business environment.
Activity Overview Cards
The top cards provide a quick count of your latest synced data:
-
Invoices: Total count of recent billable documents.
-
Customers: Total number of clients in your database.
-
Items: Total number of saved services/products in your catalog.
Quick Action Sections
-
Recent Invoices: View your latest drafts or sent items. Click "Create your first invoice" to start a new bill.
-
Recent Customers: See newly added contacts. Click "Create your first customer" to add a new client.
-
Recent Items: View recently saved services. Click "Create your first item" to expand your service catalog.
Navigation Sidebar
-
Dashboard: Returns you to this overview page.
-
Invoices: View your full history of sent, paid, and overdue bills.
-
Customers: Access your full client directory.
-
Items: Manage your full library of billable products and services.
Managing Invoices
Managing Invoices

The Invoices page is where you track the lifecycle of every bill sent from your workspace. It provides a high-level summary of your revenue and a detailed list for granular management.
Invoice Overview
At the top of the page, four key metrics provide an instant status update for your current workspace:
-
Total Invoices: The total number of invoices generated.
-
Paid: The count of all completed payments.
-
Pending: Invoices that have been sent and are awaiting payment.
-
Overdue: Any invoices that have passed their assigned due date.
The Invoice List
The Invoice List table displays all records, allowing you to search and organize your data:
-
Search: Use the "Search invoices by number..." bar to find a specific document quickly.
-
Customizing Columns: Click the Columns dropdown to choose which details to display, such as Invoice Number, Customer, Date, Due Date, Amount, Balance, and Status.
-
New Invoice: Click the + New Invoice button at the top right to start a new billing entry.
Generating Reports
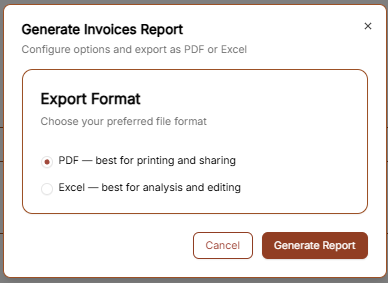
If you need to export your invoicing data for accounting or review, click the Generate Report button at the top right. This will open a configuration window with the following options:
-
PDF: This format is best for printing and direct sharing with stakeholders.
-
Excel: This format is best for detailed financial analysis and editing.
Once you have selected your preferred format, click Generate Report to download the file.
Creating Your First Invoice
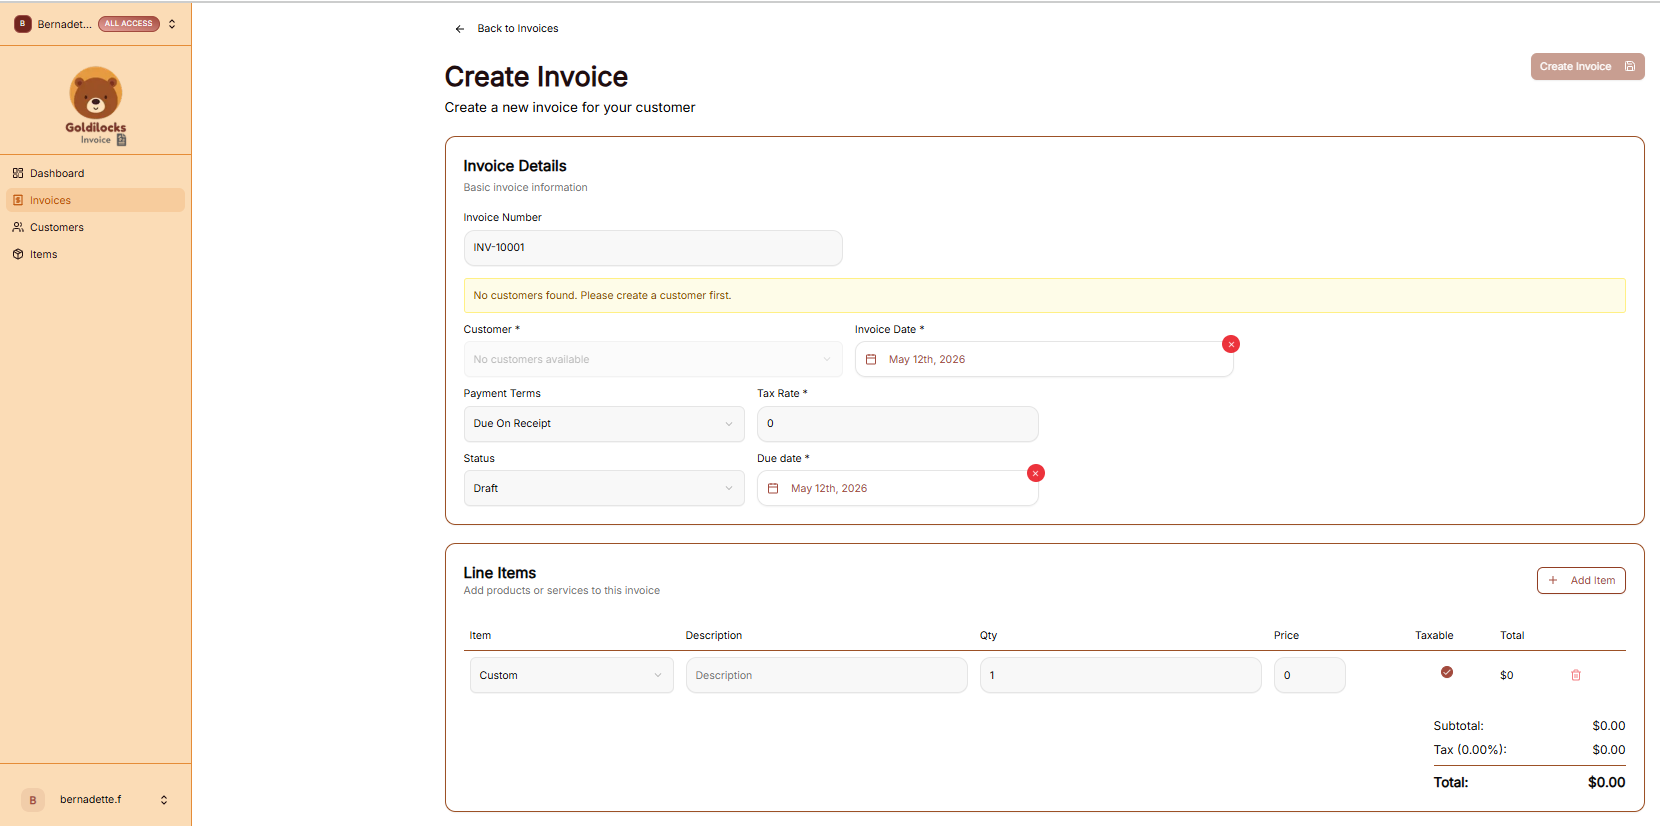
To begin a new bill, click the + New Invoice button from either the Dashboard or the Invoices page. This will open the "Create Invoice" workflow.
Invoice Details
In this section, you will configure the basic identity and timeline of the invoice:
-
Invoice Number: This is automatically generated (e.g., INV-10001) but can be modified if you have a specific internal numbering system.
-
Customer: Select a client from your saved database. If you see the message "No customers found," you must navigate to the Customers tab to add one before you can proceed.
-
Dates: Use the calendar icons to set both the Invoice Date (when it is issued) and the Due Date (when payment is expected).
-
Terms & Tax: Use the dropdowns to set Payment Terms (such as "Due On Receipt") and enter the applicable Tax Rate percentage.
Adding Line Items
Line items represent the specific work or products you are charging for.
-
Adding Items: Click the + Add Item button to add more rows to your invoice.
-
Item Details: For each row, you can choose a saved item from your catalog or enter a "Custom" one. Fill in the Description, Quantity (Qty), and Price.
-
Taxable Toggle: Check the Taxable circle for individual items if tax should be applied specifically to that row.
-
Totals: The system will automatically calculate your Subtotal, any Tax amounts, and the final Total at the bottom right.
Managing Customers
Managing Customers
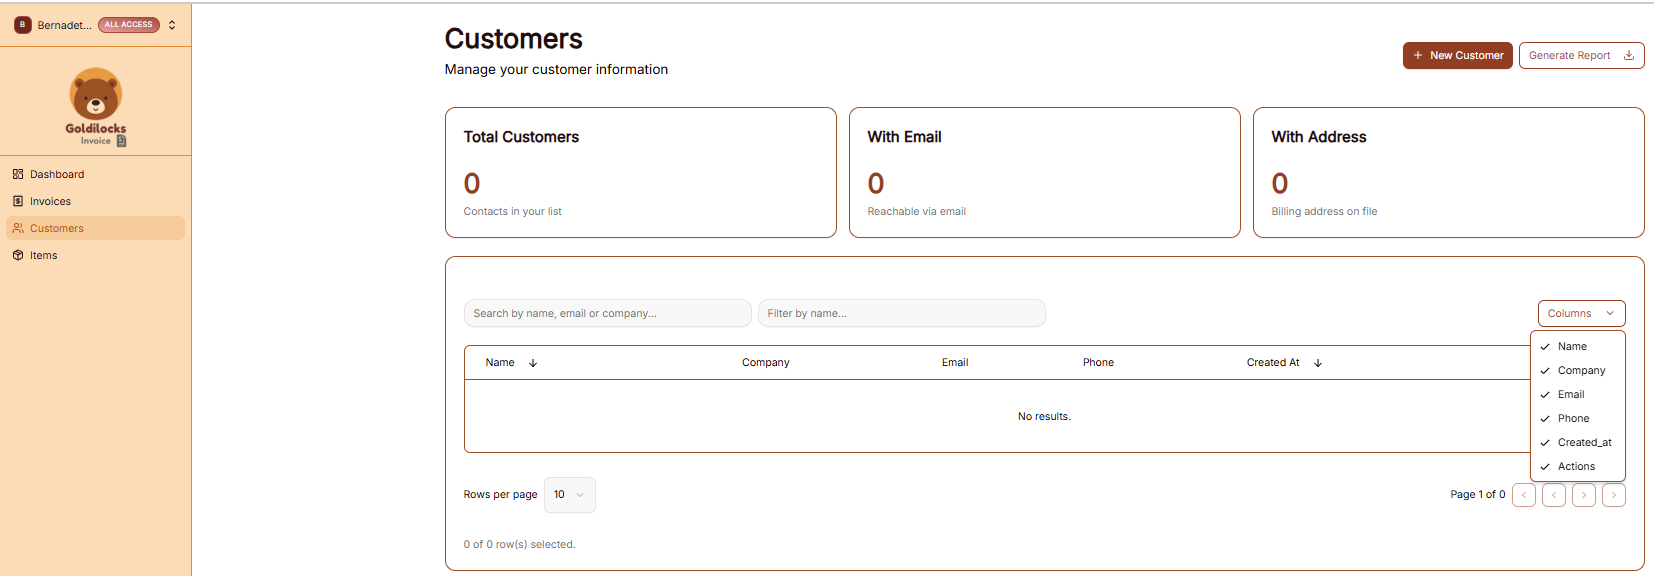
The Customers section is where you store and organize all client contact information. Having a populated customer list allows you to quickly select recipients when creating new invoices.
The Customer List View
When you click Customers in the sidebar, you’ll see a high-level summary followed by your full database:
-
Total Customers: The total number of contacts in your current workspace.
-
With Email: The number of customers that have a reachable email address on file.
-
With Address: The number of customers with a saved billing address.
-
Search & Filter: Use the search bar to find a client by Name, Email, or Company.
-
Custom Columns: Click the Columns dropdown to choose which information you want to see in the table (e.g., Phone, Company, or Created Date).
Generating Customer Reports
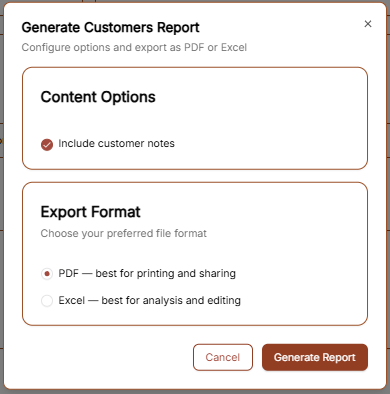
If you need a physical or digital list of your clients, click the Generate Report button at the top right. A window will appear with the following options:
-
Content Options: Check the "Include customer notes" box if you want your internal memos about the client to be included in the file.
-
Export Format:
-
PDF: Best for sharing a clean, professional-looking list.
-
Excel: Best if you need to edit the data or upload it to another system.
-
Click Generate Report to save the file to your computer.
Adding a New Customer
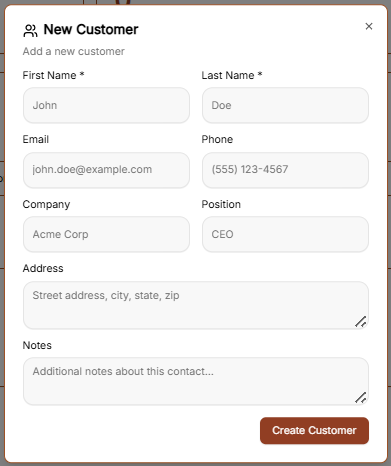
To add a new client to your workspace, click the brown + New Customer button at the top right of the Customers page. This will open the setup form where you can enter the following details:
-
Primary Identity: Enter the First Name and Last Name (required).
-
Contact Details: Add their Email address and Phone number so you can reach them regarding their invoices.
-
Professional Info: If they represent a business, enter the Company name and their Position (e.g., CEO, Manager).
-
Billing Address: Enter the full Address (Street, City, State, Zip) to ensure it appears correctly on their generated invoices.
-
Internal Notes: Use the Notes section to add any private details about this contact that you want to keep for your records. These can be included in your exported reports if you choose.
Once all the information is entered, click the brown Create Customer button to save the record to your database.
Items Catalog
Items Catalog
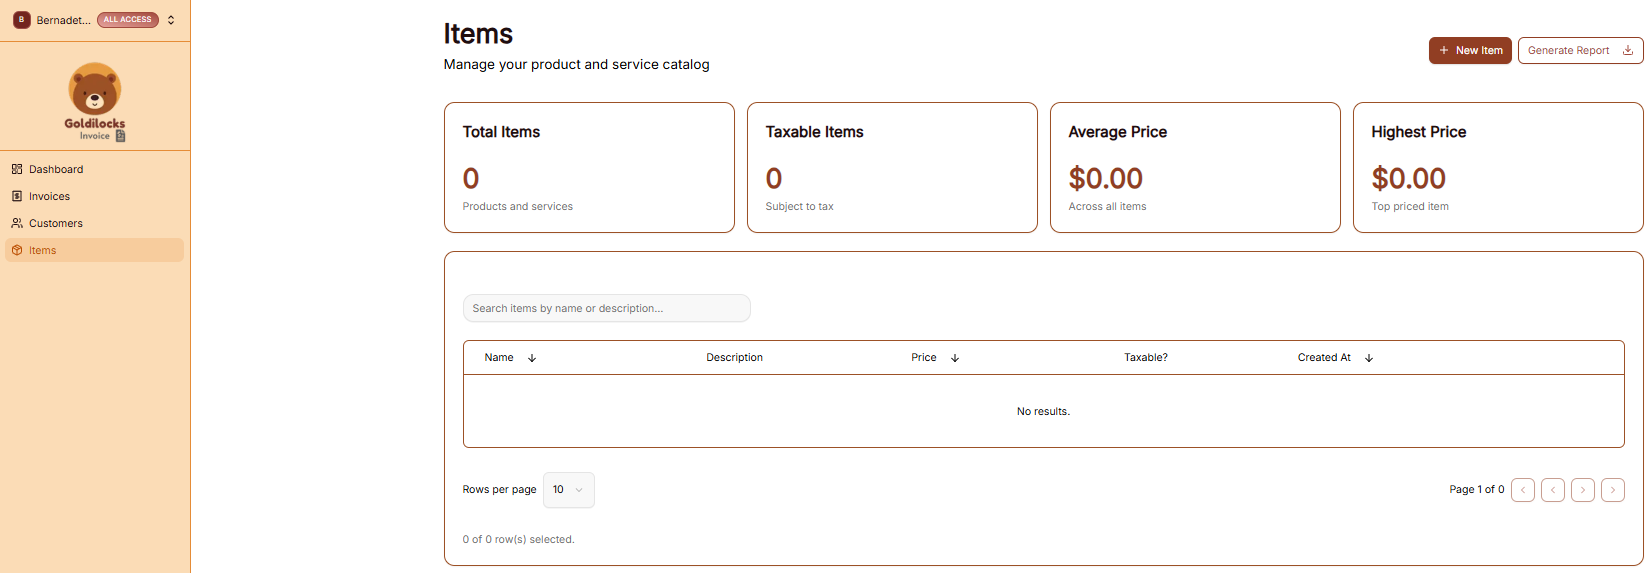
The Items page is your library of products and services. Saving your standard offerings here allows you to quickly pull them into any new invoice without re-typing details.
The Items Overview
At the top of the screen, you can see the overall status of your service catalog:
-
Total Items: The number of unique products or services you have saved.
-
Taxable Items: A count of items currently marked as subject to tax.
-
Average Price: The middle-point price across your entire list.
-
Highest Price: The price of your most expensive single offering.
Managing Your Catalog
The main table lists all your saved items and their key details:
-
Search: Use the "Search items by name or description..." bar to find a specific service.
-
Information Columns: The table displays the Name, Description, Price, and Taxable? status for each entry.
-
Organization: You can see when an item was first added under the Created At column.
-
New Item: Click the brown + New Item button at the top right to add a new service to your library.
Generating Items Reports
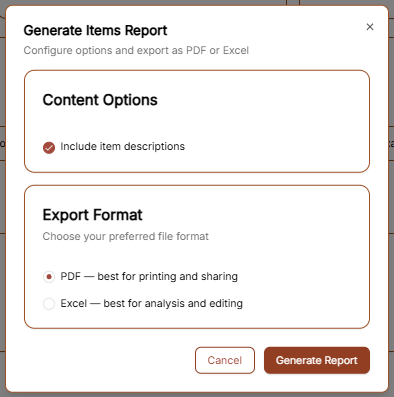
To export a list of your products and services, click the Generate Report button. The configuration window offers the following:
-
Content Options: Check "Include item descriptions" if you want the full text of your services included in the export.
-
Export Format: Choose between PDF (best for printing) or Excel (best for analysis and editing).
Click the brown Generate Report button to finalize the download.
Adding a New Item
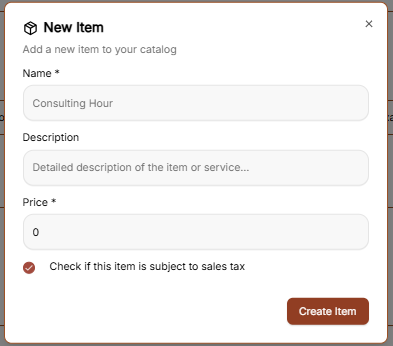
To build your catalog of standard services or products, click the brown + New Item button at the top right of the Items page. This opens a creation form with the following fields:
-
Name: Enter a clear, professional title for the service (e.g., "Consulting Hour").
-
Description: Provide a detailed explanation of what is included in this item. This text can be included in your generated reports.
-
Price: Set your standard rate for this item. This price will automatically populate whenever you add the item to a new invoice.
-
Taxable Status: If this service is subject to sales tax, ensure the "Check if this item is subject to sales tax" box is selected.
Once the details are finalized, click the brown Create Item button to add it to your permanent catalog.
User Profile & Settings
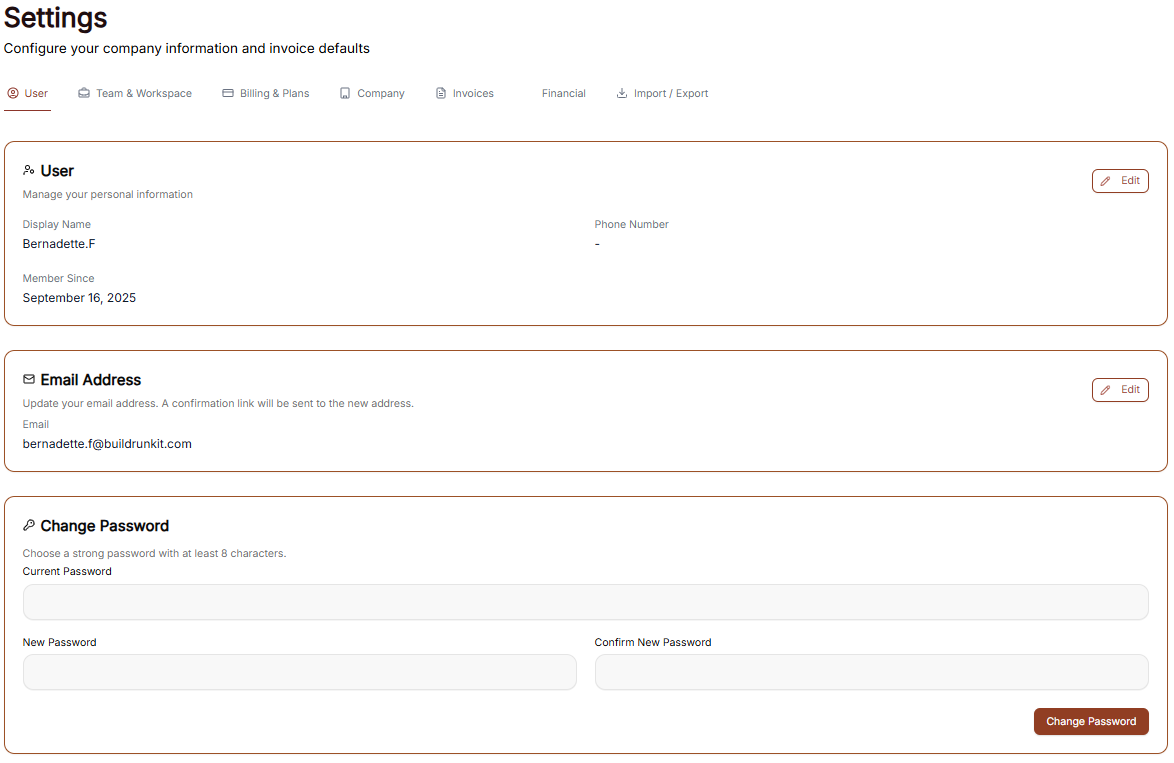
User Profile & Settings

The Settings area allows you to manage your personal information, account security, and how the interface appears to you.
Managing Personal Information
Under the User tab, you can view and update your primary account details:
-
User Profile: This section displays your Display Name, your Phone Number, and the date you became a member. Click the Edit button to make changes to your name or phone details.
-
Email Address: View the primary email associated with your account. You can update this by clicking Edit, which will trigger a confirmation link to your new address.
Account Security
You can update your login credentials at any time in the Change Password section:
-
Current Password: Enter your existing password for verification.
-
New Password: Create a new password containing at least 8 characters.
-
Confirm: Re-enter the new password to ensure it matches, then click the brown Change Password button to finalize.
Interface Preferences
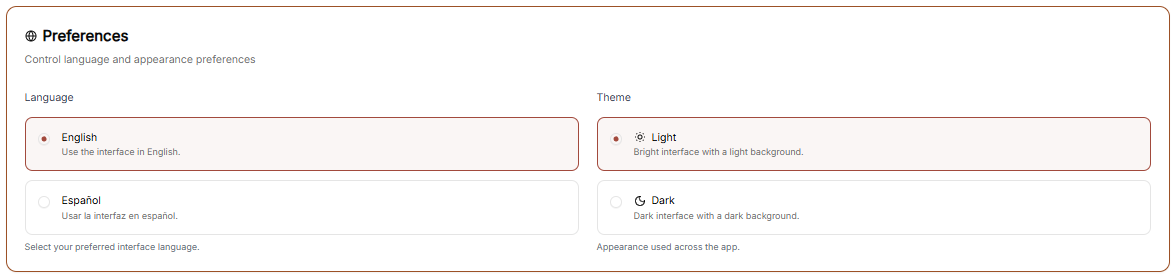
You can customize the look and language of your workspace through the Preferences menu.
Language Settings
Choose the primary language for your interface:
-
English: Use the interface in English.
-
Español: Usar la interfaz en español.
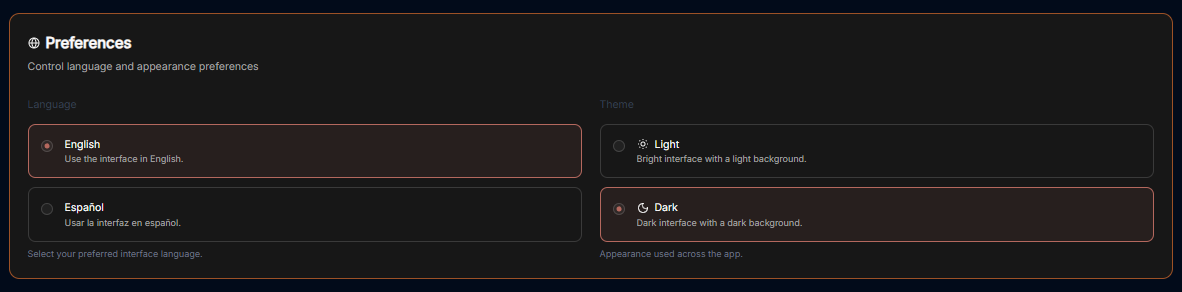
Theme Selection
Adjust the visual appearance of the application to match your working environment:
-
Light Theme: A bright interface with a light-colored background.
-
Dark Theme: A high-contrast interface with a dark background, ideal for low-light environments.
Workspace Management

The Workspace settings allow you to control the environments you belong to, manage your team, and update workspace identities.
All Workspaces
This tab provides an overview of every workspace your account is currently associated with.
-
Status & Plans: You can see the name of each workspace and its current subscription plan (e.g., "Custom" or "Enterprise").
-
Leaving a Workspace: By clicking the three dots (actions menu) next to a workspace, you can select Exit to remove yourself from that environment.
Edit Workspace
This is where you manage the primary identity of your current business environment.
-
Changing the Name: Use the Edit Workspace section to update the display name of the workspace.
-
Save Changes: Ensure you click the brown Save Changes button after renaming to apply the update across the suite.
Manage Workspace Members
Control who has access to your workspace in this section.
-
Member List: View all users, their email addresses, and their assigned roles (e.g., Owner).
-
Invite Members: Click the + Invite member button at the top right to add a new person to the team via email.
-
Removing Users: To revoke access, click the three dots (actions menu) next to a member's name and select Remove user.
Subscription & Billing
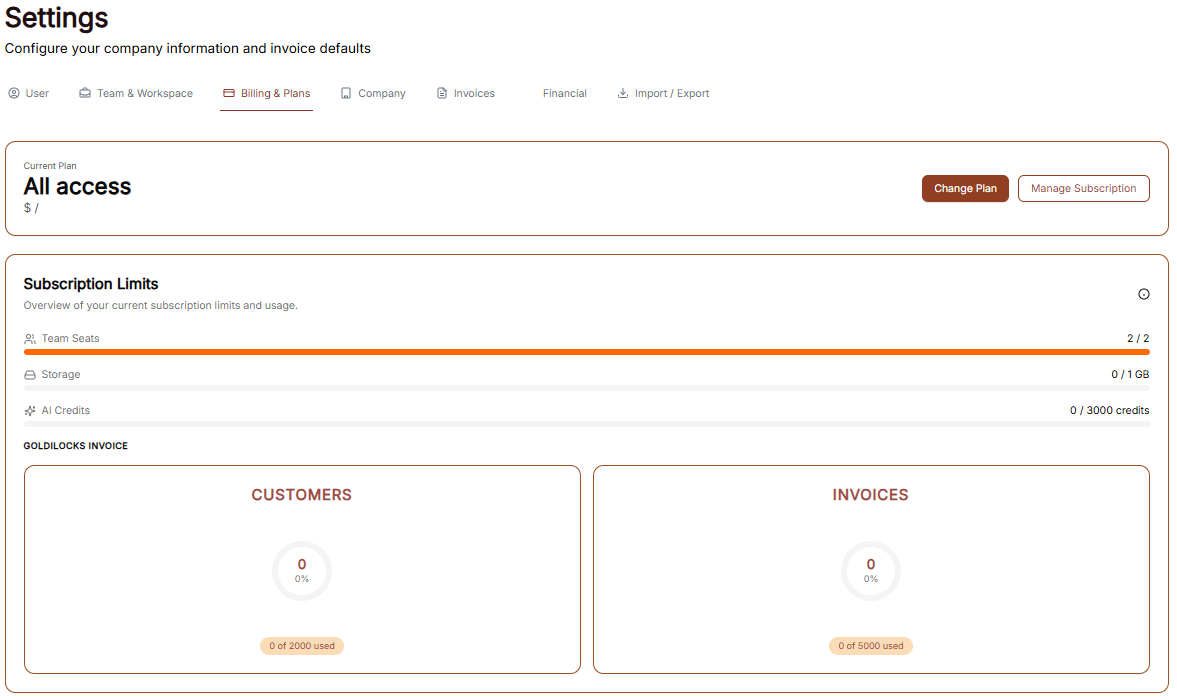
The Subscription area is where you manage your workspace plan, tracking limits, and payment details to ensure uninterrupted access to the Goldilocks Suite.
Plan Overview & Usage
In the Subscription tab, you can monitor your current plan's status and usage limits:
-
Active Plan: View your current subscription tier (e.g., "Custom").
-
Billing Cycle: Confirm the cost of your plan and the frequency of payments (e.g., "$0.00 / Monthly").
-
Usage Trackers: Monitor how much of your plan you have used, including your Invoices, Customers, and Items counts.
-
Plan Actions: You can click Change Plan to upgrade or downgrade your service level, or Cancel Subscription if you wish to stop your recurring payments.
Payment Methods
The Billing tab allows you to manage the credit cards or accounts associated with your workspace:
-
Saved Methods: View your currently active payment card, including the brand (e.g., Visa), the last four digits, and the expiration date.
-
Primary Indicator: Your default payment method will be clearly marked with a "Primary" badge.
-
Managing Cards: Click the three dots (actions menu) next to a saved card to remove it from your account.
-
Adding New Payments: Click the brown + Add payment method button to securely link a new card for future billing cycles.
Subscription & Billing

The Subscription area is your hub for managing plan access, tracking workspace limits, and handling payments.
Subscription Overview
This tab provides a high-level view of your current standing:
-
Active Plan: Displays the name of your current plan (e.g., "Custom").
-
Cost Details: Shows the recurring price and billing frequency (e.g., "$0.00 / Monthly").
-
Usage Trackers: Three progress bars track your real-time usage for Invoices, Customers, and Items against your plan’s total capacity.
-
Management Buttons: * Change Plan: Opens the tier selection menu.
-
Cancel Subscription: Initiates the process to stop recurring payments.
-
Changing Your Plan
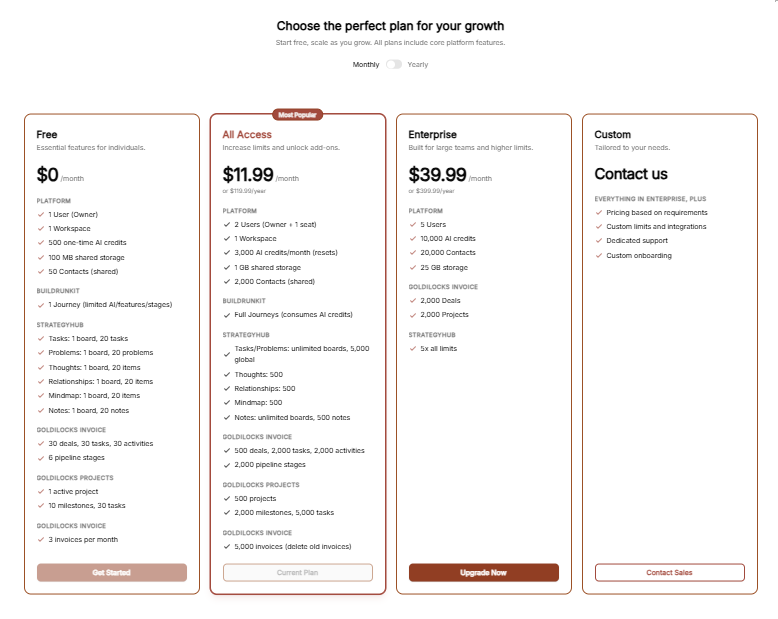
Clicking Change Plan reveals the available subscription tiers:
-
Billing Toggle: A switch at the top to toggle between Monthly and Yearly pricing.
-
Plan Tiers: Choose between Free, Plus, and Pro.
-
Tier Limits: Each column details the specific limits for Invoices, Customers, Items, and Workspace Members.
-
Action: Click the brown Choose Plan button under your desired tier to proceed.
Add-ons
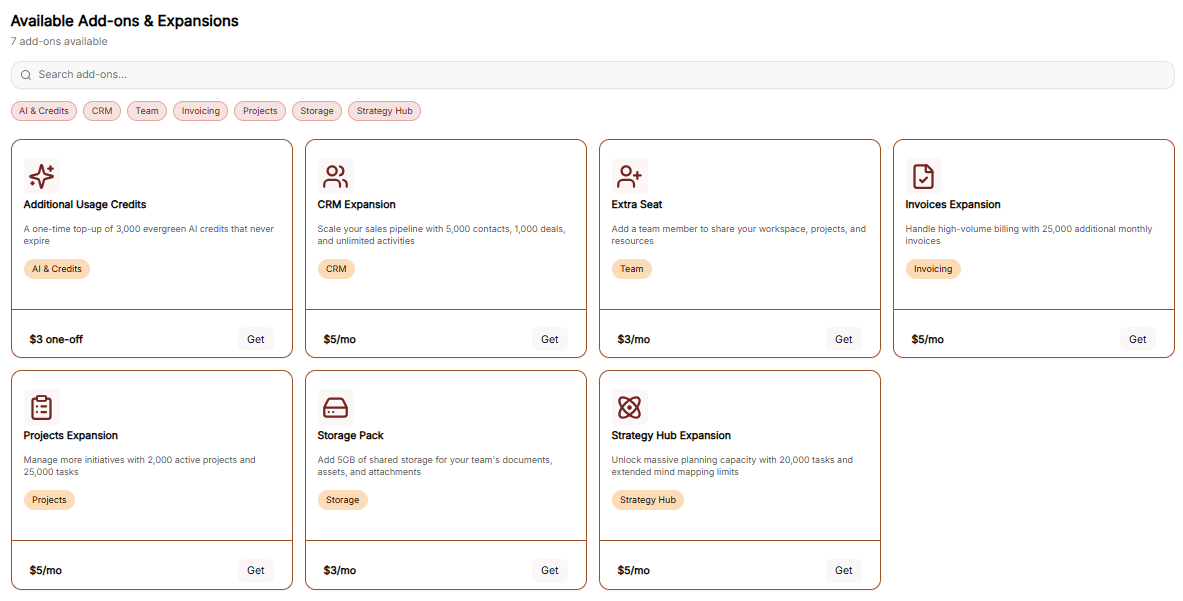
The Add-ons tab allows for modular upgrades without changing your full plan:
-
Available Features: You can purchase extra Invoices, Customers, Items, or Workspace Members.
-
Pricing: Each add-on lists its specific monthly cost.
-
Action: Click the brown Buy button next to the relevant feature to initiate the purchase.
Checkout Process
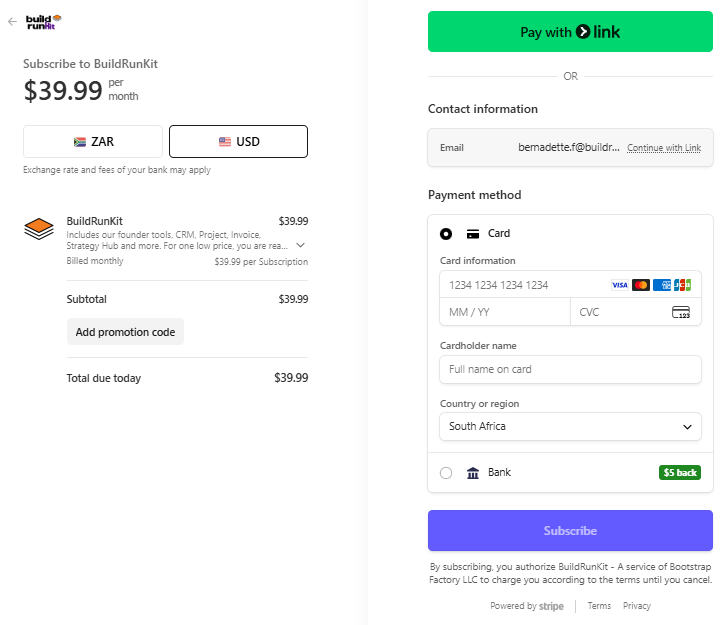
The Checkout page is the final step for any plan change or add-on purchase:
-
Back to subscription: A link at the top left to return without purchasing.
-
Payment Method: Confirms the card on file that will be charged for the transaction.
-
Order Summary: Displays the Subtotal, Tax, and the final Total Amount Due.
-
Action: Click the brown Pay & Subscribe button to finalize the order and update your workspace limits.
Company Information
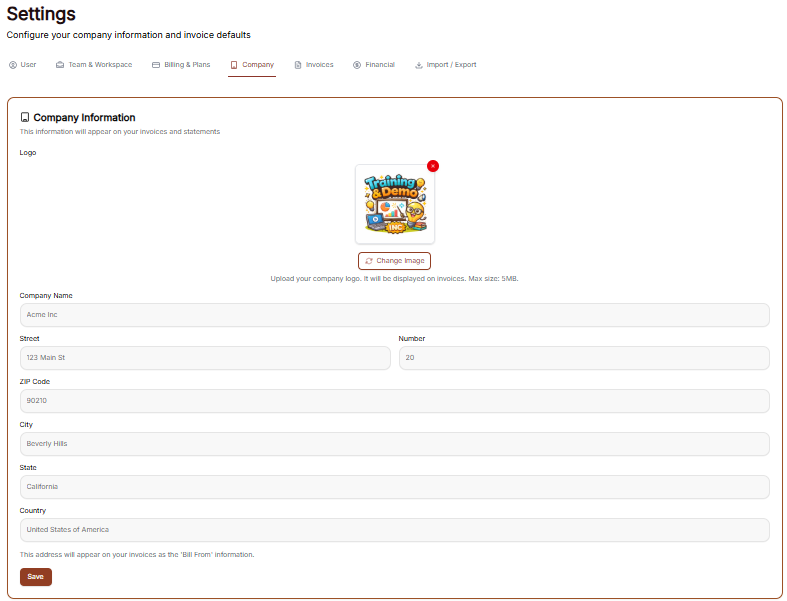
This information will appear on your invoices and statements.
-
Logo: Displays your current business logo image.
-
Click the Change Image button to upload a new logo (Max size: 5MB).
-
Click the red X icon to remove the current logo.
-
-
Company Name: A text field to enter your business name.
-
Street: A text field to enter your street address.
-
Number: A text field to enter your building or unit number.
-
ZIP Code: A text field to enter your postal code.
-
City: A text field to enter your city.
-
State: A text field to enter your state.
-
Country: A text field to enter your country.
This address will appear on your invoices as the 'Bill From' information.
-
Save: Click the brown button at the bottom left to save your updates.
Invoices Settings
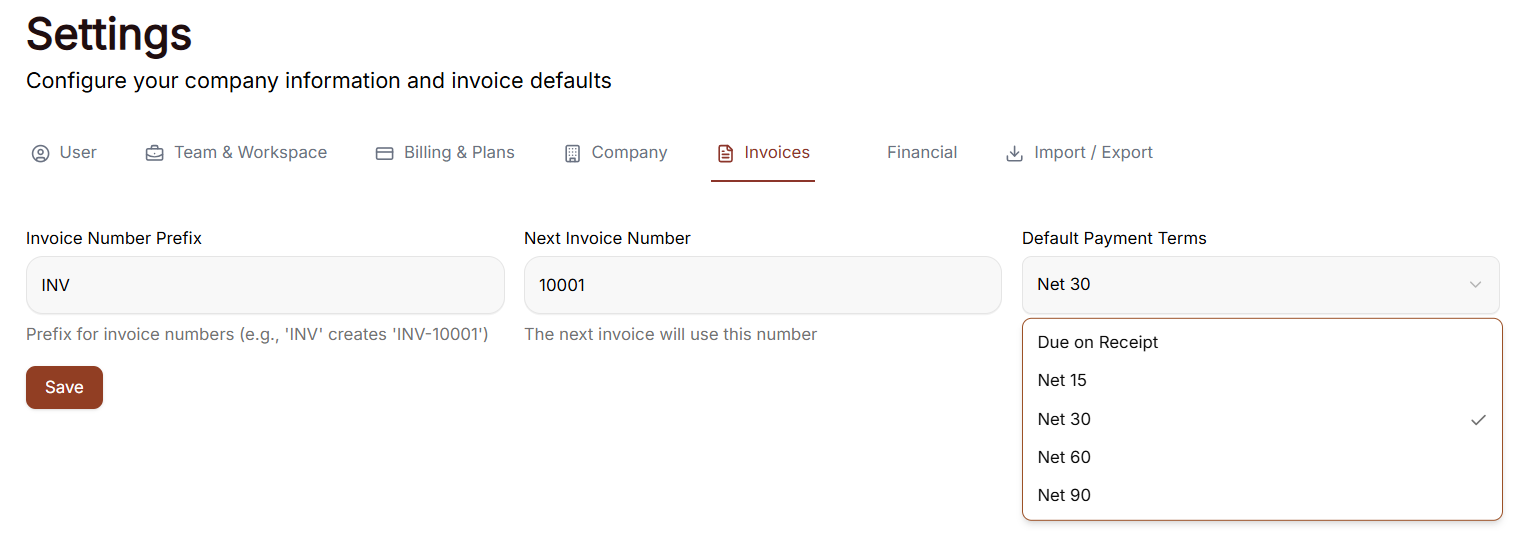
The Invoices tab in your settings allows you to configure the numbering and default terms for your billing documents.
Invoicing Preferences
-
Invoice Number Prefix: Enter the text that will appear before every invoice number (e.g., "INV"). The system notes that a prefix like 'INV' will create a number like 'INV-10001'.
-
Next Invoice Number: Displays the numerical value that will be assigned to your very next invoice.
-
Default Payment Terms: Select the standard deadline for payments from the dropdown menu. Options include:
-
Due on Receipt
-
Net 15
-
Net 30 (currently selected)
-
Net 60
-
Net 90
-
-
Save: Click the brown Save button to apply any changes made to these fields.
Financial
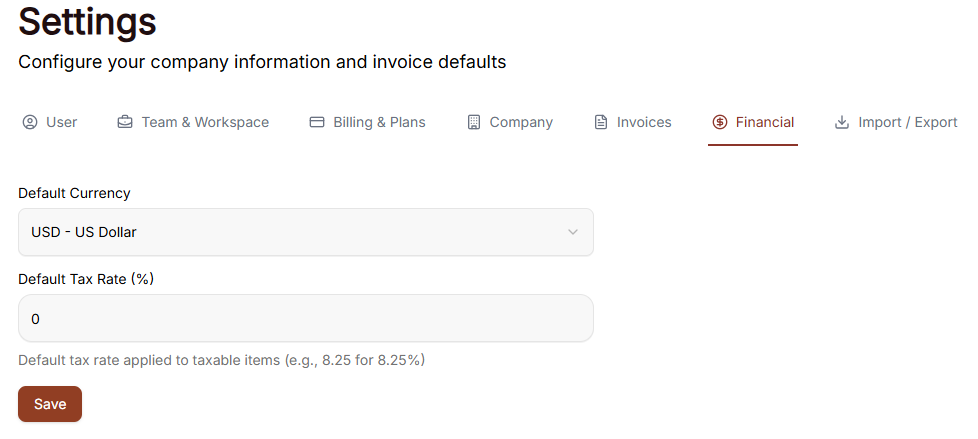
The Financial settings tab allows you to configure your baseline currency and tax rules for all billing operations.
-
Default Currency: A dropdown menu to select the primary currency used for generating invoices (e.g., USD - US Dollar).
-
Default Tax Rate (%): A text field to enter the standard tax percentage applied automatically to taxable line items.
-
Note: Enter the numeric value directly without the percentage sign (e.g., 8.25 for 8.25%).
-
-
Save: Click the brown button at the bottom left to finalize and apply your default financial configurations.
Feedback and help
Feedback and help

This section allows you to communicate with the team and access support resources directly within the platform.
Sidebar Menu
-
Feedback: The primary link to open the feedback submission window.
-
Help: The link located directly underneath "Feedback" for support resources.
Feedback
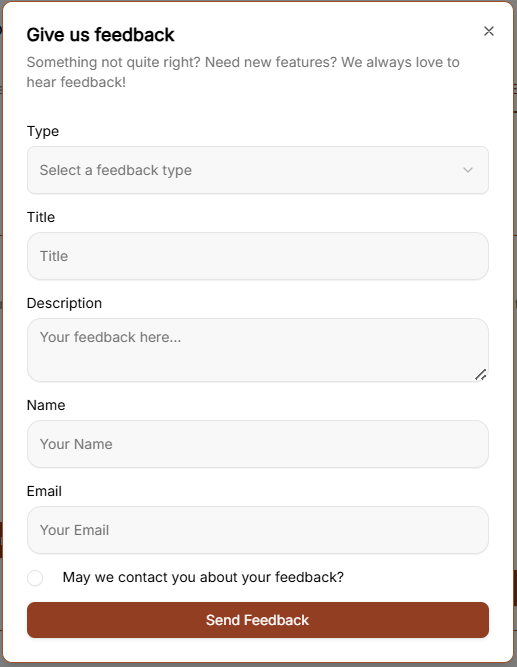
Clicking Feedback opens a window with the following fields:
-
Category: A dropdown menu to select the nature of your message. The options include:
-
Bug Report
-
Feature Request
-
General Feedback
-
Question
-
-
Subject: A text input field to summarize your feedback.
-
Message: A large text area for providing the full details of your report or suggestion.
-
Send Feedback: The brown button at the bottom of the form used to submit your information.
Help
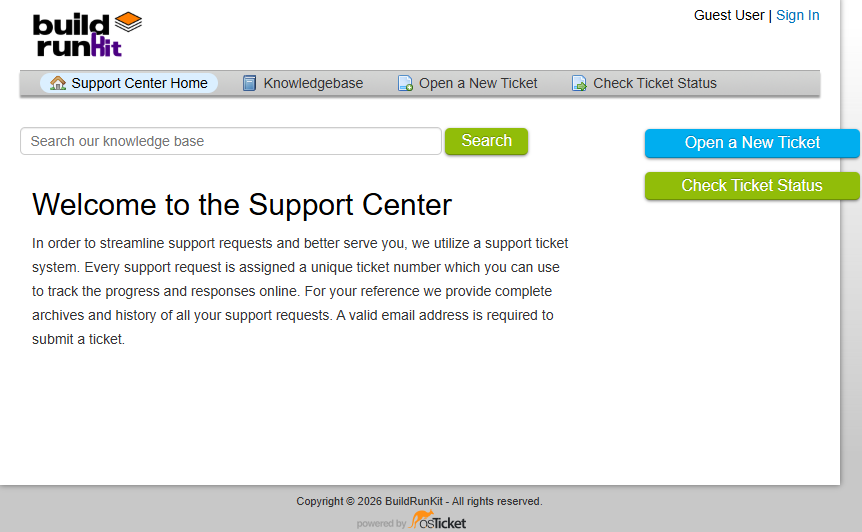
To access the support portal, click the Help option located at the bottom of the navigation sidebar. This opens the Support Center in a new window.
Support Center Home
The main landing page of the Support Center provides a centralized location for managing support requests:
-
Search: A search bar is located at the top to search the knowledge base for specific information.
-
Support Ticket System: The platform uses a ticket system where every request is assigned a unique number to track progress online.
-
Email Requirement: A valid email address is required to submit a new ticket.
Navigation Menu
-
Support Center Home: Returns you to the main welcome page.
-
Knowledgebase: Provides access to categorized FAQs and documentation.
-
Open a New Ticket: Opens a form to submit a direct support request.
-
Check Ticket Status: Allows you to view the progress of existing tickets using your email and ticket number.
Knowledgebase
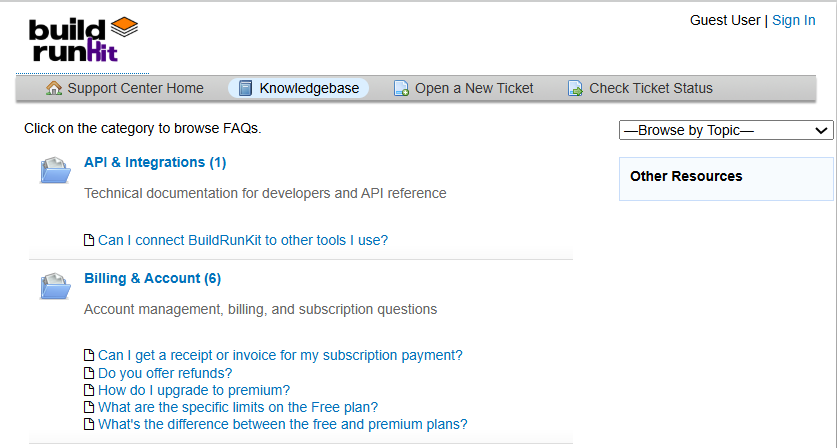
The Knowledgebase tab allows you to browse support articles by category to find answers to common questions.
-
Browse by Topic: Use the dropdown menu on the right to jump directly to a specific help topic.
Open a New Ticket
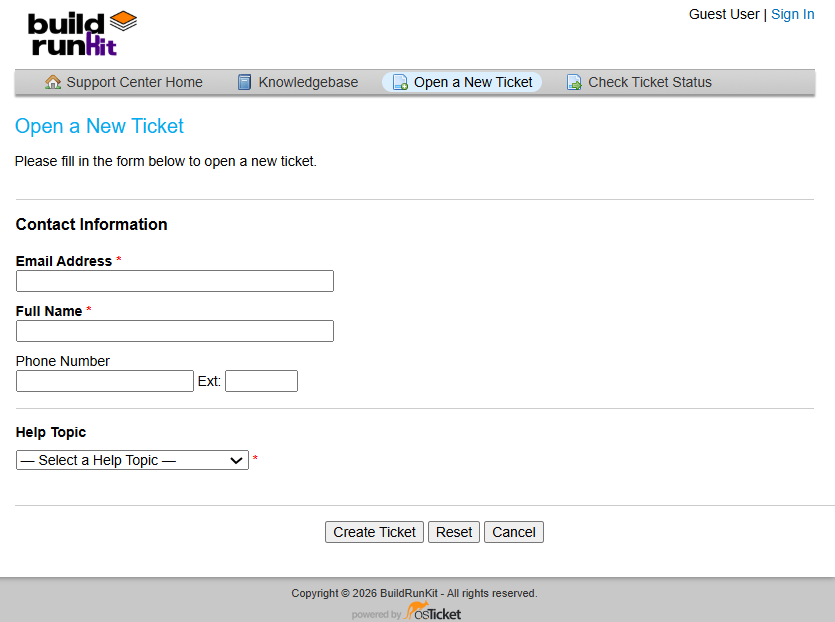
This section allows you to submit a formal support request to the team.
Contact Information
-
Email Address *: A required field to enter your contact email.
-
Full Name *: A required field to provide your name.
-
Phone Number: An optional field with a separate box for an Ext: (extension).
Ticket Details
-
Help Topic *: A required dropdown menu where you must "-Select a Help Topic -" to categorize your request.
Form Actions
-
Create Ticket: Click this button to submit your request.
-
Reset: Click this button to clear all information currently entered in the form.
-
Cancel: Click this button to exit the ticket creation process.
Check Ticket Status
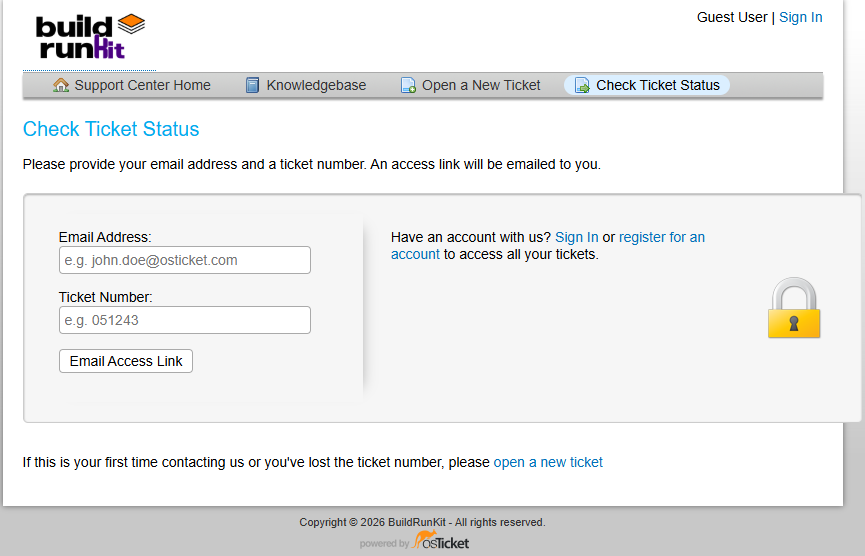
This section allows you to track the progress of your existing support requests.
Check Status via Email To access a specific ticket, provide the following details to receive an access link via email:
-
Email Address: Enter the email address associated with your ticket (e.g., john.doe@osticket.com).
-
Ticket Number: Enter the unique ID assigned to your request (e.g., 051243).
-
Email Access Link Button: Click this to have the login link sent to your inbox.
Account Access
-
Sign In / Register: If you have an account, you can Sign In or register for an account to view a complete history of all your tickets in one place.
-
Security: This form is protected, indicated by the padlock icon on the right.
Troubleshooting
-
First-time contact: If you have never contacted support before or have lost your ticket number, click the open a new ticket link at the bottom of the page.